Aller au contenu principal

Samsung Galaxy Core Prime Volume Buttons Replacement

Ce dont vous avez besoin

  1. Samsung Galaxy Core Prime Volume Buttons Replacement, Battery: étape 1, image 1 de 1
    • Turn the smartphone off by using the power button on the right-hand side.

  2. Samsung Galaxy Core Prime Volume Buttons Replacement: étape 2, image 1 de 1
    • Turn the smartphone over so that the rear camera is face up.

  3. Samsung Galaxy Core Prime Volume Buttons Replacement: étape 3, image 1 de 1
    • Use your fingernail or a flat tool to lift the back cover.

  4. Samsung Galaxy Core Prime Volume Buttons Replacement: étape 4, image 1 de 2 Samsung Galaxy Core Prime Volume Buttons Replacement: étape 4, image 2 de 2
    • Locate the battery near the bottom of the phone. The battery is square, flat, and is labeled 'SAMSUNG'.

  5. Samsung Galaxy Core Prime Volume Buttons Replacement: étape 5, image 1 de 1
    • Use your fingernail or a flat tool to lift the battery out.

  6. Samsung Galaxy Core Prime Volume Buttons Replacement, Volume Button: étape 6, image 1 de 2 Samsung Galaxy Core Prime Volume Buttons Replacement, Volume Button: étape 6, image 2 de 2
    • Use a Phillips #00 screwdriver to remove the eight 4mm screws from the midframe.

  7. Samsung Galaxy Core Prime Volume Buttons Replacement: étape 7, image 1 de 1
    Outil utilisé dans cette étape :
    iOpener
    $19.99
    J'achète
    • Flip the phone over (screen up). Use an iOpener to heat the frame. Do this until the adhesive is loose.

    • Use care when handling these heating tools!

  8. Samsung Galaxy Core Prime Volume Buttons Replacement: étape 8, image 1 de 2 Samsung Galaxy Core Prime Volume Buttons Replacement: étape 8, image 2 de 2
    Outil utilisé dans cette étape :
    iFixit Opening Tool
    $1.99
    J'achète
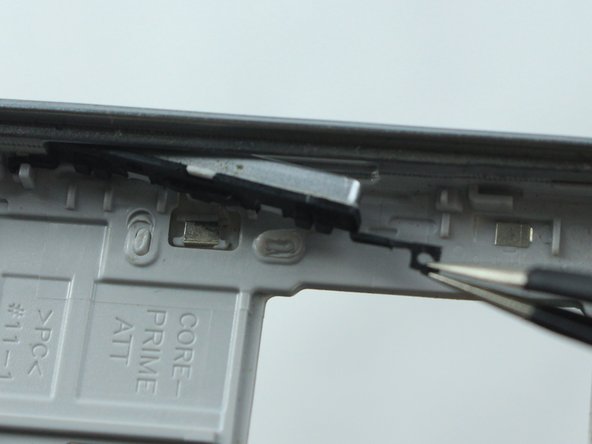
    • Use an iFixit Opening Tool or a similarly shaped tool like a guitar pick to lift the mid-frame.

  9. Samsung Galaxy Core Prime Volume Buttons Replacement: étape 9, image 1 de 2 Samsung Galaxy Core Prime Volume Buttons Replacement: étape 9, image 2 de 2
    • Use tweezers to unhook both of the rubber fixtures holding the volume button to the frame.

Conclusion

To reassemble your device, follow these instructions in reverse order.

2 autres ont terminé cette réparation.

Olivia Jensen

Membre depuis le 10/02/18

634 Réputation

2 tutoriels rédigés

Équipe

Sam Houston State, Team S11-G2, Blackburne Fall 2018 Membre de l'équipe Sam Houston State, Team S11-G2, Blackburne Fall 2018

SHSU-BLACKBURNE-F18S11G2

4 membres

5 tutoriels rédigés

0 commentaires

Ajouter un commentaire

Nombre de vues :

Dernières 24 heures : 2

7 derniers jours : 4

30 derniers jours : 10

Total : 804