Aller au contenu principal
Pour réparer ensemble - Je crée un compte

Samsung Galaxy J1 Glass Screen Replacement

Ce dont vous avez besoin

  1. Samsung Galaxy J1 Glass Screen Replacement, Midframe: étape 1, image 1 de 1
    • Insert a finger nail or plastic opening tool between the back cover and the device.

    • Gently pry the rear cover off of the back of the phone.

    Demander à FixBot

    Ajouter un commentaire

  2. Samsung Galaxy J1 Glass Screen Replacement: étape 2, image 1 de 2 Samsung Galaxy J1 Glass Screen Replacement: étape 2, image 2 de 2
    • Using a finger, pull the SIM card down out of its slot.

    • Remove the SIM card.

    • The pictured device is missing the SIM card and battery.

    Demander à FixBot

    Ajouter un commentaire

  3. Samsung Galaxy J1 Glass Screen Replacement: étape 3, image 1 de 1
    • Using a Phillips #00 screwdriver remove the eleven 3 mm screws.

    Demander à FixBot

    Ajouter un commentaire

  4. Samsung Galaxy J1 Glass Screen Replacement: étape 4, image 1 de 3 Samsung Galaxy J1 Glass Screen Replacement: étape 4, image 2 de 3 Samsung Galaxy J1 Glass Screen Replacement: étape 4, image 3 de 3
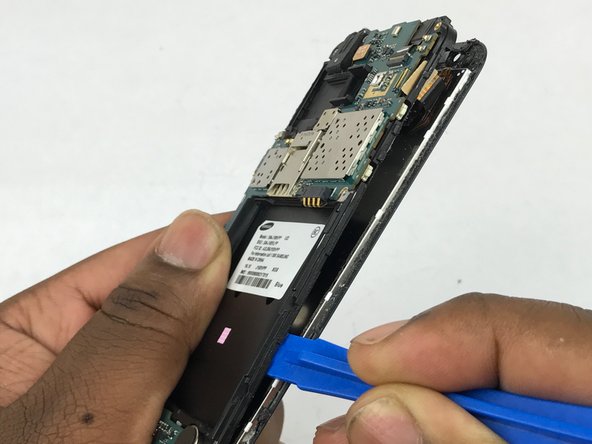
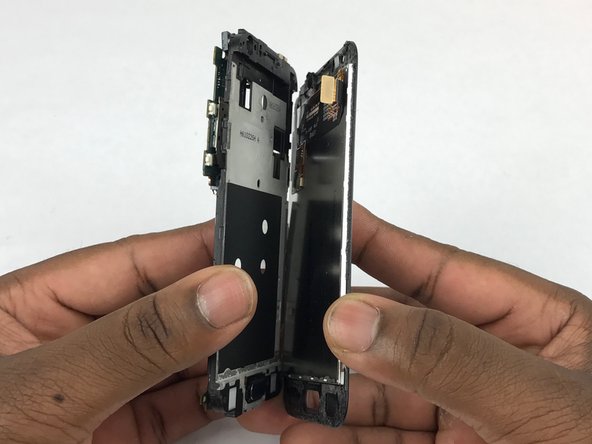
    • Insert a plastic opening tool between the screen and the back of the device.

    • Starting at the bottom of the device, gently slide the tool along the edges of the screen.

    • Gently pry the main assembly from the midframe of the device.

    • When removing the main assembly, pry gently so as to not crack the glass screen or break any clips within the device.

    Demander à FixBot

    Ajouter un commentaire

  5. Samsung Galaxy J1 Glass Screen Replacement, Glass Screen: étape 5, image 1 de 2 Samsung Galaxy J1 Glass Screen Replacement, Glass Screen: étape 5, image 2 de 2
    • Using the flat end of a spudger, disconnect the digitizer cable connector.

    Demander à FixBot

    Ajouter un commentaire

  6. Samsung Galaxy J1 Glass Screen Replacement: étape 6, image 1 de 2 Samsung Galaxy J1 Glass Screen Replacement: étape 6, image 2 de 2
    • Using a plastic opening tool pry between silver digitizer and black back piece.

    • Slowly slide plastic opening tool around the screen to loosen the adhesive.

    • Be careful not to tear the digitizer cable when threading it through the plastic housing.

    Demander à FixBot

    Ajouter un commentaire

  7. Samsung Galaxy J1 Glass Screen Replacement: étape 7, image 1 de 1
    • Carefully separate display assembly from the plastic housing.

    Demander à FixBot

    Ajouter un commentaire

Conclusion

To reassemble your device, follow these instructions in reverse order.

Annulation : je n'ai pas terminé ce tutoriel.

25 autres ont terminé cette réparation.

Sean Kramer

Membre depuis le 02/14/18

1 632 Réputation

6 tutoriels rédigés

Équipe

USF Tampa, Team S5-G4, Eyestone Spring 2018 Membre de l'équipe USF Tampa, Team S5-G4, Eyestone Spring 2018

USFT-EYESTONE-S18S5G4

3 membres

12 tutoriels rédigés

2 commentaires de tutoriel

In my Samsung J110h, Some of the right side keys in keyboard not working. They are P, Zero, In message screen, the sending button etc..

I am in desperate need for advice to rectify.

Will somebody help me.

My mail Id”: karupusolai@gmail.com

Solaimalai - Réponse Partager

I was having the display issue. So I bought Samsung Galaxy J1 Screen replacement. And, I replaced it by myself using the information in this.

harshithaemazel - Réponse Partager

Ajouter un commentaire

Nombre de vues :

Dernières 24 heures : 2

7 derniers jours : 13

30 derniers jours : 53

Total : 6,048