Aller au contenu principal
Pour réparer ensemble - Je crée un compte

Samsung Galaxy J7 Screen Assembly Replacement

Ce dont vous avez besoin

  1. Samsung Galaxy J7 Screen Assembly Replacement, Back Cover: étape 1, image 1 de 2 Samsung Galaxy J7 Screen Assembly Replacement, Back Cover: étape 1, image 2 de 2
    • Locate the Tab: Find the tab at the top left corner of the back cover. (highlighted by red square)

    • Insert the tool: Use a fingernail or a plastic opening tool to lift the tab gently

    • Pry open the cover: Carefully work around the edges to remove the back cover completely

    • If the cover is stuck do not force it open use a plastic opening tool to avoid scratching the case.

    Demander à FixBot

    Ajouter un commentaire

  2. Samsung Galaxy J7 Screen Assembly Replacement, Battery: étape 2, image 1 de 2 Samsung Galaxy J7 Screen Assembly Replacement, Battery: étape 2, image 2 de 2
    • Locate the Battery slot: Find the small slit at the bottom right corner of the battery (highlighted by red square)

    • Remove Battery: Gently pop out the edge and carefully pull out the battery.

    • Tip: Ensure the battery is disconnected from the motherboard before removing it.

    Demander à FixBot

    Ajouter un commentaire

  3. Samsung Galaxy J7 Screen Assembly Replacement, Midframe: étape 3, image 1 de 1
    • Using the Phillips #000 screwdriver, remove the ten 4.2 mm screws around the edge of the midframe.

    Demander à FixBot

    Ajouter un commentaire

  4. Samsung Galaxy J7 Screen Assembly Replacement: étape 4, image 1 de 3 Samsung Galaxy J7 Screen Assembly Replacement: étape 4, image 2 de 3 Samsung Galaxy J7 Screen Assembly Replacement: étape 4, image 3 de 3
    • Lift up the back of the device with the iFixit opening tool and disconnect it from the front.

    • If the back panel is difficult to remove, gently heat the edges using a hair dryer or heat gun to soften the adhesive.

    Demander à FixBot

    Ajouter un commentaire

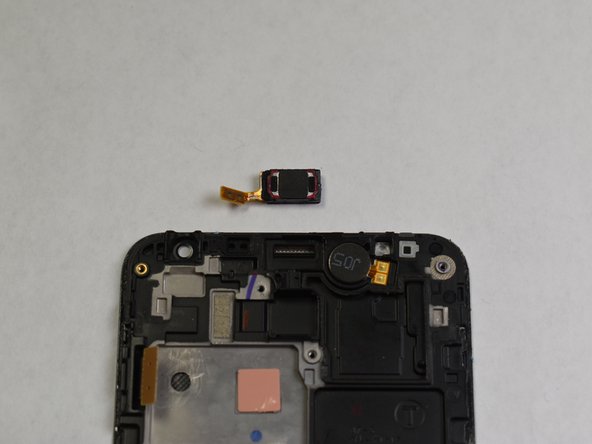
  5. Samsung Galaxy J7 Screen Assembly Replacement, Screen Assembly: étape 5, image 1 de 2 Samsung Galaxy J7 Screen Assembly Replacement, Screen Assembly: étape 5, image 2 de 2
    • The speaker piece is lightly adhered. Use a plastic pry tool to gently lift it up and disconnect the cable.

    Demander à FixBot

    Ajouter un commentaire

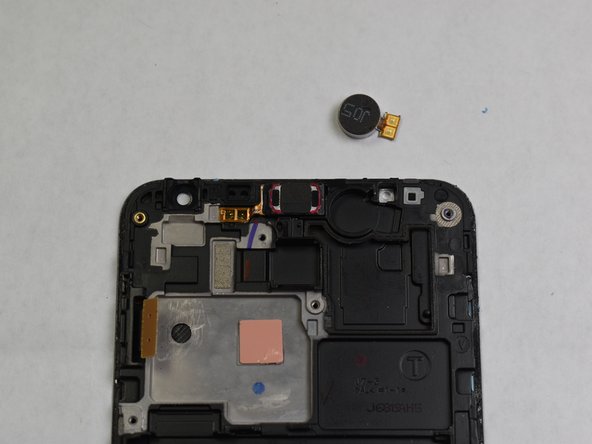
  6. Samsung Galaxy J7 Screen Assembly Replacement: étape 6, image 1 de 2 Samsung Galaxy J7 Screen Assembly Replacement: étape 6, image 2 de 2
    • Gently lift up the tab of the motor.

    • Remove the motor from the panel completely to disconnect it.

    • Removing the motor allows easier access to the screen assembly for replacement. Handle the motor and its connectors with care.

    Demander à FixBot

    Ajouter un commentaire

  7. Samsung Galaxy J7 Screen Assembly Replacement: étape 7, image 1 de 1
    • Reverse these steps with your new phone screen to replace it.

    • After reassembly, test the new screen for touch responsiveness and display quality before fully securing the device

    Demander à FixBot

    Ajouter un commentaire

Conclusion

To reassemble your device, follow these instructions in reverse order.

Annulation : je n'ai pas terminé ce tutoriel.

16 autres ont terminé cette réparation.

1 commentaire de tutoriel

I replaced the broken screen....before I saw this. Now my phone will not turn on. what should I do? ruth.fnp@gmail.com

Ruth Thomas - Réponse Partager

Ajouter un commentaire

Nombre de vues :

Dernières 24 heures : 4

7 derniers jours : 20

30 derniers jours : 89

Total : 12,913