Aller au contenu principal
Pour réparer ensemble - Je crée un compte

Samsung Galaxy Mega Display Assembly Replacement

Ce dont vous avez besoin

  1. Samsung Galaxy Mega Display Assembly Replacement, Remove Rear Cover: étape 1, image 1 de 2 Samsung Galaxy Mega Display Assembly Replacement, Remove Rear Cover: étape 1, image 2 de 2
    • Use the opening tool or a fingernail to pry open the rear cover at the top left corner.

    • Once the rear cover is removed, you'll have access to the SIM card, the SD card, and screws.

    Demander à FixBot

    Ajouter un commentaire

  2. Samsung Galaxy Mega Display Assembly Replacement, SIM, SD, Screw and Battery Removal: étape 2, image 1 de 3 Samsung Galaxy Mega Display Assembly Replacement, SIM, SD, Screw and Battery Removal: étape 2, image 2 de 3 Samsung Galaxy Mega Display Assembly Replacement, SIM, SD, Screw and Battery Removal: étape 2, image 3 de 3
    • After removing the back cover, remove the battery, the SIM card, and SD card (if present).

    • Remove the highlighted PH000 screws from the rear of the phone.

    • Ensure the phone has been powered down via the OS (if possible) before removing the battery.

    Demander à FixBot

    Ajouter un commentaire

  3. Samsung Galaxy Mega Display Assembly Replacement, Speaker Removal: étape 3, image 1 de 1
    • Using the opening tool, gently pry the speaker upwards and remove it.

    • The speaker is fragile; take caution when removing it to prevent damage.

    Demander à FixBot

    Ajouter un commentaire

  4. Samsung Galaxy Mega Display Assembly Replacement, Removal of Back Frame: étape 4, image 1 de 3 Samsung Galaxy Mega Display Assembly Replacement, Removal of Back Frame: étape 4, image 2 de 3 Samsung Galaxy Mega Display Assembly Replacement, Removal of Back Frame: étape 4, image 3 de 3
    • Insert the pry tool along the side of the device. Pry gently until you hear clicks.

    • Repeat along all sides of the phone. You will continue hearing a clicking sound as the frame begins to release.

    • Gently pull the battery clip up (shown in photo 2). Then, twist the frame slightly clockwise, as there is a little clip around the camera that needs to be released.

    Demander à FixBot

    Ajouter un commentaire

  5. Samsung Galaxy Mega Display Assembly Replacement, Removing Ribbons: étape 5, image 1 de 2 Samsung Galaxy Mega Display Assembly Replacement, Removing Ribbons: étape 5, image 2 de 2
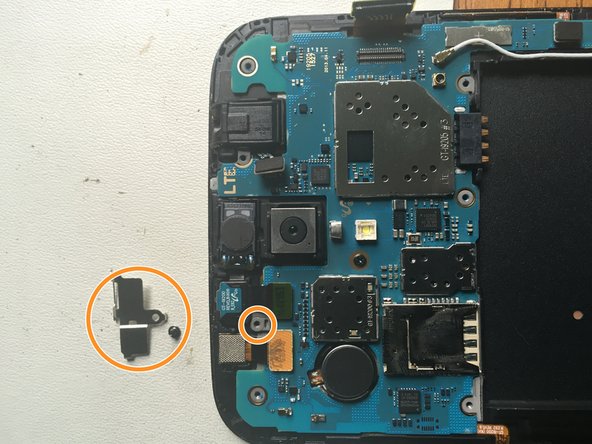
    • Use the opening tool to remove the LCD cable.

    • Once the back frame has been removed, the motherboard and connectors will be exposed.

    • Remove the front camera by unscrewing the panel.

    • Disconnect the front camera cable.

    Demander à FixBot

    Ajouter un commentaire

  6. Samsung Galaxy Mega Display Assembly Replacement, Adding some heat: étape 6, image 1 de 3 Samsung Galaxy Mega Display Assembly Replacement, Adding some heat: étape 6, image 2 de 3 Samsung Galaxy Mega Display Assembly Replacement, Adding some heat: étape 6, image 3 de 3
    • Use the heat gun to heat around the edges of the screen.

    • Insert three opening picks between the glass and the silver frame of the phone to pry it open.

    • Do not insert a pick at the bottom of the screen. The back button and the menu button break easily.

    Demander à FixBot

    Ajouter un commentaire

  7. Samsung Galaxy Mega Display Assembly Replacement, Removing screen: étape 7, image 1 de 3 Samsung Galaxy Mega Display Assembly Replacement, Removing screen: étape 7, image 2 de 3 Samsung Galaxy Mega Display Assembly Replacement, Removing screen: étape 7, image 3 de 3
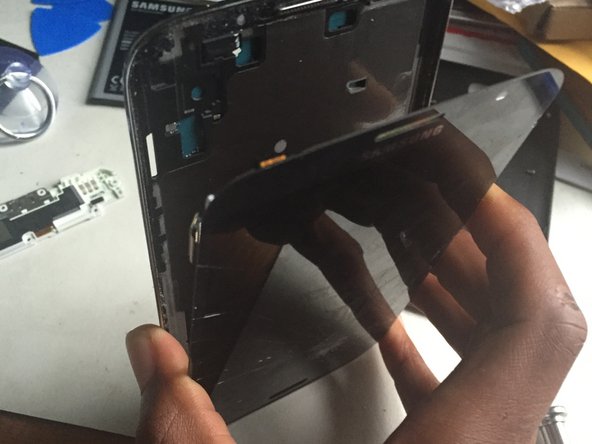
    • With the opening picks still inside the phone, lift the screen up toward you. Do not pull it off right away, but leave the screen at an angle.

    • Put the screen down along with the opening picks in order to keep it loose. Heat up the bottom to loosen the adhesive from the back and the menu button.

    • Carefully pull the screen towards you. Keep an eye on the bottom to make sure that the buttons are separating from the adhesive.

    • Be very careful when removing the button flex cables from the screen. If these cables are broken, you will need to replace the charging port assembly.

    Demander à FixBot

    Ajouter un commentaire

  8. Samsung Galaxy Mega Display Assembly Replacement, Final step screen is off: étape 8, image 1 de 3 Samsung Galaxy Mega Display Assembly Replacement, Final step screen is off: étape 8, image 2 de 3 Samsung Galaxy Mega Display Assembly Replacement, Final step screen is off: étape 8, image 3 de 3
    • Verify that the buttons are completely separated from the adhesive.

    • Separate the screen from the bezel.

    Demander à FixBot

    Ajouter un commentaire

Conclusion

To reassemble your device, follow these instructions in reverse order.

Annulation : je n'ai pas terminé ce tutoriel.

46 autres ont terminé cette réparation.

lillarrypimp1993

Membre depuis le 02/26/15

859 Réputation

1 tutoriel rédigé

3 commentaires de tutoriel

replaced screen everything works fine excepe want pickup network .this was a unlocked phone is there any way replacing it would lock it up again

KENNETH P - Réponse Partager

Unless you replaced the board, I can't see how. You might have left something disconnected.

Rongwey - Réponse Partager

check your antenna cable connection, it will not pick up a signal if not connected

Ron Lindon - Réponse Partager

Ajouter un commentaire

Nombre de vues :

Dernières 24 heures : 1

7 derniers jours : 6

30 derniers jours : 36

Total : 20,017