Aller au contenu principal

Samsung Galaxy Mega USB Board Replacement

Ce dont vous avez besoin

  1. Samsung Galaxy Mega USB Board Replacement, Battery: étape 1, image 1 de 3 Samsung Galaxy Mega USB Board Replacement, Battery: étape 1, image 2 de 3 Samsung Galaxy Mega USB Board Replacement, Battery: étape 1, image 3 de 3
    • Before starting, ensure device is completely turned off.

    • On the back of phone, locate the slot on the top left corner.

    • Insert plastic opening tool or fingernail and pull up on the back plate.

    • With the corner released, slide your finger around the device between the back plate and the phone to release connectors.

  2. Samsung Galaxy Mega USB Board Replacement: étape 2, image 1 de 3 Samsung Galaxy Mega USB Board Replacement: étape 2, image 2 de 3 Samsung Galaxy Mega USB Board Replacement: étape 2, image 3 de 3
    • Insert fingernail into the slot on bottom of battery and gently pull up.

    • Remove the battery.

  3. Samsung Galaxy Mega USB Board Replacement, Midframe: étape 3, image 1 de 3 Samsung Galaxy Mega USB Board Replacement, Midframe: étape 3, image 2 de 3 Samsung Galaxy Mega USB Board Replacement, Midframe: étape 3, image 3 de 3
    • Remove the 14 3.45 mm Phillips #000 screws from the assembly.

    • Gently, insert plastic opening tool into seam above the volume buttons of your phone.

    • You may substitute metal spudger for plastic opening tool to first start the opening of the seam. This may cause exterior cosmetic damage.

  4. Samsung Galaxy Mega USB Board Replacement: étape 4, image 1 de 2 Samsung Galaxy Mega USB Board Replacement: étape 4, image 2 de 2
    • Slowly slide plastic opening tool around the device to release all the connectors internal to the device.

    • The device should easily come apart after the plastic opening tool is slid around the entire device.

    • During reassembly, ensure volume and power buttons align properly.

  5. Samsung Galaxy Mega USB Board Replacement, USB Board: étape 5, image 1 de 1
    • This circuit board is the charging port assembly.

  6. Samsung Galaxy Mega USB Board Replacement: étape 6, image 1 de 3 Samsung Galaxy Mega USB Board Replacement: étape 6, image 2 de 3 Samsung Galaxy Mega USB Board Replacement: étape 6, image 3 de 3
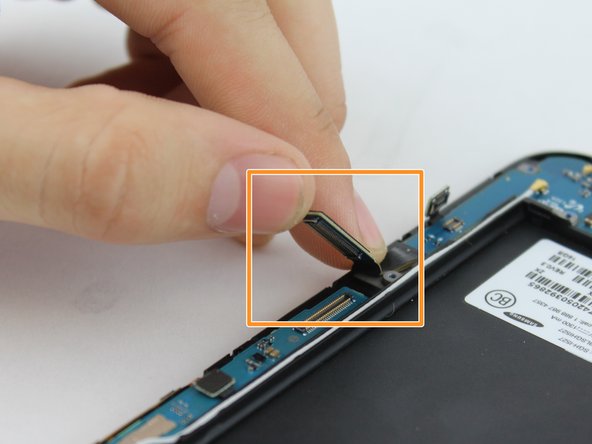
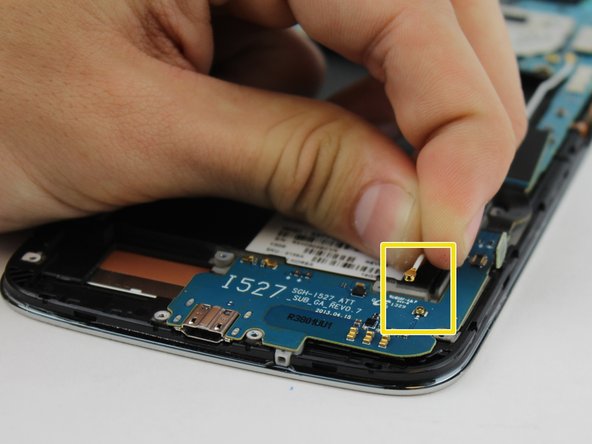
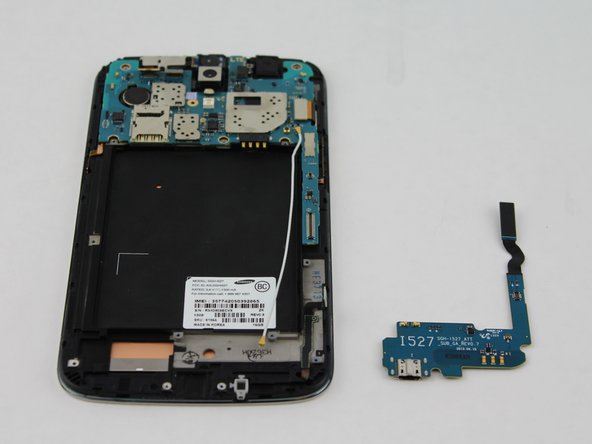
    • Lift up on the clamp with your finger to disconnect the connector.

    • Lift up on the clamp with your finger to disconnect the connection to the mother board.

    • Grasp cable head and lift up to disconnect the cable head.

  7. Samsung Galaxy Mega USB Board Replacement: étape 7, image 1 de 2 Samsung Galaxy Mega USB Board Replacement: étape 7, image 2 de 2
    • Use your fingers to gently remove charging port.

Conclusion

To reassemble your device, follow these instructions in reverse order.

10 autres ont terminé cette réparation.

Aaron Fulton

Membre depuis le 02/04/16

1 246 Réputation

3 tutoriels rédigés

Équipe

USF Tampa, Team 17-2, Blackwell Winter 2016 Membre de l'équipe USF Tampa, Team 17-2, Blackwell Winter 2016

USFT-BLACKWELL-W16S17G2

4 membres

8 tutoriels rédigés

0 commentaires

Ajouter un commentaire

Nombre de vues :

Dernières 24 heures : 0

7 derniers jours : 1

30 derniers jours : 11

Total : 8,661