Aller au contenu principal

Samsung Galaxy Note II Speaker Enclosure Replacement

Ce dont vous avez besoin

  1. Samsung Galaxy Note II Speaker Enclosure Replacement, Stylus: étape 1, image 1 de 2 Samsung Galaxy Note II Speaker Enclosure Replacement, Stylus: étape 1, image 2 de 2
    • Grasp the end of the stylus and remove it from its slot in the midframe.

  2. Samsung Galaxy Note II Speaker Enclosure Replacement, Rear Case: étape 2, image 1 de 2 Samsung Galaxy Note II Speaker Enclosure Replacement, Rear Case: étape 2, image 2 de 2
    • Pry with a plastic opening tool, or your fingernail, in the divot to the left of the rear-facing camera, near the power button.

  3. Samsung Galaxy Note II Speaker Enclosure Replacement: étape 3, image 1 de 3 Samsung Galaxy Note II Speaker Enclosure Replacement: étape 3, image 2 de 3 Samsung Galaxy Note II Speaker Enclosure Replacement: étape 3, image 3 de 3
    • Lift the rear case by the corner nearest the divot and remove it from the phone.

  4. Samsung Galaxy Note II Speaker Enclosure Replacement, MicroSD Card: étape 4, image 1 de 3 Samsung Galaxy Note II Speaker Enclosure Replacement, MicroSD Card: étape 4, image 2 de 3 Samsung Galaxy Note II Speaker Enclosure Replacement, MicroSD Card: étape 4, image 3 de 3
    • If you have an SD card inserted, use the flat end of a spudger, or your fingernail, to press the microSD card slightly deeper into its slot until you hear a click.

    • After the click, release the card and it will pop out of its slot.

    • Remove the microSD card.

    • For reassembly, push the microSD card into the slot until it clicks in place.

  5. Samsung Galaxy Note II Speaker Enclosure Replacement, Battery: étape 5, image 1 de 2 Samsung Galaxy Note II Speaker Enclosure Replacement, Battery: étape 5, image 2 de 2
    • Insert a plastic opening tool, or your finger, into the notch of the battery compartment and lift the battery upward.

  6. Samsung Galaxy Note II Speaker Enclosure Replacement: étape 6, image 1 de 1
    • Remove the battery from the midframe.

  7. Samsung Galaxy Note II Speaker Enclosure Replacement, Midframe: étape 7, image 1 de 1
    • Remove the eleven 4.0 mm Phillips #00 screws securing the midframe to the display assembly.

    In my phone some of the screws are litterally not ot turn - I screwed up one of the heads - be careful!

    erich zalcmann - Réponse

    I have 2 note 2 phones model #: SGH-I317M. I have a broken screen that does not display in my note 2 but my brother's note 2 is working perfectly. Can I either transfer the motherboard in MY note 2 to my brothers note 2 or swap the broken screen with the new screen in my brother's note 2 ? Thanks. Reach me at anmac1789@gmail.com

    An Mac - Réponse

  8. Samsung Galaxy Note II Speaker Enclosure Replacement: étape 8, image 1 de 3 Samsung Galaxy Note II Speaker Enclosure Replacement: étape 8, image 2 de 3 Samsung Galaxy Note II Speaker Enclosure Replacement: étape 8, image 3 de 3
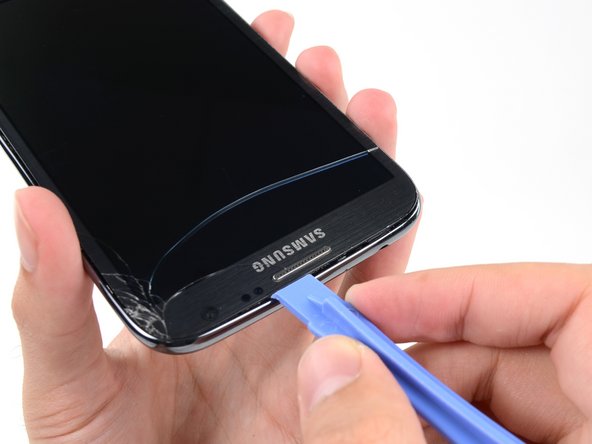
    • Insert your plastic opening tool between the midframe and front panel assembly on the side of the phone.

    • Slide the plastic opening tool down the seam.

    I didn't have an opening tool, so I used a stiff guitar pick. Worked like a charm.

    evanjpederson - Réponse

    for best result without any scratches or breaking frame, open the frame on table (solid), don't open on hand.

    Chovav Sutachy - Réponse

  9. Samsung Galaxy Note II Speaker Enclosure Replacement: étape 9, image 1 de 3 Samsung Galaxy Note II Speaker Enclosure Replacement: étape 9, image 2 de 3 Samsung Galaxy Note II Speaker Enclosure Replacement: étape 9, image 3 de 3
    • Continue to run the plastic opening tool down the seam.

  10. Samsung Galaxy Note II Speaker Enclosure Replacement: étape 10, image 1 de 2 Samsung Galaxy Note II Speaker Enclosure Replacement: étape 10, image 2 de 2
    • Carefully pry around the corner with a plastic opening tool.

    The screen cracked using that plastic tool.

    hell0allis0n - Réponse

  11. Samsung Galaxy Note II Speaker Enclosure Replacement: étape 11, image 1 de 2 Samsung Galaxy Note II Speaker Enclosure Replacement: étape 11, image 2 de 2
    • Pry along the top of the phone with a plastic opening tool.

  12. Samsung Galaxy Note II Speaker Enclosure Replacement: étape 12, image 1 de 2 Samsung Galaxy Note II Speaker Enclosure Replacement: étape 12, image 2 de 2
    • Push the plastic opening tool down to free the corner of the midframe from the display assembly.

  13. Samsung Galaxy Note II Speaker Enclosure Replacement: étape 13, image 1 de 2 Samsung Galaxy Note II Speaker Enclosure Replacement: étape 13, image 2 de 2
    • Free the clips along the power button side of the phone.

    • Lastly, free the two clips along the top and bottom edge of battery compartment.

    Start with the top clip. You can see it located next to the three battery connectors. Insert the spludge from the side gently to push, the clip should go off.

    Once this clip is off, the bottom battery clip can be unclipped simply by gently moving the two pieces apart.

    anonymous 4780 - Réponse

    Gan kalok bluetooth hp saya sama wifi nya nggak bisa nelusurin jaringan apa nya yg rusak apa gara gara udah di root

    aryadana55 -

    If you're primarily following the pictures, as I was, you might be frustrated that your display assembly isn't popping off. Unfortunately, a vital step was listed in the instructions but not photographed:

    "Lastly, there are two clips along the top and bottom edge of battery compartment that also hold the display assembly in place."

    alimac70117 - Réponse

  14. Samsung Galaxy Note II Speaker Enclosure Replacement: étape 14, image 1 de 2 Samsung Galaxy Note II Speaker Enclosure Replacement: étape 14, image 2 de 2
    • Lift the display assembly out of the midframe.

    unblock the edge at the middle-up of the battery compart!

    Giorgio - Réponse

  15. Samsung Galaxy Note II Speaker Enclosure Replacement, Speaker Enclosure: étape 15, image 1 de 1
    • Remove the 3 mm Phillips #00 screw from the speaker enclosure.

  16. Samsung Galaxy Note II Speaker Enclosure Replacement: étape 16, image 1 de 1
    • Remove the speaker enclosure.

Conclusion

To reassemble your device, follow these instructions in reverse order.

9 autres ont terminé cette réparation.

Sam Goldheart

Membre depuis le 10/18/12

465 647 Réputation

538 tutoriels rédigés

Équipe

iFixit Membre de l'équipe iFixit

Staff

135 membres

16 732 tutoriels rédigés

Un commentaire

This is an awesome guide! Cheers Sam. I have never done any electrical fixes before so I was a phone fixing virgin. I bought both the tools and the speaker for £5.80 on ebay, followed your guide carefully and had no problems. It was an easy process. Thanks to the confidence I had in your guide I didn’t have to go and buy a new phone so you saved me the £180 I thought I was going to have to spend!

Cheers, Nick (UK)

Nick Village - Réponse

Ajouter un commentaire

Nombre de vues :

Dernières 24 heures : 0

7 derniers jours : 0

30 derniers jours : 0

Total : 13,803