Aller au contenu principal
Pour réparer ensemble - Je crée un compte

Samsung Galaxy Note Speaker Enclosure Replacement

Ce dont vous avez besoin

  1. Samsung Galaxy Note Speaker Enclosure Replacement, Stylus: étape 1, image 1 de 2 Samsung Galaxy Note Speaker Enclosure Replacement, Stylus: étape 1, image 2 de 2
    • Grasp the cap of the stylus and remove it from its slot in the midframe.

    Demander à FixBot

    Ajouter un commentaire

  2. Samsung Galaxy Note Speaker Enclosure Replacement, Rear Case: étape 2, image 1 de 2 Samsung Galaxy Note Speaker Enclosure Replacement, Rear Case: étape 2, image 2 de 2
    • Pry with a plastic opening tool, or your fingernail, in the divot to the right of the rear-facing camera, near the volume rocker.

    Demander à FixBot

    Ajouter un commentaire

  3. Samsung Galaxy Note Speaker Enclosure Replacement: étape 3, image 1 de 2 Samsung Galaxy Note Speaker Enclosure Replacement: étape 3, image 2 de 2
    • Lift and remove the rear case from the phone.

    Demander à FixBot

    Ajouter un commentaire

  4. Samsung Galaxy Note Speaker Enclosure Replacement, Battery: étape 4, image 1 de 2 Samsung Galaxy Note Speaker Enclosure Replacement, Battery: étape 4, image 2 de 2
    • Insert your finger in the notch of the battery compartment.

    • Press the battery toward the rear facing camera while pulling outward.

    Demander à FixBot

    Ajouter un commentaire

  5. Samsung Galaxy Note Speaker Enclosure Replacement, MicroSD Card: étape 5, image 1 de 3 Samsung Galaxy Note Speaker Enclosure Replacement, MicroSD Card: étape 5, image 2 de 3 Samsung Galaxy Note Speaker Enclosure Replacement, MicroSD Card: étape 5, image 3 de 3
    • Use the flat end of a spudger, or your fingernail, to press the microSD card slightly deeper into its slot until you hear a click.

    • After the click, release the card and it will pop out of its slot.

    • For reassembly, push the microSD card into the slot until it clicks in place.

    Demander à FixBot

    Ajouter un commentaire

  6. Samsung Galaxy Note Speaker Enclosure Replacement: étape 6, image 1 de 1
    • Remove the microSD card from its slot in the midframe.

    Demander à FixBot

    Ajouter un commentaire

  7. Samsung Galaxy Note Speaker Enclosure Replacement, SIM Card: étape 7, image 1 de 2 Samsung Galaxy Note Speaker Enclosure Replacement, SIM Card: étape 7, image 2 de 2
    • Use a plastic opening tool, or your fingernail, to push the SIM card out of its compartment.

    Demander à FixBot

    Ajouter un commentaire

  8. Samsung Galaxy Note Speaker Enclosure Replacement: étape 8, image 1 de 2 Samsung Galaxy Note Speaker Enclosure Replacement: étape 8, image 2 de 2
    • Slide the SIM card out the rest of the way with your thumb and remove it from the device.

    Demander à FixBot

    Ajouter un commentaire

  9. Samsung Galaxy Note Speaker Enclosure Replacement, Midframe: étape 9, image 1 de 1
    • Remove the nine 3.4 mm Phillips #00 screws securing the midframe to the display assembly.

    Demander à FixBot

    Ajouter un commentaire

  10. Samsung Galaxy Note Speaker Enclosure Replacement: étape 10, image 1 de 2 Samsung Galaxy Note Speaker Enclosure Replacement: étape 10, image 2 de 2
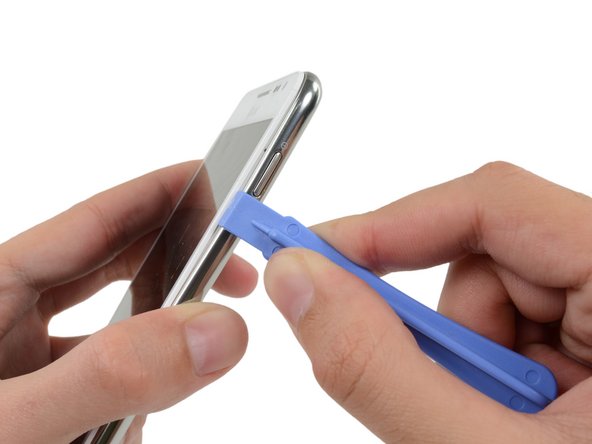
    • Insert your plastic opening tool to the left of the power button between the midframe and the front panel assembly and pry.

    Demander à FixBot

    Ajouter un commentaire

  11. Samsung Galaxy Note Speaker Enclosure Replacement: étape 11, image 1 de 3 Samsung Galaxy Note Speaker Enclosure Replacement: étape 11, image 2 de 3 Samsung Galaxy Note Speaker Enclosure Replacement: étape 11, image 3 de 3
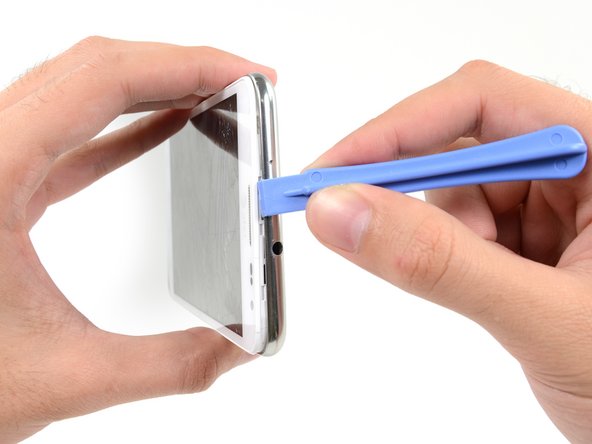
    • Slide the plastic opening tool down the seam.

    Demander à FixBot

    Ajouter un commentaire

  12. Samsung Galaxy Note Speaker Enclosure Replacement: étape 12, image 1 de 3 Samsung Galaxy Note Speaker Enclosure Replacement: étape 12, image 2 de 3 Samsung Galaxy Note Speaker Enclosure Replacement: étape 12, image 3 de 3
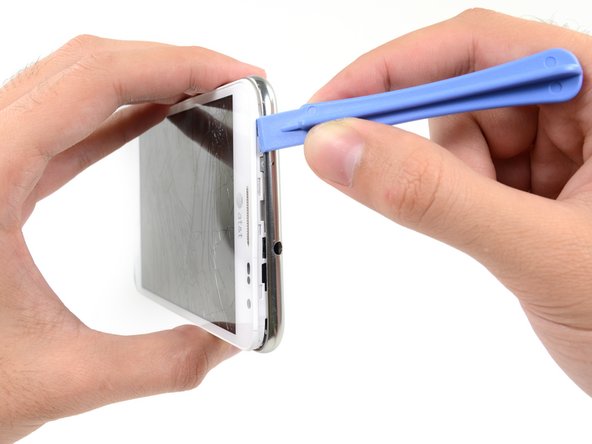
    • Insert your plastic opening tool to the left of the headphone jack between the midframe and the display assembly.

    • Slide the opening tool along the top edge of the phone.

    • Continue to run the plastic opening tool around the perimeter of the phone until the midframe is separated.

    Demander à FixBot

    Ajouter un commentaire

  13. Samsung Galaxy Note Speaker Enclosure Replacement: étape 13, image 1 de 2 Samsung Galaxy Note Speaker Enclosure Replacement: étape 13, image 2 de 2
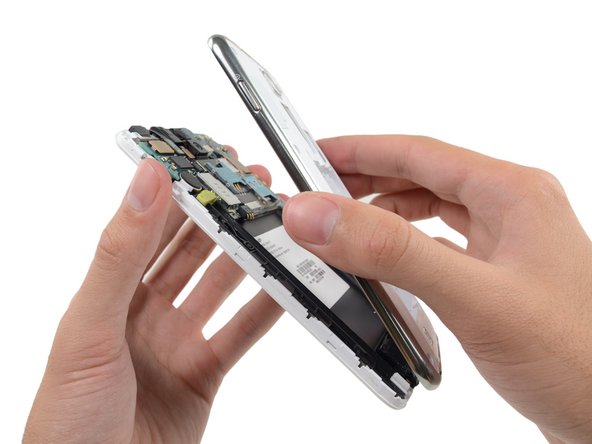
    • Remove the midframe from the display assembly.

    Demander à FixBot

    Ajouter un commentaire

  14. Samsung Galaxy Note Speaker Enclosure Replacement, Speaker Enclosure: étape 14, image 1 de 1
    • Remove the three 3 mm Phillips #00 screws securing the speaker enclosure to the front panel assembly.

    Demander à FixBot

    Ajouter un commentaire

  15. Samsung Galaxy Note Speaker Enclosure Replacement: étape 15, image 1 de 2 Samsung Galaxy Note Speaker Enclosure Replacement: étape 15, image 2 de 2
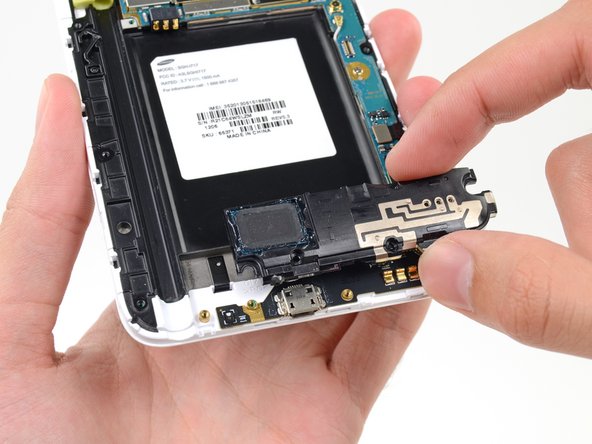
    • Remove the speaker enclosure from the display assembly.

    Demander à FixBot

    Ajouter un commentaire

Conclusion

To reassemble your device, follow these instructions in reverse order.

Annulation : je n'ai pas terminé ce tutoriel.

6 autres ont terminé cette réparation.

Sam Goldheart

Membre depuis le 10/18/12

477 670 Réputation

538 tutoriels rédigés

Équipe

iFixit Membre de l'équipe iFixit

Staff

123 membres

27 603 tutoriels rédigés

0 commentaires de tutoriel

Ajouter un commentaire

Nombre de vues :

Dernières 24 heures : 0

7 derniers jours : 9

30 derniers jours : 47

Total : 7,659