Aller au contenu principal
Pour réparer ensemble - Je crée un compte

Samsung Galaxy S Plus Front Panel Assembly Replacement

Ce dont vous avez besoin

  1. Samsung Galaxy S Plus Front Panel Assembly Replacement, Front Panel Assembly: étape 1, image 1 de 2 Samsung Galaxy S Plus Front Panel Assembly Replacement, Front Panel Assembly: étape 1, image 2 de 2
    • Unscrew 7 screws on the rear using a Phillips screw driver.

    Demander à FixBot

    Ajouter un commentaire

  2. Samsung Galaxy S Plus Front Panel Assembly Replacement: étape 2, image 1 de 3 Samsung Galaxy S Plus Front Panel Assembly Replacement: étape 2, image 2 de 3 Samsung Galaxy S Plus Front Panel Assembly Replacement: étape 2, image 3 de 3
    • Unhook the rear using a soft plastic prying tool to remove the rear cover

    • Be careful not to damage the rear cover when unhooking it.

    Demander à FixBot

    Ajouter un commentaire

  3. Samsung Galaxy S Plus Front Panel Assembly Replacement: étape 3, image 1 de 1
    Outil utilisé dans cette étape :
    Tweezers
    $4.99
    • Detach the Power Key FPCB, that is stick to the bracket by a double-sided tape, using tweezers. Make sure to remove all remaining tape on the bracket.

    Demander à FixBot

    Ajouter un commentaire

  4. Samsung Galaxy S Plus Front Panel Assembly Replacement: étape 4, image 1 de 1
    • Disconnect LCD Connector,Receiver Connector, Sub-touch Key Connector and Antenna cable from the Main PBA

    • Disconnecting the camera connector isn't necessary!

    Demander à FixBot

    Ajouter un commentaire

  5. Samsung Galaxy S Plus Front Panel Assembly Replacement: étape 5, image 1 de 1
    • After disconnecting the connectors carefully pull the Main PBA out of the bracket.

    • Make sure that the Power Key FPCB does not get stuck!

    Demander à FixBot

    Ajouter un commentaire

  6. Samsung Galaxy S Plus Front Panel Assembly Replacement: étape 6, image 1 de 3 Samsung Galaxy S Plus Front Panel Assembly Replacement: étape 6, image 2 de 3 Samsung Galaxy S Plus Front Panel Assembly Replacement: étape 6, image 3 de 3
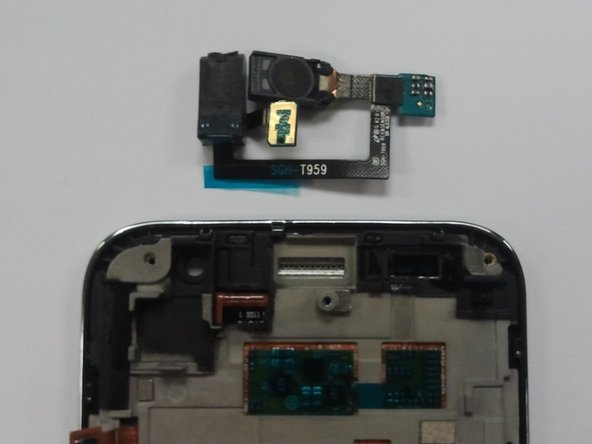
    • Remove the antenna cable from the main Antenna PCB on the sub-touch key module of your broken Screen Digitizer Frame

    • Pull out the Receiver module from the bracket. Be careful not to damage the FPC.

    • Now assembly both Receiver module and antenna cable into the new Screen Digitizer Frame and reverse the process of disassembly!

    Demander à FixBot

    Ajouter un commentaire

Conclusion

To reassemble your device, follow these instructions in reverse order.

Annulation : je n'ai pas terminé ce tutoriel.

14 autres ont terminé cette réparation.

Joao de Matos

Membre depuis le 07/02/13

383 Réputation

1 tutoriel rédigé

0 commentaires de tutoriel

Ajouter un commentaire

Nombre de vues :

Dernières 24 heures : 1

7 derniers jours : 6

30 derniers jours : 27

Total : 8,967