Aller au contenu principal

Samsung Galaxy S4 Front Facing Camera Replacement

Ce dont vous avez besoin

  1. Samsung Galaxy S4 Front Facing Camera Replacement, Rear Case: étape 1, image 1 de 2 Samsung Galaxy S4 Front Facing Camera Replacement, Rear Case: étape 1, image 2 de 2
    • Pry with a plastic opening tool, or your fingernail, in the divot to the left of the rear-facing camera, near the power button.

  2. Samsung Galaxy S4 Front Facing Camera Replacement: étape 2, image 1 de 3 Samsung Galaxy S4 Front Facing Camera Replacement: étape 2, image 2 de 3 Samsung Galaxy S4 Front Facing Camera Replacement: étape 2, image 3 de 3
    • Lift the rear case by the corner nearest the divot and remove it from the phone.

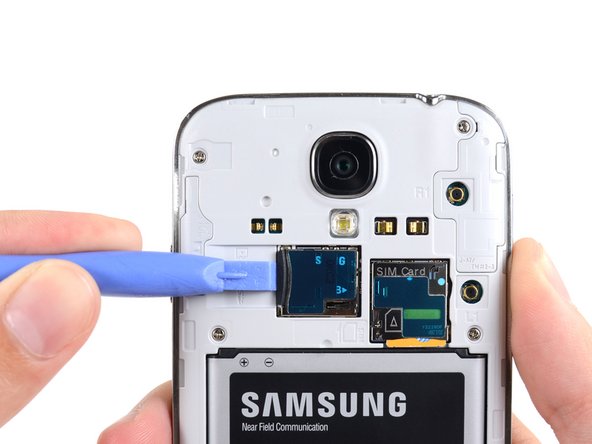
  3. Samsung Galaxy S4 Front Facing Camera Replacement, MicroSD Card: étape 3, image 1 de 3 Samsung Galaxy S4 Front Facing Camera Replacement, MicroSD Card: étape 3, image 2 de 3 Samsung Galaxy S4 Front Facing Camera Replacement, MicroSD Card: étape 3, image 3 de 3
    • Use the flat end of a spudger, or your fingernail, to press the microSD card slightly deeper into its slot until you hear a click.

    • After the click, release the card and it will pop out of its slot.

    • Remove the microSD card.

    • For reassembly, push the microSD card into the slot until it clicks in place.

  4. Samsung Galaxy S4 Front Facing Camera Replacement, Battery: étape 4, image 1 de 3 Samsung Galaxy S4 Front Facing Camera Replacement, Battery: étape 4, image 2 de 3 Samsung Galaxy S4 Front Facing Camera Replacement, Battery: étape 4, image 3 de 3
    • Insert a plastic opening tool, or your finger, into the notch of the battery compartment and lift the battery upward.

    • Remove the battery from your phone.

  5. Samsung Galaxy S4 Front Facing Camera Replacement, SIM Card: étape 5, image 1 de 3 Samsung Galaxy S4 Front Facing Camera Replacement, SIM Card: étape 5, image 2 de 3 Samsung Galaxy S4 Front Facing Camera Replacement, SIM Card: étape 5, image 3 de 3
    • Use a plastic opening tool, or your fingernail, to press the SIM card slightly deeper into its slot until you hear a click.

    • After the click, release the card and it will pop out of its slot.

    • Remove the SIM card.

    • During reassembly, push the SIM card into the slot until it clicks in place.

  6. Samsung Galaxy S4 Front Facing Camera Replacement, Midframe: étape 6, image 1 de 1
    • Remove the nine 4.0 mm Phillips #00 screws securing the midframe to the display assembly.

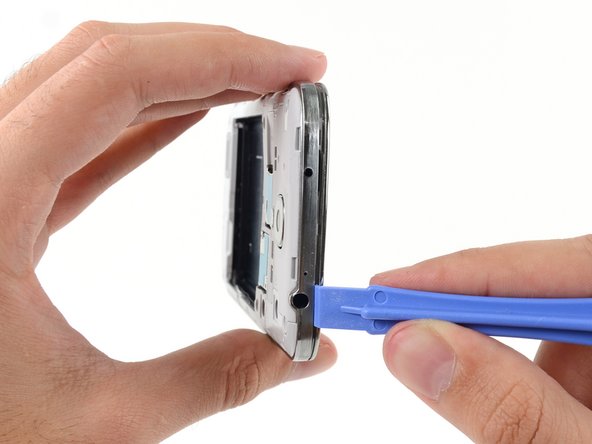
  7. Samsung Galaxy S4 Front Facing Camera Replacement: étape 7, image 1 de 2 Samsung Galaxy S4 Front Facing Camera Replacement: étape 7, image 2 de 2
    • The midframe is secured to the display assembly by several plastic clips behind the chrome bezel of the midframe. The next few steps will guide you through separating the clips to free the midframe.

    • Starting on the volume button side of the phone, insert your plastic opening tool between the chrome bezel around the display glass and the larger chrome border piece. Look for the seam between the two.

    • Slide the opening tool along the seam, separating the plastic clips as you go.

    • Be very gentle whilst prying, and pry only enough to separate the plastic clips—there are several thin points in the midframe bezel that may crack if you bend them too much.

  8. Samsung Galaxy S4 Front Facing Camera Replacement: étape 8, image 1 de 2 Samsung Galaxy S4 Front Facing Camera Replacement: étape 8, image 2 de 2
    • Continue prying around the corner of the phone.

    • Slide your opening tool along the seam between the midframe and display along the bottom of the device, releasing more of the plastic clips.

  9. Samsung Galaxy S4 Front Facing Camera Replacement: étape 9, image 1 de 2 Samsung Galaxy S4 Front Facing Camera Replacement: étape 9, image 2 de 2
    • Again, pry around the corner, to the power button side.

    • Slide the opening tool along the seam.

  10. Samsung Galaxy S4 Front Facing Camera Replacement: étape 10, image 1 de 2 Samsung Galaxy S4 Front Facing Camera Replacement: étape 10, image 2 de 2
    • Continue sliding the opening tool around the top of the phone, releasing the last of the clips and freeing the midframe from the display assembly.

    • At this point, you may want to run your plastic opening tool along the entire perimeter of the device again, to make sure you've released all of the plastic clips.

  11. Samsung Galaxy S4 Front Facing Camera Replacement: étape 11, image 1 de 3 Samsung Galaxy S4 Front Facing Camera Replacement: étape 11, image 2 de 3 Samsung Galaxy S4 Front Facing Camera Replacement: étape 11, image 3 de 3
    • Remove the midframe from the display assembly.

  12. Samsung Galaxy S4 Front Facing Camera Replacement, Front Facing Camera: étape 12, image 1 de 1
    • Remove the upper display assembly bracket.

  13. Samsung Galaxy S4 Front Facing Camera Replacement: étape 13, image 1 de 1
    • Using the flat end of a spudger, disconnect the front-facing camera cable connector.

  14. Samsung Galaxy S4 Front Facing Camera Replacement: étape 14, image 1 de 1
    • Remove the front-facing camera.

Conclusion

To reassemble your device, follow these instructions in reverse order.

66 autres ont terminé cette réparation.

Sam Goldheart

Membre depuis le 10/18/12

465 762 Réputation

538 tutoriels rédigés

Équipe

iFixit Membre de l'équipe iFixit

Staff

135 membres

16 817 tutoriels rédigés

10 commentaires

Hi my front camera is bright white all of a sudden... is it broken or am I I'm some sort of mode it's only the front facing cam. .

James - Réponse

Any instructions for replacing the front speaker? I think I clogged it with glue when replacing the front glass.

Thanks!

Bill Carden - Réponse

Great set of instructions! Pictures are very accurate and helpful! When it only take 5-10 mins to do something you have never tried before, you know the instructions were excellent! Thanks

laura - Réponse

Excellent instructions. At step 12, the bracket is fragile and can easily ping off across the room so be careful. Thanks.

Ageingjedi - Réponse

My front camera is a bright white also, even on video recording but you can still hear sound.

Cin - Réponse

Ajouter un commentaire

Nombre de vues :

Dernières 24 heures : 0

7 derniers jours : 4

30 derniers jours : 15

Total : 65,846