Aller au contenu principal

Samsung Galaxy S5 Mini Display Assembly Replacement

Ce dont vous avez besoin

  1. Samsung Galaxy S5 Mini Display Assembly Replacement, Rear Panel: étape 1, image 1 de 3 Samsung Galaxy S5 Mini Display Assembly Replacement, Rear Panel: étape 1, image 2 de 3 Samsung Galaxy S5 Mini Display Assembly Replacement, Rear Panel: étape 1, image 3 de 3
    • Insert a fingernail or a plastic opening tool into the slot located above the power button.

    • Gently pull the panel off the back of the phone.

    • The plastic snaps will make a popping sound as they separate.

  2. Samsung Galaxy S5 Mini Display Assembly Replacement, Battery: étape 2, image 1 de 3 Samsung Galaxy S5 Mini Display Assembly Replacement, Battery: étape 2, image 2 de 3 Samsung Galaxy S5 Mini Display Assembly Replacement, Battery: étape 2, image 3 de 3
    • Insert fingernail or plastic opening tool into the slot at the bottom of the battery.

    • Gently pry the battery away from the phone.

    • When replacing the battery, ensure the contacts are aligned and press lightly. The battery will appear to fit in multiple directions, so do not force it in.

  3. Samsung Galaxy S5 Mini Display Assembly Replacement, Display Assembly: étape 3, image 1 de 3 Samsung Galaxy S5 Mini Display Assembly Replacement, Display Assembly: étape 3, image 2 de 3 Samsung Galaxy S5 Mini Display Assembly Replacement, Display Assembly: étape 3, image 3 de 3
    Outil utilisé dans cette étape :
    iOpener
    $19.99
    J'achète
    • Flip the phone and lay it on a flat surface so that the back is facing towards you.

    • Use a spudger or plastic opening tool to pry up the home button cable connector and disconnect it.

    • For reassembly, insert the home button cable connector through the open slot in the display assembly.

    • Use an iOpener to loosen the adhesive beneath the display.

  4. Samsung Galaxy S5 Mini Display Assembly Replacement: étape 4, image 1 de 3 Samsung Galaxy S5 Mini Display Assembly Replacement: étape 4, image 2 de 3 Samsung Galaxy S5 Mini Display Assembly Replacement: étape 4, image 3 de 3
    • Flip the phone over so it is lying on its back.

    • Insert a plastic opening tool or a plastic opening pick in the space between the screen and the frame and slide along the right side of the phone to loosen the adhesive.

    • Gently lift the display assembly away from the frame until there is a small gap and leave the first opening pick in the bottom right corner next to your home button.

    • Insert a second opening pick and slide it up to the top left corner of the phone by loosening the adhesive beneath the display.

    • Do not insert the opening pick more than 1/8 inch. There are some components that can be harmed.

  5. Samsung Galaxy S5 Mini Display Assembly Replacement: étape 5, image 1 de 3 Samsung Galaxy S5 Mini Display Assembly Replacement: étape 5, image 2 de 3 Samsung Galaxy S5 Mini Display Assembly Replacement: étape 5, image 3 de 3
    • Reheat the display of your phone with the iOpener. Especially the top and left side of the front.

    • Insert a third opening pick and slide it carefully to the top left corner of the phone. Be aware of the front camera and the loudspeaker!

  6. Samsung Galaxy S5 Mini Display Assembly Replacement: étape 6, image 1 de 3 Samsung Galaxy S5 Mini Display Assembly Replacement: étape 6, image 2 de 3 Samsung Galaxy S5 Mini Display Assembly Replacement: étape 6, image 3 de 3
    • Insert a fourth opening pick and slide it to the lower left corner next to your home button.

    • Flip the opening pick in the top right corner to lift the display. If it is still sticky, move the four opening picks around the frame as you did before to find remains of adhesive.

    • Do not remove the display assembly from the frame. It is still connected by a cable.

  7. Samsung Galaxy S5 Mini Display Assembly Replacement: étape 7, image 1 de 2 Samsung Galaxy S5 Mini Display Assembly Replacement: étape 7, image 2 de 2
    • Keep the top portion of the display assembly next to the frame.

    • Unplug the display flex connector with a spudger.

  8. Samsung Galaxy S5 Mini Display Assembly Replacement: étape 8, image 1 de 3 Samsung Galaxy S5 Mini Display Assembly Replacement: étape 8, image 2 de 3 Samsung Galaxy S5 Mini Display Assembly Replacement: étape 8, image 3 de 3
    Outil utilisé dans cette étape :
    Suction Handle
    $2.99
    J'achète
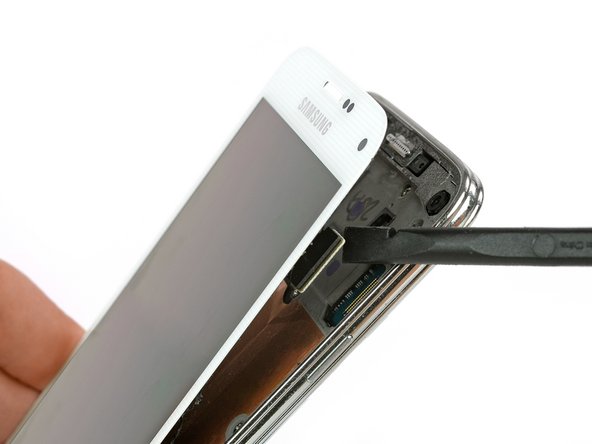
    • Use a suction handle to lift the display off of your phone. The home button cable connector should go with the display through a small gap in the mid frame. If it doesn't, use a tweezer to help a little.

    • Pull the display assembly away from the phone to remove it.

Conclusion

To reassemble your device, follow these instructions in reverse order.

21 autres ont terminé cette réparation.

Jon Kuzmich

Membre depuis le 09/29/14

1 963 Réputation

7 tutoriels rédigés

Équipe

Cal Poly, Team 12-4, Forte Fall 2014 Membre de l'équipe Cal Poly, Team 12-4, Forte Fall 2014

CPSU-FORTE-F14S12G4

5 membres

38 tutoriels rédigés

2 commentaires

Hi, there! I assume, I can fix the occasional malfunction of my display backpane light. I dropped the phone on the floor one day, and now I sometimes have to knock on die upper right corner of the display to get it working again. Will try to check the connector.

tiger - Réponse

When I reassemble the display after a repair, will the glue work again? Do I have to heat it on reassembly to make it sticky again? Will it still be waterproof after repair?

todd - Réponse

Ajouter un commentaire

Nombre de vues :

Dernières 24 heures : 0

7 derniers jours : 7

30 derniers jours : 20

Total : 22,487