Aller au contenu principal

Samsung Galaxy Tab Pro 10.1 Battery Cable Replacement

Conditions préalables uniquement
Ce tutoriel est uniquement destiné à être utilisé comme prérequis d'autres tutoriels. Il ne se suffit pas à lui-même.

Ce dont vous avez besoin

  1. Samsung Galaxy Tab Pro 10.1 Battery Cable Replacement, Battery Cables: étape 1, image 1 de 2 Samsung Galaxy Tab Pro 10.1 Battery Cable Replacement, Battery Cables: étape 1, image 2 de 2
    • Remove the six 4 mm Phillips #00 screws that hold the battery in place.

  2. Samsung Galaxy Tab Pro 10.1 Battery Cable Replacement: étape 2, image 1 de 3 Samsung Galaxy Tab Pro 10.1 Battery Cable Replacement: étape 2, image 2 de 3 Samsung Galaxy Tab Pro 10.1 Battery Cable Replacement: étape 2, image 3 de 3
    • Remove the tape that runs along the length of the battery.

    • Lift the retaining flaps of the ZIF connectors on each side of the battery connector.

    • Remove the two ribbon cables that lay across the width of the battery and are connected to the motherboard. Place your finger underneath the ribbon cable and gently lift the cable upwards and off.

  3. Samsung Galaxy Tab Pro 10.1 Battery Cable Replacement: étape 3, image 1 de 2 Samsung Galaxy Tab Pro 10.1 Battery Cable Replacement: étape 3, image 2 de 2
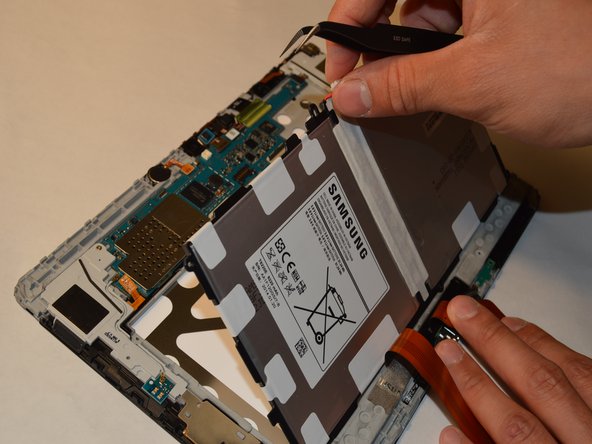
    • Use a plastic tweezer and remove the top center 6 pin power connector that is attached to the edge of the motherboard.

    • Detach the battery by gently lifting the battery out of the panel.

Conclusion

To reassemble your device, follow these instructions in reverse order.

Stephen Yeung

Membre depuis le 08/26/15

1 526 Réputation

6 tutoriels rédigés

0 commentaires

Ajouter un commentaire

Nombre de vues :

Dernières 24 heures : 0

7 derniers jours : 0

30 derniers jours : 0

Total : 107