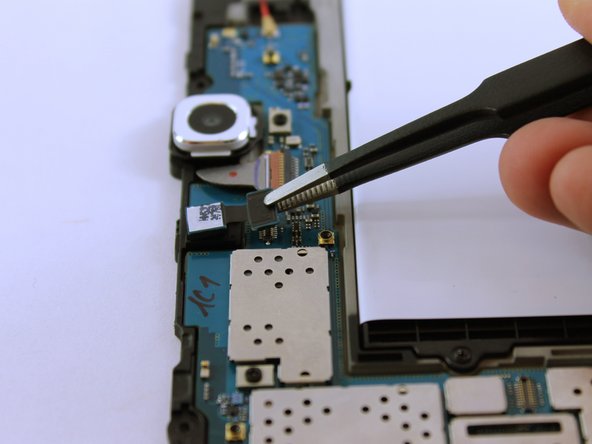
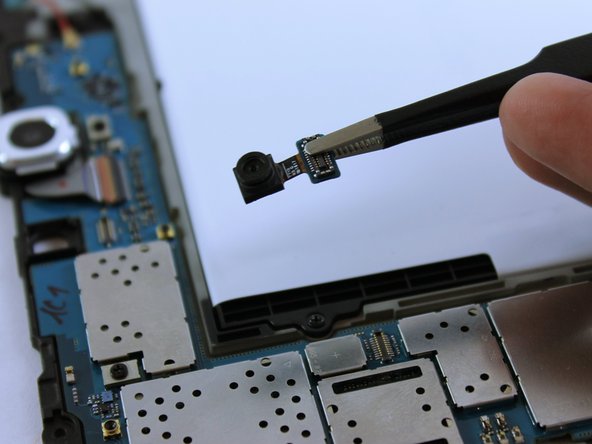
Aller au contenu principal

Samsung Galaxy Tab S2 9.7 Verizon Tablet Front-Facing Camera Replacement

Ce dont vous avez besoin

  1. Samsung Galaxy Tab S2 9.7 Verizon Tablet Front-Facing  Camera Replacement, Back Case: étape 1, image 1 de 1
    • Turn off the tablet before disassembly.

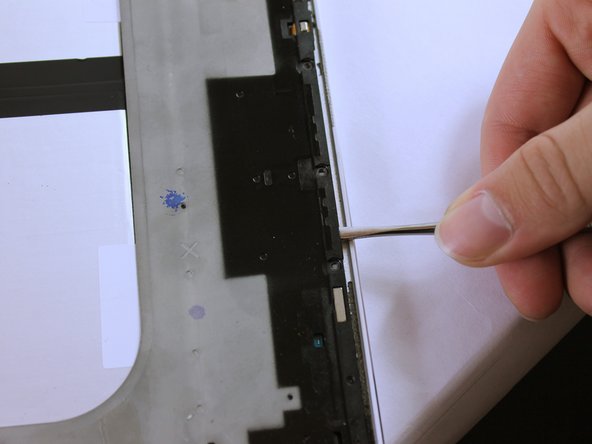
    • Heat up an iOpener for 30 seconds and place on all four seams of the screen. A heat gun can be used as well.

  2. Samsung Galaxy Tab S2 9.7 Verizon Tablet Front-Facing  Camera Replacement: étape 2, image 1 de 2 Samsung Galaxy Tab S2 9.7 Verizon Tablet Front-Facing  Camera Replacement: étape 2, image 2 de 2
    • The glue is now melted, so using the metal spudger shown, pry open all sides of the tablet.

    • When prying open near the home and touch screen buttons, use a suction cup.

    • Do not stick the metal spudger past these buttons as this may damage your device.

  3. Samsung Galaxy Tab S2 9.7 Verizon Tablet Front-Facing  Camera Replacement: étape 3, image 1 de 2 Samsung Galaxy Tab S2 9.7 Verizon Tablet Front-Facing  Camera Replacement: étape 3, image 2 de 2
    • Carefully lift up the screen.

    • There is a ribbon cable attached. Lifting the screen too quickly can damage the cable.

  4. Samsung Galaxy Tab S2 9.7 Verizon Tablet Front-Facing  Camera Replacement: étape 4, image 1 de 3 Samsung Galaxy Tab S2 9.7 Verizon Tablet Front-Facing  Camera Replacement: étape 4, image 2 de 3 Samsung Galaxy Tab S2 9.7 Verizon Tablet Front-Facing  Camera Replacement: étape 4, image 3 de 3
    • Remove the ribbon cable using the Metal Spudger.

    • The ribbon may be taped underneath to the grey frame. Gently lift the ribbon to untape it.

  5. Samsung Galaxy Tab S2 9.7 Verizon Tablet Front-Facing  Camera Replacement: étape 5, image 1 de 2 Samsung Galaxy Tab S2 9.7 Verizon Tablet Front-Facing  Camera Replacement: étape 5, image 2 de 2
    • Remove all seventeen 3 mm screws using a PH000 Phillips screwdriver.

  6. Samsung Galaxy Tab S2 9.7 Verizon Tablet Front-Facing  Camera Replacement: étape 6, image 1 de 3 Samsung Galaxy Tab S2 9.7 Verizon Tablet Front-Facing  Camera Replacement: étape 6, image 2 de 3 Samsung Galaxy Tab S2 9.7 Verizon Tablet Front-Facing  Camera Replacement: étape 6, image 3 de 3
    • Lift the black frame using the two Metal Spudgers shown.

    • On the third picture, there is a Sim Card component that is connected to the frame and back cover. As you lift up the frame, it'll detach. This is normal.

  7. Samsung Galaxy Tab S2 9.7 Verizon Tablet Front-Facing  Camera Replacement: étape 7, image 1 de 1
    • Once lifted, flip the grey frame over.

    • This component connects to the sim card.

    • Remember to click this component back into place when reassembling the tablet.

  8. Samsung Galaxy Tab S2 9.7 Verizon Tablet Front-Facing  Camera Replacement, Front-Facing Camera: étape 8, image 1 de 1
    • This is where the front-facing camera is located on the frame

  9. Samsung Galaxy Tab S2 9.7 Verizon Tablet Front-Facing  Camera Replacement: étape 9, image 1 de 3 Samsung Galaxy Tab S2 9.7 Verizon Tablet Front-Facing  Camera Replacement: étape 9, image 2 de 3 Samsung Galaxy Tab S2 9.7 Verizon Tablet Front-Facing  Camera Replacement: étape 9, image 3 de 3
    • Using the Blunt ESD Tweezer, disconnect the front-facing camera

    • Lift the camera

Conclusion

To reassemble your device, follow these instructions in reverse order.

Divya Prabakaran

Membre depuis le 02/20/17

633 Réputation

6 tutoriels rédigés

Équipe

USF Tampa, Team S2-G4, Sullivan Spring 2017 Membre de l'équipe USF Tampa, Team S2-G4, Sullivan Spring 2017

USFT-SULLIVAN-S17S2G4

4 membres

12 tutoriels rédigés

0 commentaires

Ajouter un commentaire

Nombre de vues :

Dernières 24 heures : 0

7 derniers jours : 0

30 derniers jours : 0

Total : 307