Introduction
Is your tablet not charging, heating up, or the battery is dying off to quickly?
Then maybe its time to replace your tablet's battery.
This guide will give you step by step instructions on how to replace your tablet's battery.
Ce dont vous avez besoin
-
-
Heat the iOpener in the microwave for 30 seconds. Then place it on each side for 20 seconds in order to loosen the adhesive sealing on the device.
I tried to open the case with the plastic tool and my case just wouldn't open (keep in mind this is definitely not my first time using this tool or building/disembling a PC) and my screen broke before the case would open, and I wasn't really worried about the screen because I just wanted the parts but my tool broke I dont know if it was my case or the guide but I'm pretty mad.
-
-
-
-
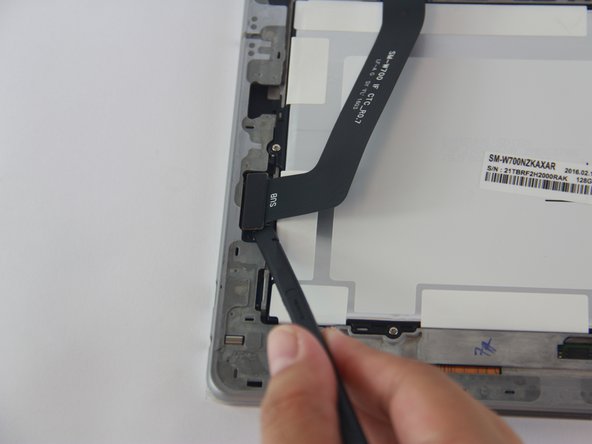
Once opened you will notice three locations (boxed in red) that will need to be disconnected in order to proceed.
Do you know where to get replacement flesx cables for those two wifi antennas?
-


To reassemble your device, follow these instructions in reverse order.
To reassemble your device, follow these instructions in reverse order.
Annulation : je n'ai pas terminé ce tutoriel.
9 autres ont terminé cette réparation.
Équipe

USF Tampa, Team 1-2, Sullivan Spring 2017 Membre de l'équipe USF Tampa, Team 1-2, Sullivan Spring 2017
USFT-SULLIVAN-S17S1G2
4 membres
2 tutoriels rédigés
20 commentaires
Can you provide the part number for the battery itself?
You fail to draw attention to the very real risk of breaking three small cables (one near the keyboard connector at the bottom, one on the right hand side and on at the right hand top - looking at the back panel with the SAMSUNG label right way up) - if great care is not used when removing the back panel. They are fragile cable, not mush spare length and no easy way to disconnect
Not sure if these cables and what they are attached to, are available as spares but require a more extensive disassembly to replace if they are!
Steve Williams
do you know if i can get replacement for those cables?
Jin Choi -
You are so right I severed the connection to my keyboard only to find out that my tablet and battery are fine but the screen is black because of an upgrade and now I cant use my keyboard to connect the tablet to an external monitor to fix the download. Is there any way to repair that cable? Any Help would be greatly appreciated.
mrv_18 -
pretty sure the correct way to take apart this device is to heat off the screen first, then after removing a few screws the metal chassis comes avay from the back avoiding you having to remove the back cover that has small flexed attached. therefore avoiding any chance of damaging the device by incorrect procedure. you should definitely update this guide
Exactly. Hate when people say to remove the backs that break the plastic clips that hold it in place.
So do you have any idea how to avoid to damage WiFi antenna cables?
How is this supposed to work from the rear? There’s a ton of cables attached to the rear of the tablet. I have the rear plate lose (which was hard enough, as the gap isn’t wide enough for a plastic tool to get in), but now I can see cables connecting the tablet with the back plate, and I don’t see a way to disconnect all of them. Let alone reconnect them. I also think the right way to get in is through the screen…
https://www.mrmemory.co.uk/downloads/mem...
From the User manual:
Removing the battery • To remove the battery, you must visit an authorised service centre with the provided instructions. •
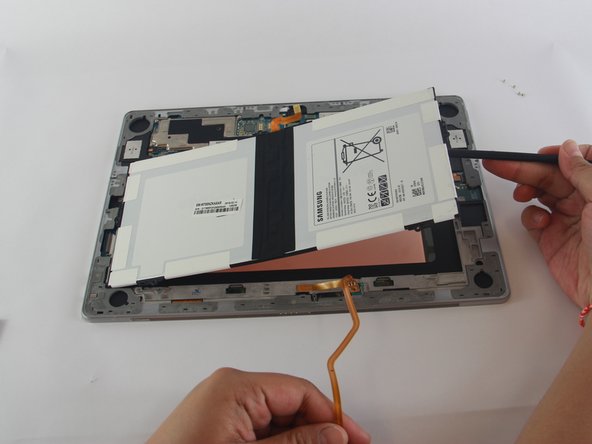
1 To soften the adhesive that holds the front panel to the main device, the device must be warmed to a controlled level using a dedicated temperature controlled chamber. Attach a suction pad removal tool to the lower end of the front panel and while holding the device firmly, pull the front panel away from the bottom upwards. 2 Loosen and remove the screws at the location points and remove the chassis. 3 Disconnect the connectors. 4 Loosen and remove the screws from the battery and remove the battery.
At least two flex cables shown here were torn, and zero mention was made about it. In step four, you can see a torn flex at the top-right and at the right-side. Looks like multiple people in the comments damaged this device following this guide.
First, I’m not sure how you would access the battery attachment screws if you came at it through the front, behind the screen. I happened to catch a video on YouTube that had shown a disassembly from the rear. What that person did was carefully detach several cables during the rear cover removal.
Regardless of which method of disassembly, I was wondering if anyone has actually found a source for a replacement abttery, and if so where. Also, if anyone has the actual Samsung part number for the battery, that would also be appreciated.
U demonstrate with SM-W700 mine is SM-W708 DO I get a 708 battery and the same tools as u used?
THis is not the correct way to do it!
You have to go at it though the front remove the screen then frame. Then from there you’ll see that the back plate is actually designed as one piece.
If you go in though the back which on this model I guess you can. You will for sure break little clip rivet things as well risk damage bottom connector.
I know it may seem more risky but once you take the screen the rest is pretty easy. THough I’ll cation taking the screen off without damaging it is a a challenge .
I’d make a post on correct way but too lazy though check youtube I found a vid on there pretty good details and all though no English!
Go in through the screen!
I’ve successfully changed the battery on my Galaxy Tab Pro S 12”!
I went in through the screen which was very straightforward, just as the comments in this guide suggest. Thank you for that good advice.
I’d recommend studding the screen glue spread-pattern carefully before removing the screen as it would be very easy to go in too far and damage it (I have done this).
I heated the edge of the screen using a heat gun on a medium setting, the screen got to a point were it was almost too hot to touch. I then used the plastic tool to gently lift the screen, inserting playing cards as I went. Pushing the separating tool in no more the 5mm. Don’t go in too far, this is very important. Also, do not over stress the screen, take your time.
Before attempting the battery replacement, I watched plenty of YouTube videos showing how the plugs and cables come apart. This preparation was essential!
The result is that I have successfully replaced the battery in my Galaxy tablet. It’s just like new!
Attention !!! read the comments
Freeman - Réponse