Aller au contenu principal

Samsung Impression LCD Replacement

Ce dont vous avez besoin

  1. Samsung Impression LCD Replacement, Battery: étape 1, image 1 de 1
    • Orient the phone with the screen facing down.

    • Using your thumb, slide the back panel away from the camera to expose the battery.

  2. Samsung Impression LCD Replacement: étape 2, image 1 de 2 Samsung Impression LCD Replacement: étape 2, image 2 de 2
    • Insert the tip of the spudger on the left side of the battery, opposite the direction of the white arrow.

    • Pry the battery free. It will pivot in the direction of the white arrow.

  3. Samsung Impression LCD Replacement, Back Cover: étape 3, image 1 de 1
    • Remove the six 3.5 mm screws using a Phillips #000 screwdriver. Make sure to unscrew in a counterclockwise direction.

  4. Samsung Impression LCD Replacement: étape 4, image 1 de 1
    • Remove the back cover by gently prying around the top and bottom edges with the spudger.

    • It may help to slide the touchscreen upwards when removing the back panel.

    • The side buttons will become loose and will fall out, so put these in a safe place.

  5. Samsung Impression LCD Replacement, Circuit Board: étape 5, image 1 de 1
    • To free the circuit board, remove the black wire that is holding it down.

    • You can remove the wire by gently prying up the gold terminator that is attached to the green circuit board. A gentle tug is all it should take.

  6. Samsung Impression LCD Replacement: étape 6, image 1 de 2 Samsung Impression LCD Replacement: étape 6, image 2 de 2
    • The circuit board will still be held on by a blue and black ribbon. Remove the entire circuit board by gently tugging the ribbon upwards.

  7. Samsung Impression LCD Replacement, Keyboard: étape 7, image 1 de 1
    • Remove the two base screws along the edge of the silver piece, where you just removed the black end piece.

    • The screws are 2.7mm in length.

    • The bottom black end cap will snap out.

  8. Samsung Impression LCD Replacement: étape 8, image 1 de 2 Samsung Impression LCD Replacement: étape 8, image 2 de 2
    • Remove 6 screws holding the silver plate on.

    • 2.7mm in length

    • The keys will peel right out of the screen side of the phone.

  9. Samsung Impression LCD Replacement: étape 9, image 1 de 1
    • The silver piece you are left with is the physical keyboard assembly.

  10. Samsung Impression LCD Replacement, LCD Flex Cable: étape 10, image 1 de 2 Samsung Impression LCD Replacement, LCD Flex Cable: étape 10, image 2 de 2
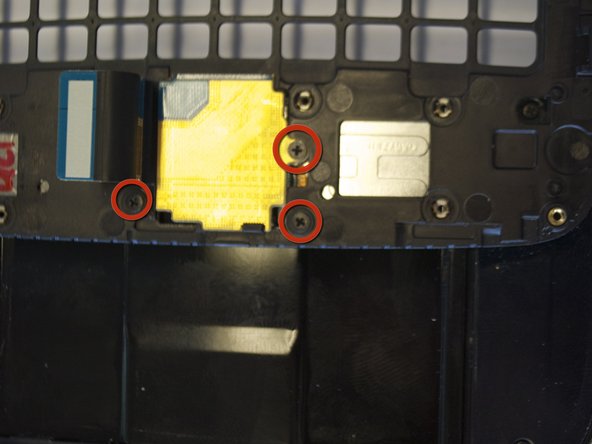
    • Remove the 3 screws holding down the flex cable.

    • The screws are 2.0 mm in length.

    • The screw that goes through the circle port on the flex cable is longer at 2.3mm long.

    • The keyboard slider frame will come off and the flex cable exposed, but not free.

  11. Samsung Impression LCD Replacement: étape 11, image 1 de 1
    • Remove 4 outer screws.

    • The screws are 3.5mm in length.

  12. Samsung Impression LCD Replacement: étape 12, image 1 de 3 Samsung Impression LCD Replacement: étape 12, image 2 de 3 Samsung Impression LCD Replacement: étape 12, image 3 de 3
    • Slide the phone apart, and remove a 5th screw (3.5 mm).

    • Remove the outer shell by prying the edges off with your fingers, or a small screwdriver. (second image, taken before the image for above instruction)

    • The device will now be in two pieces

  13. Samsung Impression LCD Replacement: étape 13, image 1 de 2 Samsung Impression LCD Replacement: étape 13, image 2 de 2
    • Lift the tab underneath the blue tape and gently pull the flex cable.

    • The flex cable will now be completely free.

  14. Samsung Impression LCD Replacement, Ear Speaker: étape 14, image 1 de 1
    • Remove the single screw.

    • This screw is 2.25 mm in length.

    • Lift the black tab at the end of the ribbon.

    • Gently pull the speaker and ribbon free.

  15. Samsung Impression LCD Replacement, LCD: étape 15, image 1 de 2 Samsung Impression LCD Replacement, LCD: étape 15, image 2 de 2
    • Lift the remaining two tabs and free their respective ribbon cables.

    • Gently pry the screen away from the housing.

    • Be careful with this step as you are in direct contact with the LCD screen.

Conclusion

To reassemble your device, follow these instructions in reverse order.

Saul Villatoro

Membre depuis le 04/25/11

255 Réputation

7 tutoriels rédigés

Équipe

Cal Poly, Team 8-10, Regan Spring 2011 Membre de l'équipe Cal Poly, Team 8-10, Regan Spring 2011

CPSU-REGAN-S11S8G10

4 membres

22 tutoriels rédigés

0 commentaires

Ajouter un commentaire

Nombre de vues :

Dernières 24 heures : 0

7 derniers jours : 2

30 derniers jours : 2

Total : 4,362