Aller au contenu principal

Samsung NP540U3C-A02UB Hinge Replacement

Ce dont vous avez besoin

  1. Samsung NP540U3C-A02UB Hinge Replacement, Hard Drive: étape 1, image 1 de 1
    • Turn off the laptop before beginning disassembly and unplug it from the power cord.

    • Place the laptop flat with its bottom facing up.

  2. Samsung NP540U3C-A02UB Hinge Replacement: étape 2, image 1 de 2 Samsung NP540U3C-A02UB Hinge Replacement: étape 2, image 2 de 2
    • Remove one 4 mm Phillips #00 screw labeled "HDD Memory".

  3. Samsung NP540U3C-A02UB Hinge Replacement: étape 3, image 1 de 3 Samsung NP540U3C-A02UB Hinge Replacement: étape 3, image 2 de 3 Samsung NP540U3C-A02UB Hinge Replacement: étape 3, image 3 de 3
    • Gently release the 3 clips holding the HDD cover with the plastic opening tool.

    • Remove the HDD cover from the device.

  4. Samsung NP540U3C-A02UB Hinge Replacement: étape 4, image 1 de 2 Samsung NP540U3C-A02UB Hinge Replacement: étape 4, image 2 de 2
    • Remove the four 6 mm Phillips #00 screws attaching the hard drive to the case.

  5. Samsung NP540U3C-A02UB Hinge Replacement: étape 5, image 1 de 2 Samsung NP540U3C-A02UB Hinge Replacement: étape 5, image 2 de 2
    • Using the plastic opening tool, push the hard drive connector clip upwards in order to release the cable.

  6. Samsung NP540U3C-A02UB Hinge Replacement: étape 6, image 1 de 2 Samsung NP540U3C-A02UB Hinge Replacement: étape 6, image 2 de 2
    • Remove the hard drive from the case.

  7. Samsung NP540U3C-A02UB Hinge Replacement, Hinge Assembly: étape 7, image 1 de 1
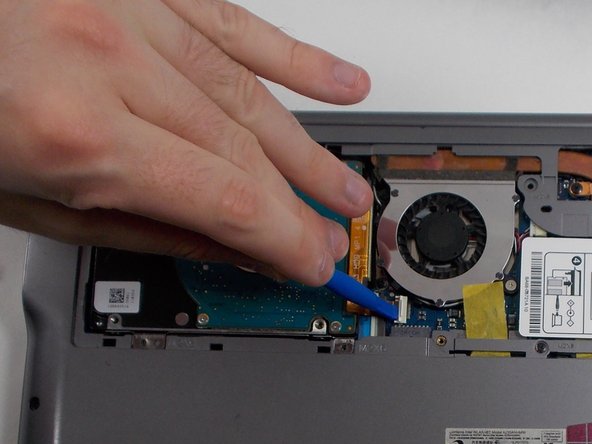
    • Remove the following screws holding the case together:

    • 6x 4mm Phillips #00 screws.

    • 3x 6mm Phillips #00 screws.

  8. Samsung NP540U3C-A02UB Hinge Replacement: étape 8, image 1 de 2 Samsung NP540U3C-A02UB Hinge Replacement: étape 8, image 2 de 2
    • Using the opening tool, remove the two rubber pads just above the hard drive cover.

  9. Samsung NP540U3C-A02UB Hinge Replacement: étape 9, image 1 de 2 Samsung NP540U3C-A02UB Hinge Replacement: étape 9, image 2 de 2
    • Remove the two 4 mm Phillips #00 screws formerly concealed by the pads.

  10. Samsung NP540U3C-A02UB Hinge Replacement: étape 10, image 1 de 1
    • Using the plastic opening tool, gently lift and remove the back cover.

    • There are clips along the edges of the back cover that hold it in place. Be careful not to break these.

  11. Samsung NP540U3C-A02UB Hinge Replacement: étape 11, image 1 de 1
    • Open the laptop.

    • Use the Opener Tool to gently pry off the plastic piece that is covering the hinges.

    • The hinges and frame of the laptop are made of aluminum; be gentle when removing this section.

  12. Samsung NP540U3C-A02UB Hinge Replacement: étape 12, image 1 de 1
    • Close the laptop and flip it so its bottom is facing up and the hinges are exposed.

  13. Samsung NP540U3C-A02UB Hinge Replacement: étape 13, image 1 de 1
    • For each hinge needing a replacement:

    • Remove the three 4 mm Phillips #00 screws attaching the hinge to the display assembly.

    • Remove the two 4 mm Phillips #00 screws attaching the hinge to the base of the laptop.

  14. Samsung NP540U3C-A02UB Hinge Replacement: étape 14, image 1 de 1
    • Remove the hinge.

Conclusion

To reassemble your device, follow these instructions in reverse order.

Caleb Hunt

Membre depuis le 03/28/22

157 Réputation

1 tutoriel rédigé

Équipe

UMass Dartmouth, Team C-1, Gurgel Spring 2022 Membre de l'équipe UMass Dartmouth, Team C-1, Gurgel Spring 2022

UMASSD-GURGEL-S22SCG1

4 membres

6 tutoriels rédigés

0 commentaires

Ajouter un commentaire

Nombre de vues :

Dernières 24 heures : 1

7 derniers jours : 3

30 derniers jours : 22

Total : 253