Aller au contenu principal

Samsung NX1 Back Cover Replacement

Ce dont vous avez besoin

  1. Samsung NX1 Back Cover Replacement, Viewfinder Focus Dial: étape 1, image 1 de 2 Samsung NX1 Back Cover Replacement, Viewfinder Focus Dial: étape 1, image 2 de 2
    • Push the rubber viewfinder grip upward.

  2. Samsung NX1 Back Cover Replacement: étape 2, image 1 de 2 Samsung NX1 Back Cover Replacement: étape 2, image 2 de 2
    • Use the Phillips #00 screwdriver to remove one 6.4 mm screw in the center of the dial.

    • Remove the dial by lifting upward with your fingers.

  3. Samsung NX1 Back Cover Replacement, Back Cover: étape 3, image 1 de 3 Samsung NX1 Back Cover Replacement, Back Cover: étape 3, image 2 de 3 Samsung NX1 Back Cover Replacement, Back Cover: étape 3, image 3 de 3
    • Use the Phillips #00 screwdriver to remove the four 5.5 mm screws surrounding the viewfinder.

    • Use your fingers to lift the plastic viewfinder cover upward.

  4. Samsung NX1 Back Cover Replacement: étape 4, image 1 de 2 Samsung NX1 Back Cover Replacement: étape 4, image 2 de 2
    • Use the Phillips #00 screwdriver to remove the two 5.5 mm screws from the right side of the camera above the SD card port.

  5. Samsung NX1 Back Cover Replacement: étape 5, image 1 de 1
    • Use the Phillips #00 screwdriver to remove one 5.5 mm screw on the left, above the HDMI port.

  6. Samsung NX1 Back Cover Replacement: étape 6, image 1 de 1
    • Use the Phillips #00 screwdriver to remove the five 5.5 mm screws from the bottom, near the battery compartment.

    • Use the Phillips #00 screwdriver to remove one 3.8 mm screw from the bottom of the hand grip, below the battery compartmen.

  7. Samsung NX1 Back Cover Replacement: étape 7, image 1 de 3 Samsung NX1 Back Cover Replacement: étape 7, image 2 de 3 Samsung NX1 Back Cover Replacement: étape 7, image 3 de 3
    • Use a plastic opening tool to separate the back cover from the front cover.

    • Pry the back cover in this order: bottom, right side, left side.

  8. Samsung NX1 Back Cover Replacement: étape 8, image 1 de 2 Samsung NX1 Back Cover Replacement: étape 8, image 2 de 2
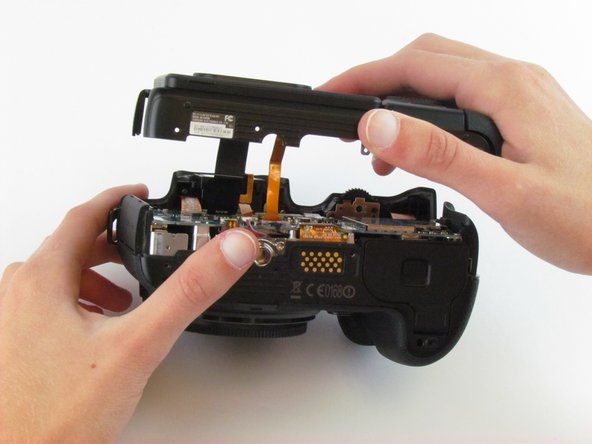
    • Use your fingers to pull the back cover away from the front cover.

    • Do not completely separate the back cover from the front cover as two cables hold these components together.

  9. Samsung NX1 Back Cover Replacement: étape 9, image 1 de 3 Samsung NX1 Back Cover Replacement: étape 9, image 2 de 3 Samsung NX1 Back Cover Replacement: étape 9, image 3 de 3
    • Use tweezers to pull the two ribbon cables horizontally out of their clips.

Conclusion

To reassemble your device, follow these instructions in reverse order.

Une autre personne a terminé cette réparation.

Hannah Patrick

Membre depuis le 02/24/16

891 Réputation

6 tutoriels rédigés

Équipe

USF Tampa, Team 1-4, Leahy Spring 2016 Membre de l'équipe USF Tampa, Team 1-4, Leahy Spring 2016

USFT-LEAHY-S16S1G4

3 membres

6 tutoriels rédigés

0 commentaires

Ajouter un commentaire

Nombre de vues :

Dernières 24 heures : 0

7 derniers jours : 0

30 derniers jours : 5

Total : 974