Aller au contenu principal

Samsung NX1 LCD Touch Screen Replacement

Ce dont vous avez besoin

  1. Samsung NX1 LCD Touch Screen Replacement, Viewfinder Focus Dial: étape 1, image 1 de 2 Samsung NX1 LCD Touch Screen Replacement, Viewfinder Focus Dial: étape 1, image 2 de 2
    • Push the rubber viewfinder grip upward.

  2. Samsung NX1 LCD Touch Screen Replacement: étape 2, image 1 de 2 Samsung NX1 LCD Touch Screen Replacement: étape 2, image 2 de 2
    • Use the Phillips #00 screwdriver to remove one 6.4 mm screw in the center of the dial.

    • Remove the dial by lifting upward with your fingers.

  3. Samsung NX1 LCD Touch Screen Replacement, Back Cover: étape 3, image 1 de 3 Samsung NX1 LCD Touch Screen Replacement, Back Cover: étape 3, image 2 de 3 Samsung NX1 LCD Touch Screen Replacement, Back Cover: étape 3, image 3 de 3
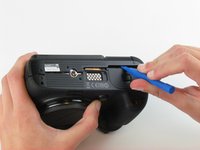
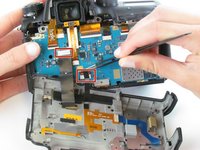
    • Use the Phillips #00 screwdriver to remove the four 5.5 mm screws surrounding the viewfinder.

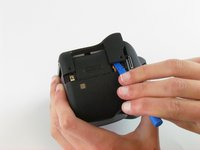
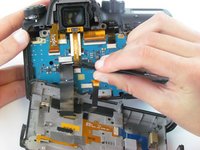
    • Use your fingers to lift the plastic viewfinder cover upward.

  4. Samsung NX1 LCD Touch Screen Replacement: étape 4, image 1 de 2 Samsung NX1 LCD Touch Screen Replacement: étape 4, image 2 de 2
    • Use the Phillips #00 screwdriver to remove the two 5.5 mm screws from the right side of the camera above the SD card port.

  5. Samsung NX1 LCD Touch Screen Replacement: étape 5, image 1 de 1
    • Use the Phillips #00 screwdriver to remove one 5.5 mm screw on the left, above the HDMI port.

  6. Samsung NX1 LCD Touch Screen Replacement: étape 6, image 1 de 1
    • Use the Phillips #00 screwdriver to remove the five 5.5 mm screws from the bottom, near the battery compartment.

    • Use the Phillips #00 screwdriver to remove one 3.8 mm screw from the bottom of the hand grip, below the battery compartmen.

  7. Samsung NX1 LCD Touch Screen Replacement: étape 7, image 1 de 3 Samsung NX1 LCD Touch Screen Replacement: étape 7, image 2 de 3 Samsung NX1 LCD Touch Screen Replacement: étape 7, image 3 de 3
    • Use a plastic opening tool to separate the back cover from the front cover.

    • Pry the back cover in this order: bottom, right side, left side.

  8. Samsung NX1 LCD Touch Screen Replacement: étape 8, image 1 de 2 Samsung NX1 LCD Touch Screen Replacement: étape 8, image 2 de 2
    • Use your fingers to pull the back cover away from the front cover.

    • Do not completely separate the back cover from the front cover as two cables hold these components together.

  9. Samsung NX1 LCD Touch Screen Replacement: étape 9, image 1 de 3 Samsung NX1 LCD Touch Screen Replacement: étape 9, image 2 de 3 Samsung NX1 LCD Touch Screen Replacement: étape 9, image 3 de 3
    • Use tweezers to pull the two ribbon cables horizontally out of their clips.

  10. Samsung NX1 LCD Touch Screen Replacement, LCD Touch Screen: étape 10, image 1 de 1
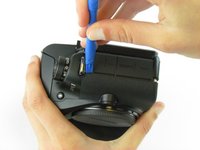
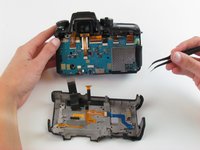
    • Use the Phillips #00 screwdriver to remove the seven screws (three silver 3.5 mm screws and four black 2.7 mm screws).

  11. Samsung NX1 LCD Touch Screen Replacement: étape 11, image 1 de 2 Samsung NX1 LCD Touch Screen Replacement: étape 11, image 2 de 2
    • Use tweezers to remove the glued rubber piece.

  12. Samsung NX1 LCD Touch Screen Replacement: étape 12, image 1 de 3 Samsung NX1 LCD Touch Screen Replacement: étape 12, image 2 de 3 Samsung NX1 LCD Touch Screen Replacement: étape 12, image 3 de 3
    • Use the Phillips #00 screwdriver to remove the four black 2.3 mm screws.

    • Use your fingers to separate the LCD screen from the folding mechanism.

Conclusion

To reassemble your device, follow these instructions in reverse order.

2 autres ont terminé cette réparation.

Hannah Patrick

Membre depuis le 02/24/16

891 Réputation

6 tutoriels rédigés

Équipe

USF Tampa, Team 1-4, Leahy Spring 2016 Membre de l'équipe USF Tampa, Team 1-4, Leahy Spring 2016

USFT-LEAHY-S16S1G4

3 membres

6 tutoriels rédigés

4 commentaires

Where can one buy a new screen?

Lourens Coetzee - Réponse

Where to get new screen?

Jonathan Wood - Réponse

Thanks! This guide is missing some steps and details once you open it up, but it was enough for me to get the job done. Thank you.

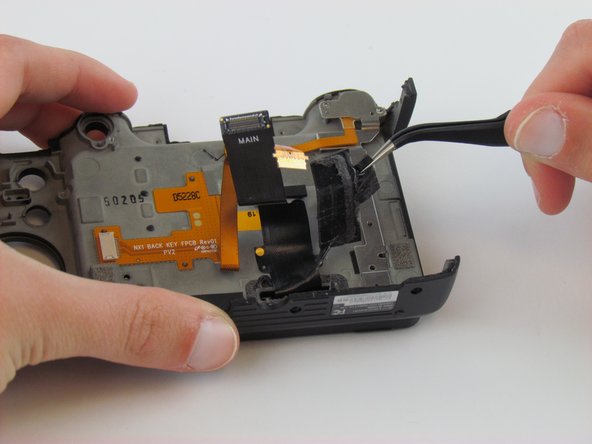
Once inside be super careful with the ribbon cables. One slides out the side and the cable labeled “Main” pops off the top. At first I thought I broke the Main cable. You’ll need to unhood the main cable from the frame before you can detach the LCD… and the LCD is glued on airtight to the articulating frame.

I ordered a new replacement LCD on ebay from S. Korea. Good luck to anyone else who has to do this. I killed my screen after a couple heavy rain storms.

drew - Réponse

One more question: where can I order a display for the NX1?

Henning Marx - Réponse

Ajouter un commentaire

Nombre de vues :

Dernières 24 heures : 0

7 derniers jours : 0

30 derniers jours : 6

Total : 1,250