Aller au contenu principal

Samsung NX1 Navigation Buttons Replacement

Ce dont vous avez besoin

  1. Samsung NX1 Navigation Buttons Replacement, Viewfinder Focus Dial: étape 1, image 1 de 2 Samsung NX1 Navigation Buttons Replacement, Viewfinder Focus Dial: étape 1, image 2 de 2
    • Push the rubber viewfinder grip upward.

  2. Samsung NX1 Navigation Buttons Replacement: étape 2, image 1 de 2 Samsung NX1 Navigation Buttons Replacement: étape 2, image 2 de 2
    • Use the Phillips #00 screwdriver to remove one 6.4 mm screw in the center of the dial.

    • Remove the dial by lifting upward with your fingers.

  3. Samsung NX1 Navigation Buttons Replacement, Back Cover: étape 3, image 1 de 3 Samsung NX1 Navigation Buttons Replacement, Back Cover: étape 3, image 2 de 3 Samsung NX1 Navigation Buttons Replacement, Back Cover: étape 3, image 3 de 3
    • Use the Phillips #00 screwdriver to remove the four 5.5 mm screws surrounding the viewfinder.

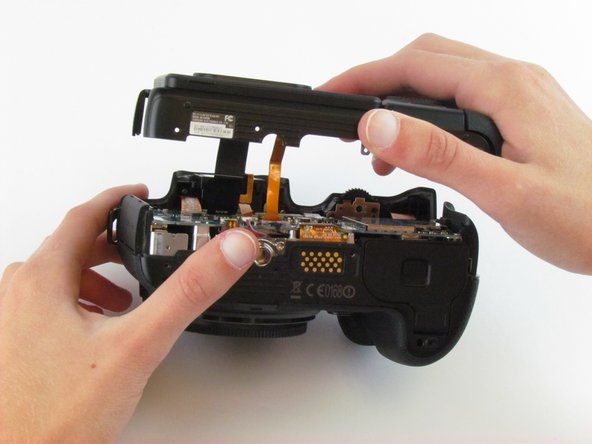
    • Use your fingers to lift the plastic viewfinder cover upward.

  4. Samsung NX1 Navigation Buttons Replacement: étape 4, image 1 de 2 Samsung NX1 Navigation Buttons Replacement: étape 4, image 2 de 2
    • Use the Phillips #00 screwdriver to remove the two 5.5 mm screws from the right side of the camera above the SD card port.

  5. Samsung NX1 Navigation Buttons Replacement: étape 5, image 1 de 1
    • Use the Phillips #00 screwdriver to remove one 5.5 mm screw on the left, above the HDMI port.

  6. Samsung NX1 Navigation Buttons Replacement: étape 6, image 1 de 1
    • Use the Phillips #00 screwdriver to remove the five 5.5 mm screws from the bottom, near the battery compartment.

    • Use the Phillips #00 screwdriver to remove one 3.8 mm screw from the bottom of the hand grip, below the battery compartmen.

  7. Samsung NX1 Navigation Buttons Replacement: étape 7, image 1 de 3 Samsung NX1 Navigation Buttons Replacement: étape 7, image 2 de 3 Samsung NX1 Navigation Buttons Replacement: étape 7, image 3 de 3
    • Use a plastic opening tool to separate the back cover from the front cover.

    • Pry the back cover in this order: bottom, right side, left side.

  8. Samsung NX1 Navigation Buttons Replacement: étape 8, image 1 de 2 Samsung NX1 Navigation Buttons Replacement: étape 8, image 2 de 2
    • Use your fingers to pull the back cover away from the front cover.

    • Do not completely separate the back cover from the front cover as two cables hold these components together.

  9. Samsung NX1 Navigation Buttons Replacement: étape 9, image 1 de 3 Samsung NX1 Navigation Buttons Replacement: étape 9, image 2 de 3 Samsung NX1 Navigation Buttons Replacement: étape 9, image 3 de 3
    • Use tweezers to pull the two ribbon cables horizontally out of their clips.

  10. Samsung NX1 Navigation Buttons Replacement, Navigation Buttons: étape 10, image 1 de 1
    • Use the Phillips #00 screwdriver to remove the six screws (three silver 3.5 mm screws and three black 4.2 mm screws).

  11. Samsung NX1 Navigation Buttons Replacement: étape 11, image 1 de 1
    • Use the tweezers to pull the blue ribbon cable horizontally out of its clip.

  12. Samsung NX1 Navigation Buttons Replacement: étape 12, image 1 de 2 Samsung NX1 Navigation Buttons Replacement: étape 12, image 2 de 2
    • Use your fingers to remove the metal piece with the blue ribbon cable and the rubber buttons lying underneath.

Conclusion

To reassemble your device, follow these instructions in reverse order.

Hannah Patrick

Membre depuis le 02/24/16

891 Réputation

6 tutoriels rédigés

Équipe

USF Tampa, Team 1-4, Leahy Spring 2016 Membre de l'équipe USF Tampa, Team 1-4, Leahy Spring 2016

USFT-LEAHY-S16S1G4

3 membres

6 tutoriels rédigés

0 commentaires

Ajouter un commentaire

Nombre de vues :

Dernières 24 heures : 0

7 derniers jours : 0

30 derniers jours : 3

Total : 513