Aller au contenu principal

Samsung NX3000 Back Case Replacement

Ce dont vous avez besoin

  1. Samsung NX3000 Back Case Replacement, Battery: étape 1, image 1 de 3 Samsung NX3000 Back Case Replacement, Battery: étape 1, image 2 de 3 Samsung NX3000 Back Case Replacement, Battery: étape 1, image 3 de 3
    • Turn the camera upside down. Only remove the lens if you have to in order to access the battery compartment, as dust particles could easily enter the main body and fall onto the delicate sensor.

    • Slide the button to the left to open the battery compartment.

    • Push the blue button up to release the battery.

    • The battery is not shown in these photos.

  2. Samsung NX3000 Back Case Replacement, Lens Assembly: étape 2, image 1 de 2 Samsung NX3000 Back Case Replacement, Lens Assembly: étape 2, image 2 de 2
    • Remove the four 7.3 mm Phillips screws from the front of the lens assembly.

    • Remove the silver ring with tweezers.

  3. Samsung NX3000 Back Case Replacement: étape 3, image 1 de 2 Samsung NX3000 Back Case Replacement: étape 3, image 2 de 2
    • Use tweezers to remove the black plastic ring and small metal ring inside the lens assembly.

  4. Samsung NX3000 Back Case Replacement: étape 4, image 1 de 3 Samsung NX3000 Back Case Replacement: étape 4, image 2 de 3 Samsung NX3000 Back Case Replacement: étape 4, image 3 de 3
    • Use tweezers to lift the pyramid screw and spring from the lens assembly.

  5. Samsung NX3000 Back Case Replacement, Back Case: étape 5, image 1 de 2 Samsung NX3000 Back Case Replacement, Back Case: étape 5, image 2 de 2
    • Remove the three 4.3 mm Phillips screws from the bottom of the camera.

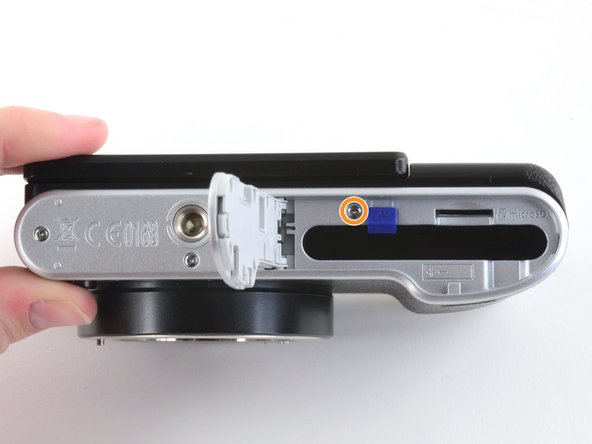
    • Remove the 4.3 mm Phillips screw hiding inside the battery compartment.

  6. Samsung NX3000 Back Case Replacement: étape 6, image 1 de 2 Samsung NX3000 Back Case Replacement: étape 6, image 2 de 2
    • Remove the 4.2 mm Phillips screw from the left handgrip.

    • Remove the two 4.2 mm Phillips screws from the right handgrip.

  7. Samsung NX3000 Back Case Replacement: étape 7, image 1 de 2 Samsung NX3000 Back Case Replacement: étape 7, image 2 de 2
    • Use tweezers to remove the metal shield from the external flash mount.

  8. Samsung NX3000 Back Case Replacement: étape 8, image 1 de 1
    • Remove the four 5 mm Phillips screws from the external flash mount .

  9. Samsung NX3000 Back Case Replacement: étape 9, image 1 de 2 Samsung NX3000 Back Case Replacement: étape 9, image 2 de 2
    • Remove the external flash mount.

  10. Samsung NX3000 Back Case Replacement: étape 10, image 1 de 2 Samsung NX3000 Back Case Replacement: étape 10, image 2 de 2
    • Slowly pull the bottom of the back case away from the camera.

    • Do not attempt to remove the back case as it is attached to the motherboard by a ribbon cable.

  11. Samsung NX3000 Back Case Replacement: étape 11, image 1 de 3 Samsung NX3000 Back Case Replacement: étape 11, image 2 de 3 Samsung NX3000 Back Case Replacement: étape 11, image 3 de 3
    • Use the flat end of a spudger to pry the flat topped connector straight up from the motherboard.

    • Remove the back case.

Conclusion

To reassemble your device, follow these instructions in reverse order.

3 autres ont terminé cette réparation.

Kelsea Weber

Membre depuis le 11/12/15

19 745 Réputation

32 tutoriels rédigés

Équipe

iFixit Membre de l'équipe iFixit

Staff

136 membres

16 586 tutoriels rédigés

0 commentaires

Ajouter un commentaire

Nombre de vues :

Dernières 24 heures : 0

7 derniers jours : 1

30 derniers jours : 10

Total : 1,138