Aller au contenu principal

Samsung Radiant 360 R1 WiFi Module Replacement

Ce dont vous avez besoin

  1. Samsung Radiant 360 R1 WiFi Module Replacement, Micro USB / Power Port Panel: étape 1, image 1 de 1
    • Working on your device while it is turned on may result in electric shock. Make sure to shut down and unplug your device before you begin.

    • Use the plastic opening tool to lift and remove the rubber grommet plugs.

  2. Samsung Radiant 360 R1 WiFi Module Replacement: étape 2, image 1 de 1
    • Using a PH1 Philips screwdriver, remove four (9.5mm x 1.6mm) screws from the base plate.

    • Remove base plate by stabilizing speaker and using plastic prying tool to pry the base plate from the speaker.

  3. Samsung Radiant 360 R1 WiFi Module Replacement: étape 3, image 1 de 1
    • Place the speaker on the table with the Touch Pad facing down. This will leave you with the Port Panel exposed.

    • Remove speaker grill by stabilizing speaker on a table and applying pressure to the bottom of the speaker. Slide the speaker grill up and away from the remaining endcap.

  4. Samsung Radiant 360 R1 WiFi Module Replacement: étape 4, image 1 de 1
    • Remove the two exposed (9.5mm x 1.6mm) PH1 Phillips screws on the Port Panel.

    • Remove the Port Panel from the speaker body, exposing the ribbon cables.

  5. Samsung Radiant 360 R1 WiFi Module Replacement: étape 5, image 1 de 1
    • While stabilizing the Port Panel remove the two ribbon cables one at a time by pressing the locking clip down on the ribbon cable connectors and pulling the connector away from the Port Panel.

  6. Samsung Radiant 360 R1 WiFi Module Replacement, 1" Tweeter Speaker: étape 6, image 1 de 3 Samsung Radiant 360 R1 WiFi Module Replacement, 1" Tweeter Speaker: étape 6, image 2 de 3 Samsung Radiant 360 R1 WiFi Module Replacement, 1" Tweeter Speaker: étape 6, image 3 de 3
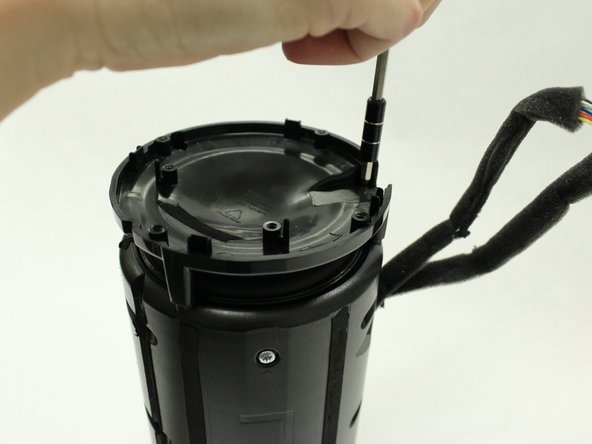
    • Remove the four (9.5mm x 1.6mm) PH1 Phillips screws on the port speaker body.

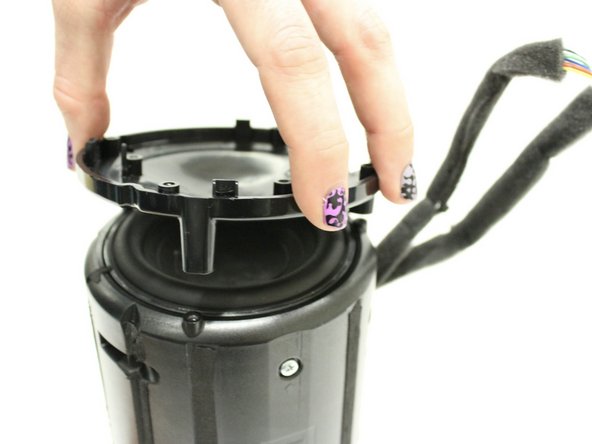
    • Remove the Port Panel exposing the subwoofer.

  7. Samsung Radiant 360 R1 WiFi Module Replacement: étape 7, image 1 de 3 Samsung Radiant 360 R1 WiFi Module Replacement: étape 7, image 2 de 3 Samsung Radiant 360 R1 WiFi Module Replacement: étape 7, image 3 de 3
    • Remove the eight (9.5mm x 1.6mm) PH1 Phillips screws on the right side of the speaker body.

    • Remove the one (9.5mm x 1.6mm) PH1 Phillips screw on the left side of the speaker body.

    • The body sides are denoted with a "R" and an "L" for right and left sides.

  8. Samsung Radiant 360 R1 WiFi Module Replacement: étape 8, image 1 de 1
    • Open up the body to expose the inner panel and motherboard.

  9. Samsung Radiant 360 R1 WiFi Module Replacement: étape 9, image 1 de 3 Samsung Radiant 360 R1 WiFi Module Replacement: étape 9, image 2 de 3 Samsung Radiant 360 R1 WiFi Module Replacement: étape 9, image 3 de 3
    • Remove the ribbon cable from the tweeter which is attached to the main motherboard.

    • Slide the tweeter out of the enclosure.

  10. Samsung Radiant 360 R1 WiFi Module Replacement, Bluetooth Module: étape 10, image 1 de 1
    • Slide rubber grommet out of slot on plastic housing.

    • This may have occurred naturally when separating the two halves.

  11. Samsung Radiant 360 R1 WiFi Module Replacement: étape 11, image 1 de 3 Samsung Radiant 360 R1 WiFi Module Replacement: étape 11, image 2 de 3 Samsung Radiant 360 R1 WiFi Module Replacement: étape 11, image 3 de 3
    • Disconnect white connector by pushing down on the release tab while gently pulling the connector free from the socket.

    • Remove wiring harness and set aside.

    • The other connectors in the wiring harness should already be free from previous steps.

  12. Samsung Radiant 360 R1 WiFi Module Replacement: étape 12, image 1 de 2 Samsung Radiant 360 R1 WiFi Module Replacement: étape 12, image 2 de 2
    • Locate and remove the two PH2 Phillips screws from the base of the motherboard assembly.

    • These screws may be extremely tight. Be careful not to snap the plastic when removing the screws.

  13. Samsung Radiant 360 R1 WiFi Module Replacement: étape 13, image 1 de 2 Samsung Radiant 360 R1 WiFi Module Replacement: étape 13, image 2 de 2
    • Flip the motherboard assembly over and locate the Bluetooth module on the side of the metal frame.

    • Remove the one PH2 Philips screw.

  14. Samsung Radiant 360 R1 WiFi Module Replacement: étape 14, image 1 de 1
    • Press the white tab while gently pulling the Bluetooth module away from the connector and frame.

  15. Samsung Radiant 360 R1 WiFi Module Replacement, WiFi Module: étape 15, image 1 de 3 Samsung Radiant 360 R1 WiFi Module Replacement, WiFi Module: étape 15, image 2 de 3 Samsung Radiant 360 R1 WiFi Module Replacement, WiFi Module: étape 15, image 3 de 3
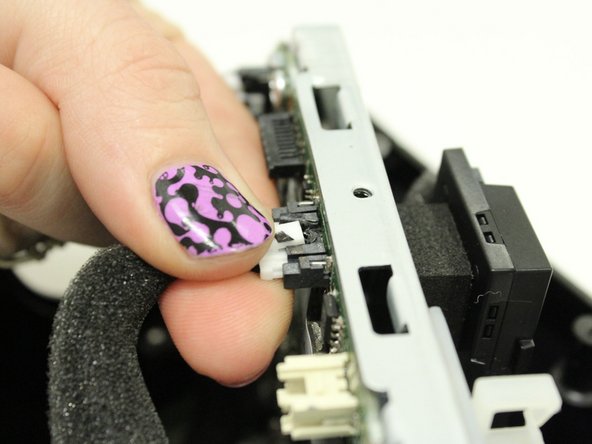
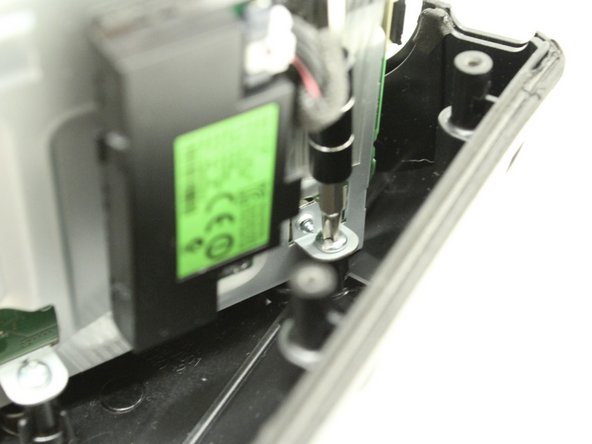
    • Disconnect cable from WiFi module.

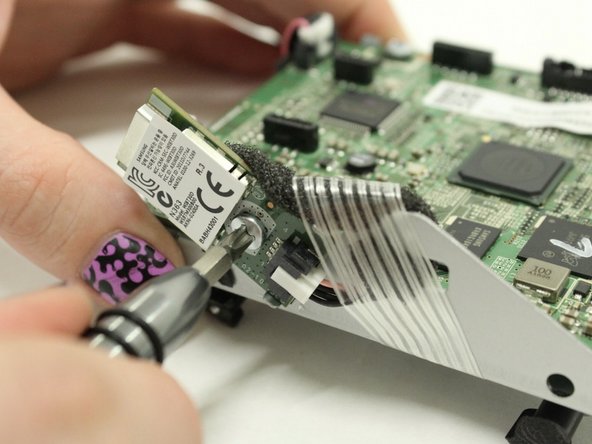
    • Flip the motherboard assembly over and locate the black WiFi module.

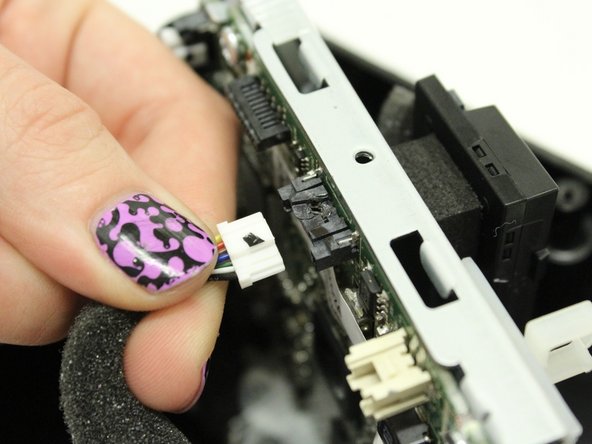
    • Press the white tab on the connector while gently pulling on the connector to disconnect it.

  16. Samsung Radiant 360 R1 WiFi Module Replacement: étape 16, image 1 de 1
    • Remove the one PH2 Phillips screw from the WiFi module.

  17. Samsung Radiant 360 R1 WiFi Module Replacement: étape 17, image 1 de 2 Samsung Radiant 360 R1 WiFi Module Replacement: étape 17, image 2 de 2
    • Use a flat prying tool to cut under the foam holding the WiFi module to the motherboard assembly.

    • As the foam begins to separate, pull upwards on the WiFi module to keep it from sticking back down.

Conclusion

To reassemble your device, follow these instructions in reverse order.

Aaron Bristow

Membre depuis le 09/21/17

406 Réputation

3 tutoriels rédigés

Équipe

Washington State, Team S5-G121, Phelps-Hillen Fall 2017 Membre de l'équipe Washington State, Team S5-G121, Phelps-Hillen Fall 2017

WSU-PHELPS-HILLEN-F17S5G121

4 membres

3 tutoriels rédigés

Un commentaire

Hi,

I am new here. You did an excellent job! I would like to know the point of removing the wifi module. Is it to replace it? If you were to replace it, where would you buy the part? Also, I do not have the R1. I have the R7. Do you know if it is similar? Thanks very much

Alex

Alex Duong - Réponse

Ajouter un commentaire

Nombre de vues :

Dernières 24 heures : 0

7 derniers jours : 1

30 derniers jours : 4

Total : 746