Introduction
I repaired a couple of screen replacements for the Samsung Note 20
I did one that needed a back glass and one that did not.
Created a custom back glass to troll my older brother for not having a case on a brand new phone. The replacement screens had not even been created yet until now we waited for 3 weeks!
Ce dont vous avez besoin
Vidéo d'introduction
-
-
On this Note 20 the OLED is clearly broken and has a crack on the side.
-
The back has no damage to it so apply heat.
-
-
-
Start from the buttom straight up and down push tool in until you hit the frame you while hear a sound
-
Slide tool at angle stop at the curve
-
-
-
After loosening the buttom pull tool out.
-
Now pry with your fingers and pull up with suction cup.
-
While sticking splicer on curved edge side slowly working wiggling down the curve edge
-
Lift and wiggle the back glass off
-
-
-
Remove 6 PH000 Screws from the wireless charging pad covering the battery connection.
-
Disconnect wireless coil from connections with plastic spudger
-
Use spudger at top on the metal squeezing it under the top of the wireless charging pad bracket.
-
Lift and wiggle slowly the charging pad off while locating the battery connection
-
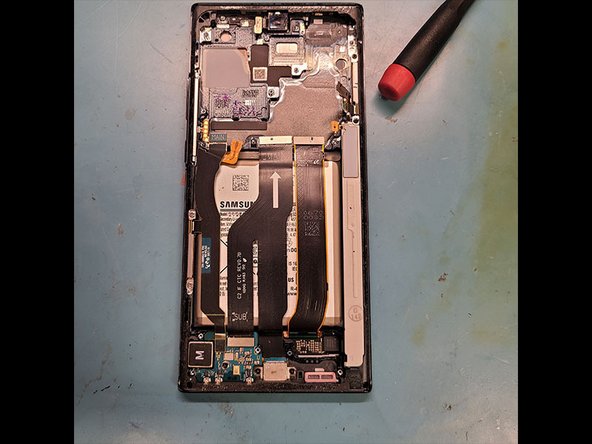
Battery Connection!!
-
-
-
Remove 4 PH000 Screws to the ear speaker bracket.
-
Also disconnect this connection!
I have another couple pictures that did not make it to the guide that the screws just disintegrated and stripped out where I dremmeled the brand new Note20 Ultra lol
I believe that is the connection for the Laser AF sensor and flashlight. I think the earpiece speaker connection is right by the earpiece on the bottom of that bracket.
-
-
-
-
Make sure its disconnected
-
Disconnect all yellow boxed connections!
-
Remove the 2 PH000 Screws holding the camera
-
Lift mainboard with spudger from ear speaker goin down using the frame as a leveler
-
-
-
Front Camera Location
-
Use straight edge blade at bottom of camera to break it loose. You can actually pull the glue/adhesive out it will come out in one chunk.
-
Lift camera out slowly
-
-
-
Remove 2 black PH000 Screws on top right lifting flex out.
-
Remove 2 PH000 Screws on Bottom right lift flex out.
-
-
-
Lay the main board down in new frame
-
Insert the front camera after laying the board down
So when your laying it into the new frame, that the front part with the new glass and such? I'm just making sure I'm picturing this in my head correctly. I'm contemplating trying this but making sure I fully understand before I even think about attempting it. I guess I always thought when you opened the phone, the glass and front would come off and then you would have the parts and body of the phone in the back side frame. But here it is opposite where the back just comes off and the body is in the front frame. Correct? Im sorry, I probably sound so stupid. But I'm just double checking. Sorry this became so long and thank you for your time. :-)
- Jamie
Depends on which Samsung your working on but this is the best way if you do just screen you would still have to take apart whole device to ensure you don't short circuit anything you must unplug battery!
Samsung A50 i think is a screen 1st if device is off or
-


During this repair on the black Note 20 Ultra I noticed the screen looked refurbished had issues with screws being stripped I did some serious work drilling into the phone. Which is not included in this guide.
Before I worked on the phone that had the stripping screw issue I already had worked on the phone which I made a video and had not issues with screws stripping the phone I did the picture guide was clearly refurbished straight talk phone.
Annulation : je n'ai pas terminé ce tutoriel.
10 autres ont terminé cette réparation.

8 commentaires
I did the repair and ran into issues with the REAR camera. I retraced all my hardware. its all connected. the selfie cam works. nothing got disconnected when I removed the mother board. i’ve tried to reset app cache
help plz
Do you have all the screws back in with the speakers and wireless charger coil on the phone?
Stow -
Rear camera hmm did you try repeating the connection did the cameras work before repair?
Thanks for the effort here with the guide. Unless I am missing something (lol) where is the part of the screen replacement (by screen = the display screen, right?) I see the back replacement here. You do mention the OLED screen being broken at the beginning but the guide is for the back replacement, right? (not as title suggests ‘screen replacement) Sorry maybe am wrong here.
He transfered anything from the original phone to the new sreen/frame assembly.
Thanks Daniele - this had me confused “I repaired a couple of screen replacements”…and the sentence after that. Ok, so he took the back, board, battery etc from the one with the broken screen and mated it with a new screen. So one has to assume that somewhere in step 16 is the connection with the screen flex cable. Looking to see if just the screen is cracked, does the whole disassembly need to be done? (starting from the back working way to the front)? (think it is lol but hoping asking, as videos I have seen address broken screen (not just glass cracks) replacements-maybe the glass and the digitizer are fused?) thanks
In step 14 he starts to speak about the new frame (that include the new OLED panel and digitizer). Replacing only the glass is a bit difficult and you may broke the OLED too if you are not extra careful. You have to do the same that hr did for the back glass (better if you use an opening pick and you heat the side you are working on before you insert the pick, for each side, and you do not insirte the pick more than 1 or 2 mm). If you manage to do that, you can save a lot of money, else you have to buy a new oled too. So, i will suggest you to try to remove the glass without broking anyting, then try to turn the phone on to see if you broke thee oled. Finally, you decide what to buy based on what’s broken.
Highly recommend not doing the screen repair without frame assembly but you can do it just have high chance of screen falling off, or cracking oled when claping it down