Aller au contenu principal

Shark Rotator Powered Lift-Away Head Nozzle Disassembly

Conditions préalables uniquement
Ce tutoriel est uniquement destiné à être utilisé comme prérequis d'autres tutoriels. Il ne se suffit pas à lui-même.

Ce dont vous avez besoin

  1. Shark Rotator Powered Lift-Away Head Nozzle Disassembly, Shark Rotator Powered Lift-Away Head Nozzle Disassembly: étape 1, image 1 de 2 Shark Rotator Powered Lift-Away Head Nozzle Disassembly, Shark Rotator Powered Lift-Away Head Nozzle Disassembly: étape 1, image 2 de 2
    • Push lift away button and pull the handle up to separate the body from the wand section.

  2. Shark Rotator Powered Lift-Away Head Nozzle Disassembly: étape 2, image 1 de 1
    • Push lift away button on the wand then lift up on the top section to separate.

  3. Shark Rotator Powered Lift-Away Head Nozzle Disassembly: étape 3, image 1 de 2 Shark Rotator Powered Lift-Away Head Nozzle Disassembly: étape 3, image 2 de 2
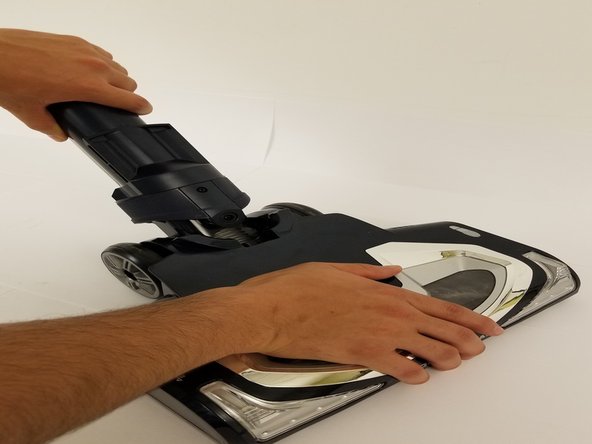
    • Tilt the wand shaft backwards for convenient.

  4. Shark Rotator Powered Lift-Away Head Nozzle Disassembly: étape 4, image 1 de 2 Shark Rotator Powered Lift-Away Head Nozzle Disassembly: étape 4, image 2 de 2
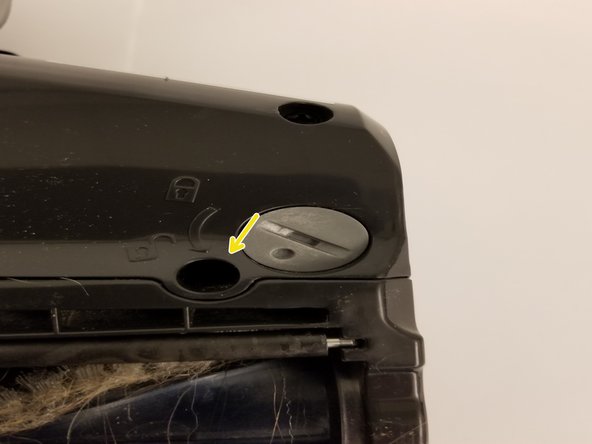
    • Lay the head nozzle piece upside down.

    • Locate and rotate the three gray taps to the unlock position.

  5. Shark Rotator Powered Lift-Away Head Nozzle Disassembly: étape 5, image 1 de 1
    • With your fingers, pry and pull the brush cage open.

  6. Shark Rotator Powered Lift-Away Head Nozzle Disassembly: étape 6, image 1 de 2 Shark Rotator Powered Lift-Away Head Nozzle Disassembly: étape 6, image 2 de 2
    • Remove the 13 screws (circled in yellow) using a phillips screwdriver.

    • Be sure to keep track of which screws go into which hole.

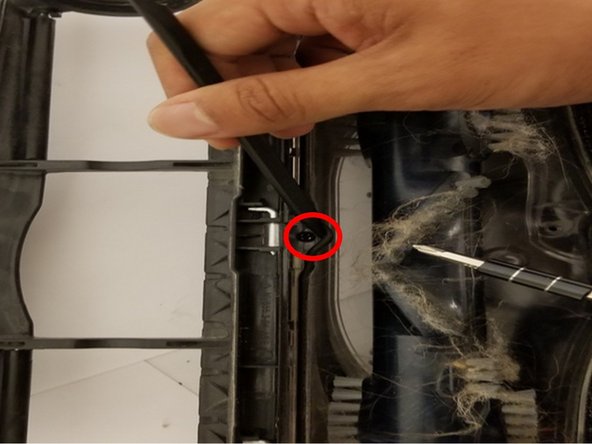
    • Remove the one screw (circled in red) that has a Torx head.

    • The Torx screw is hidden under a rubber gasket. Carefully, lift up the gasket without damaging it to access this screw.

  7. Shark Rotator Powered Lift-Away Head Nozzle Disassembly: étape 7, image 1 de 1
    • Lift up the top cover now that all of the screws have been removed.

Conclusion

To reassemble your device, follow these instructions in reverse order.

Une autre personne a terminé cette réparation.

Dan lee

Membre depuis le 09/27/17

101 Réputation

1 tutoriel rédigé

Équipe

Cal Poly, Team S9-G3, Banghart Fall 2017 Membre de l'équipe Cal Poly, Team S9-G3, Banghart Fall 2017

CPSU-BANGHART-F17S9G3

4 membres

12 tutoriels rédigés

0 commentaires

Ajouter un commentaire

Nombre de vues :

Dernières 24 heures : 0

7 derniers jours : 2

30 derniers jours : 2

Total : 69