Aller au contenu principal

Shark Rotator Powered Lift-Away Roller Brush Replacement

Ce dont vous avez besoin

  1. Shark Rotator Powered Lift-Away Roller Brush Replacement, Shark Rotator Powered Lift-Away Head Nozzle Disassembly: étape 1, image 1 de 2 Shark Rotator Powered Lift-Away Roller Brush Replacement, Shark Rotator Powered Lift-Away Head Nozzle Disassembly: étape 1, image 2 de 2
    • Push the lift away button and pull the handle up to separate the body from the wand section.

  2. Shark Rotator Powered Lift-Away Roller Brush Replacement: étape 2, image 1 de 1
    • Push lift away button on the wand then lift up on the top section to separate.

  3. Shark Rotator Powered Lift-Away Roller Brush Replacement: étape 3, image 1 de 2 Shark Rotator Powered Lift-Away Roller Brush Replacement: étape 3, image 2 de 2
    • Tilt the wand shaft backwards for convenient.

  4. Shark Rotator Powered Lift-Away Roller Brush Replacement: étape 4, image 1 de 2 Shark Rotator Powered Lift-Away Roller Brush Replacement: étape 4, image 2 de 2
    • Lay the head nozzle piece upside down.

    • Rotate the three gray taps to the unlock position.

  5. Shark Rotator Powered Lift-Away Roller Brush Replacement: étape 5, image 1 de 1
    • With your fingers, pry and pull the brush cage open.

  6. Shark Rotator Powered Lift-Away Roller Brush Replacement: étape 6, image 1 de 2 Shark Rotator Powered Lift-Away Roller Brush Replacement: étape 6, image 2 de 2
    • Remove the 13 screws (circled in yellow) using a phillips screwdriver.

    • Be sure to keep track of which screws go into which hole.

    • Remove the one screw (circled in red) that has a Torx head (might be Phillips head on some models).

    • The Torx screw is hidden under a rubber gasket. Carefully, lift up the gasket without damaging it to access this screw.

    • Remove the horizontal screw (circled in orange) that attaches the gray side panel (necessary to remove the white cap on the roller brush in step 8)

  7. Shark Rotator Powered Lift-Away Roller Brush Replacement: étape 7, image 1 de 1
    • Lift up the top cover now that all of the screws have been removed.

  8. Shark Rotator Powered Lift-Away Roller Brush Replacement, Roller Brush: étape 8, image 1 de 1
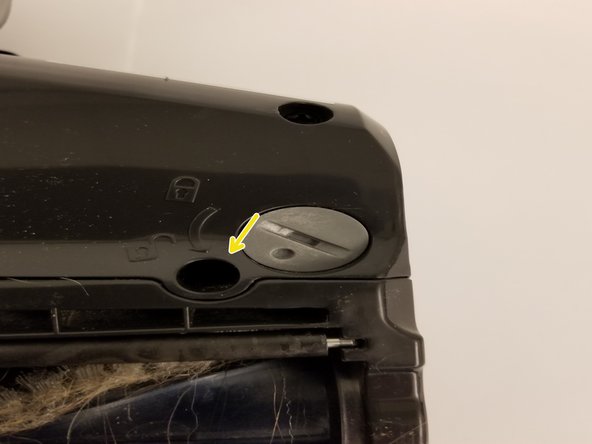
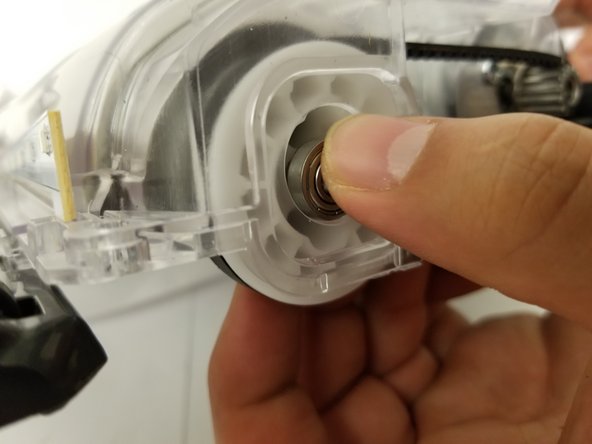
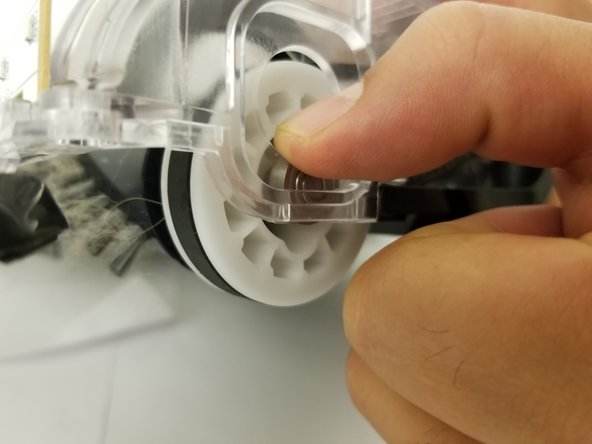
    • Remove white cap with a Flathead screwdriver or any other wedge-like tool.

  9. Shark Rotator Powered Lift-Away Roller Brush Replacement: étape 9, image 1 de 3 Shark Rotator Powered Lift-Away Roller Brush Replacement: étape 9, image 2 de 3 Shark Rotator Powered Lift-Away Roller Brush Replacement: étape 9, image 3 de 3
    • Gently push piece in.

    • Pull piece down and out of the container.

  10. Shark Rotator Powered Lift-Away Roller Brush Replacement: étape 10, image 1 de 1
    • Turn vacuum head over to remove brush.

Conclusion

To reassemble your device, follow these instructions in reverse order.

12 autres ont terminé cette réparation.

Cameron Ngai

Membre depuis le 09/27/17

718 Réputation

3 tutoriels rédigés

Équipe

Cal Poly, Team S9-G3, Banghart Fall 2017 Membre de l'équipe Cal Poly, Team S9-G3, Banghart Fall 2017

CPSU-BANGHART-F17S9G3

4 membres

12 tutoriels rédigés

19 commentaires

Where do you get the rotator brush? All I can find are the two for the Navigator.

Dave - Réponse

Same. Need a new brush bar.

Michael Brennan - Réponse

I appreciate the info you had posted. It was easy to follow and helped me to save money on buying a new vacuum!

Ah Sum Taeza - Réponse

I have the same question. Where can I find the brushbar to the Shark Rotator Professional lift-away mv650?

i’m getting a little frustrated because my carpet’s pile is not getting lifted and cleaned.

Venette

7 August 2019

crazeeincc - Réponse

Does anyone get a reply?

crazeeincc - Réponse

Ajouter un commentaire

Nombre de vues :

Dernières 24 heures : 13

7 derniers jours : 146

30 derniers jours : 706

Total : 45,028