Introduction
Le SodaStream Source carbonate l'eau, et ajoute des saveurs grâce à sa buse. Cette buse dispose d'un joint en caoutchouc qui permet de prévenir les fuites et de stabiliser le bloc de gazéification. Si le joint est endommagé, son remplacement arrêtera les fuites lors de la création de votre soda. Pour remplacer ce joint, un démontage interne et externe est nécessaire. Ce tutoriel vous montre comment accéder et retirer un joint endommagé.
Ce dont vous avez besoin
-
-
Retirez la bouteille de soda ainsi que la cartouche de CO2 de la machine.
-
-
-
Retirez les quatre vis de 17,8 mm de la base inférieure en métal en utilisant un tournevis cruciforme #1.
-
-
-
Retirez le couvercle extérieur du devant de l'appareil.
We are working on that for the last two hours without succcess. The boytom seems to slide out, but the top is totally stuck.
Hey Robert Coles, I figured it out. It wants to slide out backwards. You’ll notice the bottom wants to come out but the top is stuck. There is a sturdy plastic catch at the top, I managed to dislodge it by inserting a flathead screwdriver and giving it a little twist while pulling the housing away at the same time. I hope this helps! -jt
I have the same problem.
I’m stuck here too. I’ve pulled a lot of things apart but this has got the better of me. I can’t even get the bottom to slide. I love the way his hands are delicately poised to gently lift the back off. I’ve tried pulling so hard I’m frightened of breaking it. Pity. Such a good, well thought out manual otherwise. Stuck on step 3
used two thin wood skewers to break the hold on the top. Slid them in each about 1/2” from the enter. finally released.
Brian’s comment is excellent. The only additional piece of information is that the skewers should be inserted from the back. The catch is in the middle near the back. I inserted from the front which was wrong, but still worked. I left a couple of very fine marks that I think would not happen if inserted from the back.
This step was unnecessary. I was able to slide off the front panel without pulling the outer cover off.
Same for me. Jump to step4/5 first to see if it's even necessary.
jwitt72 -
there might be different variations within the same “model”. in my case (source), i realized that there is a tab at the top of of the housing. i pulled upwards the top of the housing, and was able to slide the housing backwards. there were 2 pairs of tracks on the sides of the housing that i thought they might have latches, but they were only guides to slide the housing. i do not how to share pictures here to show my steps
This step was a real bugger. What helped was sliding a medium putty knife between the top and inner piece. The plastic snap is very near the back. They are right above the small “point” in the centre of the mechanism below it. Takes patience and let the plastic give way in time. I thought for sure I was going to bust it, and then it finally slid out like magic.
This step is only useful if you need to retension the two springs that lift the head and releases the pressure so that you don't have to lift it manually to get the bottle out.
There are definitely different model variations. The outer metal case on my 2013 is split at the bottom as in this guide. The plastic case on my 16/17 is different an has the catch at the top rear as discussed in this thread. A gentle push up with my thumbs was enough to release it.
There is no need for steps 1, 2 and 3. Start at 4, and just remove the two screws from the front square that you push down. Use a tool to firmly pull the cover off and go ahead and replace the battery. Put back the cover, the two screws and you are done!
-
-
-
Retirez les deux vis de 18,2 mm de la base du capot avant à l'aide d'un tournevis cruciforme #1.
-
-
-
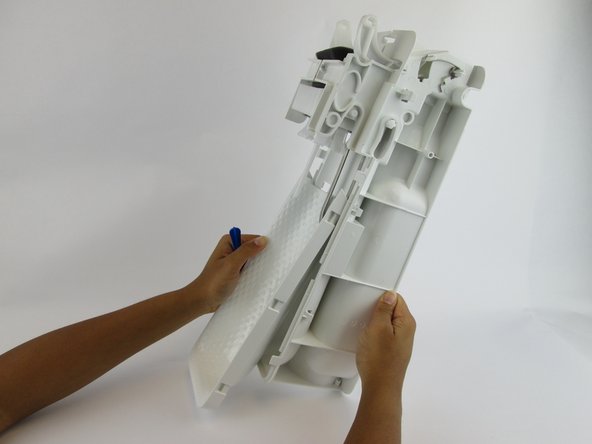
Tirez fermement sur le couvercle avant pour le retirez.
The plastic spudgers that are supplied for mobile phone or tablet screen removal are perfect for this job. Use 2 - 1 on each side.
Once the 18.2 mm screws are removed, I just pulled the black plastic outer cover a couple mm away from the white plastic internal block on each side to release 4 of the 6 plastic catches, and then rotated upward to release the last 2 plastic catches.
Note for the SodaStream Source model that doesn't have a battery: The contents of the electrical unit will come off along with the cover itself. The connecting wires are short and won't allow removing the cover as shown here. Disassemble carefully so as to not damage the wires.
This model looks slightly different than the one shown in this guide: there are three horizontally placed buttons along the top edge, used to select the degree of carbonation and to start the process. -
-
-
Retirez la barre dorée, située en haut de l'appareil, en la poussant hors du bloc de carbonation.
We could,remove this covee, without sliding the assembly out ofbthe case. There was NO gold bar in the system…
-
-
-
Faites glisser le couvercle de batterie, jaune, vers le haut puis retirez-le vers vous.
Careful! I had springs and retainers go flying on this step
Yep…same here. Took me a good minute to figure out where they came from!?
Fun fact: The lights on the SodaStream are simply a timer. They are in no way linked to a pressure gauge. If you want more bubbles it doesn't mean you have to press on the activation mechanism harder. you can press gently and just wait longer. This way the water will not spill out over the top and leak all over the table. Ignore the lights and just wait for the safety release valve to activate as you are filling the bottle. that's how you know you have reached the limit.
-
-
-
-
A l'aide d'un outil d'ouverture en plastique ou d'une spatule en nylon, retirez la pièce en plastique située à l'avant du bloc de carbonation, de chaque côté de l'appareil.
-
-
-
Retirez l'oval en plastique et le ressort qu'il contient.
Do not have this piece on mine?
nor do I. They must have made some changes.
Scott -
This piece exists on my 2013 metal chassis version, but not on my 2016/17 plastic chassis.
-
-
-
Retirez les 3 vis de 17.9 mm situées sur le côté droit.
Should this be four screws? I followed all directions (I think) and had one extra screw to remove, just above the bottle mount, before I could split the two halves apart
Yes I had a 4th screw at this step too. Going backwards the missing fourth screw in the instruction messed me up and I had to redo it!
Yes the 4th screw still isn't mentioned - and just below it is the rare-earth magnet that can fall out when the halves are separated. This magnet activates the LEDs when the carbonating block is pushed down - no magnet, no lights.
-
-
-
Saisissez les parties droite et gauche de l'appareil et en tirant, séparez les en deux parties identiques.
what happens to the middle white piece?
Yeah there's a step missing here…between 17 & 18
Is it better to lay it on its side?
I hope someone will document the missing step of what it looks like if you separate the halves without having all the parts fall out.
What does it look like and where do they go? Kinda' important for reassembly.
I've added a photo to this step showing just this, fingers crossed it gets approved
Liz - would you post a link to your pic here so we can see it even though it's not approved yet?
Joe -
Re: "missing step"
On the newer models, (at least 2016/17) the valve is attached to the left side and it's two Phillips head screws must be removed.
These instructions are correct for earlier models where the valve is in the middle, so there is no missing step.
Thanks to this guide, I’ve taken a part my SodaStream Source a few times now. Like others have mentioned, during reassembly, this step tripped me up every time. It’s definitely missing details about the part orientation. I took some additional photos in efforts to help others. Please find the album here.
Thanks Mitch!! That's exactly what I needed! been pulling my hair out trying to figure out how that white piece went back in.
You’re very welcome! I’m so glad it helped you out!
Mitch -
-
-
-
Tirez le bloc en mousse vers le haut et enlevez le de la partie avant du bloc de carbonation.
Any source for spare parts known? Ebay and Amazon does not help here!
The part on mine that was broken is the plastic cap/nut that connects the black hose to the canister holder.
Going to try and superglue it. Wonder if there's a source for this nut?
I wish it was that simple. The hose has a brass ferrule crimped on it, and the nut cannot be replaced without being able to remove and crimp a new ferrule to the (new?) hose. I have found a listing (eBay Europe?) for a split brass nut that allows replacement, but...
-
-
-
Retirez la languette de chargement de l'ensemble avec le tube de carbonation.
-
-
-
Retirez le joint en caoutchouc de la buse, et remplacez-le par un nouveau joint.
Hallo
wo kann ich mit welcher Ersatzteilenummer diese Dichtung kaufen?
Anyone have a link on where to buy a seal????
My screw driver pulled a tiny silver magnet from somewhere in the last step. Any suggestions where this came from
This is a rare-earth magnet that triggers the LED circuit when the carbonating block is pushed down. The LED lights will not work without it. The magnet slots into a cavity just below the screw that holds the 2 halves of the unit together at the front (approximately level with the operator's thumbs in Step 17 pic). NOTE: there appears to be no mention of removal of this screw in the guide. The magnet is only accessible when the halves are separated. I replaced one recently that had reduced magnetism due to corrosion, probably from fluid escaping past the internal rubber seal. And no, I don't know where to buy the seals - the web is flooded with seals for the gas bottle but not this one.
Super tuto merci je ne pensais pas qu’il fallait autant en démonter !
Where can I get the internal gasket?
-


Pour rassembler votre SodaStream, suivez les instructions dans l'ordre inverse.
Pour rassembler votre SodaStream, suivez les instructions dans l'ordre inverse.
Annulation : je n'ai pas terminé ce tutoriel.
29 autres ont terminé cette réparation.
Merci à ces traducteurs :
100%


Ces traducteurs nous aident réparer le monde ! Vous voulez contribuer ?
Commencez à traduire ›
Équipe

USF Tampa, Team S1-G4, Leahy Spring 2017 Membre de l'équipe USF Tampa, Team S1-G4, Leahy Spring 2017
USFT-LEAHY-S17S1G4
3 membres
40 tutoriels rédigés
50 commentaires
I’ll ask the same question as the gentleman above. Where can I purchase the rubber gasket seal? I cannot find it anywhere online. I would also like to purchase the gas delivery tube and is installed.
Thank you
Peter (USA)
Our sodastream does not work anymore. It’s the electrick model with three different gasfillings. When you put the waterbottle into the filling station and then you turn your suitably filled bottle down and you try to push some of those lights (- /--/ ---) for to fill your bottle, it sounds like little choked “puff” and then all lights are blinking (I think they tell mailfunction). No gas comes. I have changed new and stuffed gasbottle, power cable is its place and works. So what’s wrong? Thank You allready, Juha Heikkilä (Finland).
I can’t remove the outer cover, step 3.
I am also looking for a gasket. Do you have any advice?
You have to make your own gasket using a 3d printer. sodastream will not sell you any internal parts. They consider all soda makers disposable!!!
Where do I get the rubber????? The only think that I wil find is this https://www.aliexpress.com/wholesale?cat...
I thought so too - but then send you little black washer dealies and not the inner gasket.
You should show the answers. Where do I get the seal
I do not see any answers. Hopefully there were some. I have the same question: where can I buy the infamous “internal rubber seal”? Awesome step-by-step guide.
I have just had a conversation on FB with SodaStream UK re obtaining these gaskets, but apparently they don’t want to help. Their customer support person even told me that replacing one is ‘not safe’. I’m sure they’d much rather sell you a new machine, which would be much safer for their profit margins.
Here’s a replacement part:
If I can pull this whole thing off (and back on and assemble) that will be ACHIEVEMENT!
Started reminding me of watching an excellent video (BTW) of a guy tearing down and rebuilding a vehicle’s transmission…..kind of exaggeration:)
Thanks for posting this wonderful step-by-step! Great diagram and details*
Where can you buy the rubber seals?
For what it’s worth does anyone know where to get a gasket/washer that is in the back of the unit that holds the Co2 container by twisting it in to that mechanism? I know i came close to finding at Home Depot but the center was too solid and it wouldn’t fit properly, This is and has been something else to find any info. or parts or the exact measurements of same. Mine’s the Source model but I take it they are all pretty much the same size to fit the co2 container.
What’s the point with this repair guide if you don’t explaine where a new seal can be purchased from?
I’ve completed all the steps and found neither washer was damaged. I am now trying to reverse the steps and stuck between 17 and 18 - I am unclear where all the “internal components” go. Anyone know where to get photos of this?
The Real Fix (Very Simple and costs nothing)
If your machine no longer carbonates, stick a sewing needle in the end hole on the white tube. Make the hole SLIGHTLY wider and it will work again. DO NOT MAKE THE HOLE TOO BIG OR YOU WILL HAVE SODA TOO CARBONATED AND WATER WILL SPRAY EVERYWHERE.
FYI, You can not buy the rubber ring or the white tube. SodaStream makes you buy the entire carbonator, about 90 Dollars. It has many part numbers: W10639752, W10645558, W42105377. Also, the SodaStream carbonator unit is the same in the SodaStream model and the Kitchenaid model.
Where to buy the big black washer ? Soda Stream South Africa basically lied to me saying they are not removeable !!!
Und wo bekomme ich diese Dichtung her?
Genau das suche ich auch
schon fündig geworden? bin auch auf der suche .. wenn alle Stricke reißen druck ich mir mit meinem 3D Drucker eine Negativ Form und mach die aus Silikon!
Amazing how useless this iFixit page is because nobody cares to answer the simple question of where to get the replacement gasket. Wasted my time here.
Couldn’t agree more.
Alles schön und gut, aber wo kann ich die dichtung kaufen?
Nur Werkzeuge werden zum Kauf angeboten.
Grüße Schmidt Jörg aus Leverkusen.
Nice instruction - this works for the later model Fizzy as well. They are not exactly the same but just use your head and they are close enough. Since there are no replacement gaskets available (yet) I found a trick that works. My problem was the gasket was not making contact with the bottle anymore so it just blew co2, air, and water right out the bottle. What worked for me is to notice the gasket has the outer part that would presumably just touch the bottle then the gas will inflate it a little to make a decent seal. With the gasket on the white plastic part take 3 fingers from each hand and carefully peel that outer part of the gasket upward sort of turning it inside out, then with it in that position, insert it into the bottle and let it sit there overnight. That will stretch it outward, then when you put it all back together it actually seems to work just fine. NOTE: This worked for the fizzy - I don’t know if the gasket is the same in this model. What he is holding in his hand it looks a bit different than mine.
Need to get washer where the tank screws in.
I’ve contacted the Soda Stream importer in New Zealand, asking for a replacement seal and was told:
“All the parts are integral to the Sodastream unit and as such there are no spare parts available and no authorised service agent.”
So my Stream with a faulty seal is junk. I can’t find anything that looks right on the usual Aliexpress-type sites either.
Ridiculous how the soda stream is advertised as an environmentally friendly alternative to bottled water and then dont even offer the most essential spare parts. can’t find the required washer anywhere.
https://www.kegland.com.au/seal-kit-for-...
I just ordered one. I'm hoping it's the right part. Looks the same
Did this work?
That’s the kit for using the gas bottle for a keg set up. I too am looking for the seal we all need. Just might try glueing a very thin piece of rubber under the said seal to make it more proud.
Hallo, guten Morgen, bin Eurer Anleitung gefolgt, bei meinem Gerät ist nicht die Dichtung zu erneuern, sondern ich suche den internen ca. 15 cm langen co2 Verbindungsschlauch, da eines der beiden Schraubgewinde gerissen ist. Vielleicht könnt ihr mir helfen, wo genau bekommt man einen solchen Ersatzschlauch? Liebe Grüße Herbert Witzany h.witzany@googlemail.com
Please buy new Sodastream unit it come with new gasket. Smile
Ebay has the seals.
No. As far as I can see, eBay has only seals for the CO2 bottle connection, not the tapered seal for the soda bottle.
Has anyone found the tapered seals for the water bottle ?
No I’m still looking it’s scandalous throwing all that plastic away for a little rubber gasket. Shame on Soda Stream. If I have to replace it I will not be buying Sodastream it will be an alternative manufacturer!
Does anybody know where to buy the rubber seal?
I didn't need to replace the rubber gasket at all. My model is a slightly different SodaStream Source - one without a battery unit that receives power through a wall outlet. The problem: loud noise when operating the machine and almost no carbon in the water.
In my case the cause was that the rubber gasket had gone off center. The spout/tube part is supposed to be asymmetrically positioned, pointing slightly away from the machine. Everything else should look symmetrical: the black circle of rubber should be smack bang in the center of the white plastic opening, viewed from below.
I fixed this by disassembling the machine until I could access the six screws shown in step 19 and remove the rubber seal. There was some minor debris on it, which I cleaned off, but other than that the seal was in perfect condition. Once I repositioned the seal, the machine started working perfectly again. I've used it almost daily for 5+ years so I don't expect to have to replace the seal any time soon, if ever.
Some notes on disassembly of this different model. The part that's in place of the battery unit can't be fully detached as shown. There are short wires running through on the top side that could get damaged if you pull too carelessly. Pull off the lower side first, then the top side using more care. I was able to access the rubber seal by leaving this unit hanging over the top side while dismantling the lower parts.
I didn't have to fully detach the two sides of the body, but I did have to take out the attaching screws to bring them apart slightly (four screws in my case, not three as stated in step 13). Some parts are different than on this guide, but dismantling was not super complicated using common sense.
When reassembling the thing, I recommend keeping the loader tab tilted forward until all the parts shown in step 10 and 16 have been put back in place. I accidentally tilted the tab in without them in place and couldn't bring it back forward again without taking the body apart once more.
Where can I get the internal gasket?
I my case, I thought it was the seal then realized the center white nozzle came slightly unscrewed. Tightened it and everything fine afterwards. This definitely will not solve everybody's problem, but check it out first!
My machine is overflowing when i put gas
Elaine Anja - Réponse
Does this article apply to the Fizzi too?
When I look at my Fizzi (that I bought secondhand), it does not have any black seal like the one shown in this article.
Greg Harrington - Réponse
Parts are not specified - why? You would need a replacement circuit board (PCB, not a "chip")/battery holder assembly, if indeed that has failed.
Malcolm Noble - Réponse
IMPORTANT! Don’t use Philips screwdriver size PH1, it’s too small and will damage the screws. The correct size is PH2. This goes for all screws on this machine.
Charles Greneby - Réponse