Aller au contenu principal

Sonos Play 5 Disassembly

Tutoriel Archivé
Ce tutoriel est conservé uniquement à des fins de suivis historiques. Utilisez la version actuelle du tutoriel pour effectuer votre réparation.

Ce dont vous avez besoin

  1. Sonos Play 5 Disassembly, Sonos Play 5 Disassembly: étape 1, image 1 de 3 Sonos Play 5 Disassembly, Sonos Play 5 Disassembly: étape 1, image 2 de 3 Sonos Play 5 Disassembly, Sonos Play 5 Disassembly: étape 1, image 3 de 3
    • Use the metal spudger to pry open the front grill. Little force will be needed to wedge the metal spudger into the crevice.

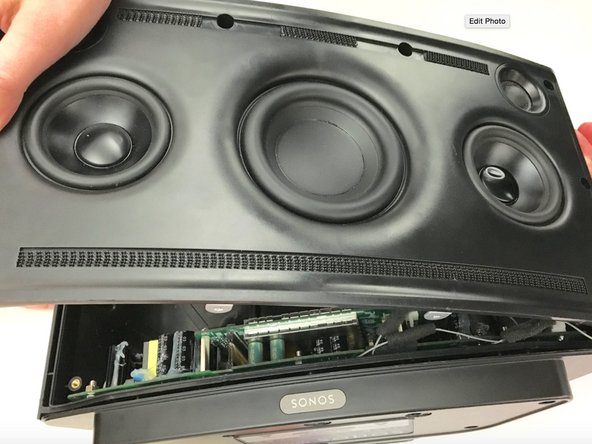
    • After the grill has been loosened on all edges. Use your fingers as a wedge and gently pull the grill off the speaker. This will reveal the front speaker panel.

  2. Sonos Play 5 Disassembly: étape 2, image 1 de 3 Sonos Play 5 Disassembly: étape 2, image 2 de 3 Sonos Play 5 Disassembly: étape 2, image 3 de 3
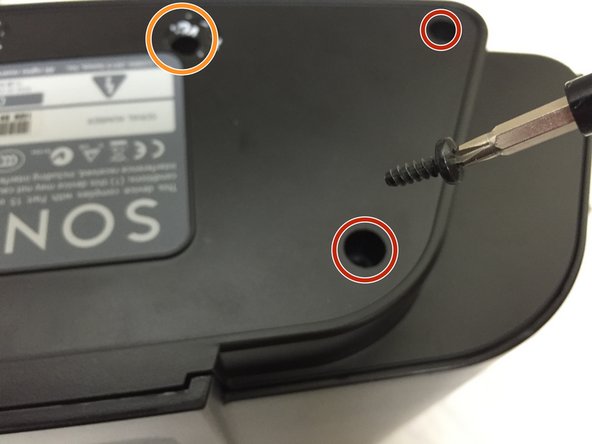
    • Use a pointed metal spudger to remove the rubber plugs covering the screws in the bottom left and right corners of the speaker panel.

    • Insert the spudger against the side of the rubber plug and the speaker panel while leveraging upward.

    • Remove the eight 12 mm Phillips #1 screws bordering the front speaker panel.

  3. Sonos Play 5 Disassembly: étape 3, image 1 de 2 Sonos Play 5 Disassembly: étape 3, image 2 de 2
    • Orient the speaker so that the volume and speaker control buttons are facing down onto your work space. The Sonos name and product number should be facing upward toward the ceiling

    • Use a metal spudger to pry the outer corner of the grey rubber pad revealing eight 12mm screws.

  4. Sonos Play 5 Disassembly: étape 4, image 1 de 3 Sonos Play 5 Disassembly: étape 4, image 2 de 3 Sonos Play 5 Disassembly: étape 4, image 3 de 3
    Outil utilisé dans cette étape :
    Tweezers
    $4.99
    J'achète
    • With a #1 Phillips-head screwdriver, remove the eight 12mm screws on the bottom panel.

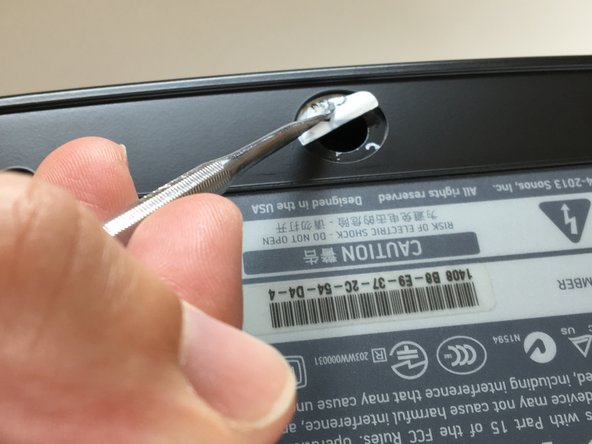
    • We have marked the original placement of the warranty stickers in orange. To remove use a pair of tweezers to grip onto the sticker and pull with a gentle upward motion

    • We have already removed the warranty stickers in this picture.

  5. Sonos Play 5 Disassembly: étape 5, image 1 de 1
    • Orient the speaker so that the speaker panel is facing upward.

    • With a metal spudger, apply medium force and wedge the spudger into the crevice with a prying motion

    • This action will need to be repeated on all sides to allow for the panel to be opened up

  6. Sonos Play 5 Disassembly: étape 6, image 1 de 3 Sonos Play 5 Disassembly: étape 6, image 2 de 3 Sonos Play 5 Disassembly: étape 6, image 3 de 3
    • Use both hands to lift the front speaker panel away from the skeleton of the speaker housing.

    • While removing the front speaker panel, pay close attention to the bottom right-hand corner. There will be an antenna connector you will need to remove in the next step.

  7. Sonos Play 5 Disassembly: étape 7, image 1 de 2 Sonos Play 5 Disassembly: étape 7, image 2 de 2
    • Using your thumb and forefinger to grip the antenna clasp while moving outward and away from the motherboard.

    • Do not use excessive force while disconnecting. This will damage the connector and motherboard.

    • We have removed the bottom panel in this picture for another guide.

Conclusion

To reassemble your device, follow these instructions in reverse order.

Une autre personne a terminé cette réparation.

Dakota Clontz

Membre depuis le 09/17/15

237 Réputation

2 tutoriels rédigés

Équipe

CSU Fullerton, Team 2-1, Bruce Fall 2015 Membre de l'équipe CSU Fullerton, Team 2-1, Bruce Fall 2015

CSUF-BRUCE-F15S2G1

4 membres

5 tutoriels rédigés

0 commentaires

Ajouter un commentaire

Nombre de vues :

Dernières 24 heures : 0

7 derniers jours : 0

30 derniers jours : 2

Total : 2,205