Aller au contenu principal

Sony Alpha NEX-5N Camera Image Sensor Replacement

Ce dont vous avez besoin

  1. Sony Alpha NEX-5N Camera Image Sensor Replacement, Motherboard: étape 1, image 1 de 3 Sony Alpha NEX-5N Camera Image Sensor Replacement, Motherboard: étape 1, image 2 de 3 Sony Alpha NEX-5N Camera Image Sensor Replacement, Motherboard: étape 1, image 3 de 3
    • Unscrew the 3 silver 1.2 mm Phillips #000 screws from the bottom of the camera.

    • This does not include the two screws in the bottom of the LCD screen panel.

  2. Sony Alpha NEX-5N Camera Image Sensor Replacement: étape 2, image 1 de 1
    • On the bottom casing, locate the split along the tripod port.

    • Insert the prying tool into the split.

    • Pull the prying tool towards the LCD screen to begin separating the split.

    • Jiggling the prying tool may be necessary to open the split.

  3. Sony Alpha NEX-5N Camera Image Sensor Replacement: étape 3, image 1 de 1
    • Hold the device with the lens facing you, and grasp the battery compartment.

    • Locate the split on the side of the battery compartment.

    • Locate the split and insert the prying tool.

    • Pull the prying tool towards the LCD screen to begin separating the split.

    • Jiggling the prying tool may be necessary to open the split.

  4. Sony Alpha NEX-5N Camera Image Sensor Replacement: étape 4, image 1 de 1
    • Locate the charging port.

    • Unscrew the silver 3.5 mm Phillips #0 screw next to the port.

  5. Sony Alpha NEX-5N Camera Image Sensor Replacement: étape 5, image 1 de 1
    • Open the battery compartment.

    • Unscrew the 2 silver 3.5 mm Phillips #0 screws found at the inside bottom of the battery port.

  6. Sony Alpha NEX-5N Camera Image Sensor Replacement: étape 6, image 1 de 1
    • Insert prying tool in the split between the top panel (where you find the movie button) and the LCD screen.

    • Jiggle the prying tool and pull the tool away from the device.

    • The panel will fall off immediately.

  7. Sony Alpha NEX-5N Camera Image Sensor Replacement: étape 7, image 1 de 2 Sony Alpha NEX-5N Camera Image Sensor Replacement: étape 7, image 2 de 2
    • Unscrew the silver 3.5 mm Phillips #0 screw, visible on the left top edge when looking at the face of the device.

    • The dark gray panel that surrounds the shutter button and covers the battery compartment will be loose.

  8. Sony Alpha NEX-5N Camera Image Sensor Replacement: étape 8, image 1 de 1
    • Locate the middle top of the device.

    • Unscrew 2 copper 1.2 mm Phillips #000 screws.

  9. Sony Alpha NEX-5N Camera Image Sensor Replacement: étape 9, image 1 de 1
    • To the right of where you unscrewed the copper screws, unscrew 4 black 1.2 mm Phillips #000 screws.

  10. Sony Alpha NEX-5N Camera Image Sensor Replacement: étape 10, image 1 de 2 Sony Alpha NEX-5N Camera Image Sensor Replacement: étape 10, image 2 de 2
    • Locate the tripod port.

    • Unscrew 2 black 1.2 mm Phillips #000 screws, one on each side of the tripod port.

    • Pull the section holding the LCD screen away from the device body.

  11. Sony Alpha NEX-5N Camera Image Sensor Replacement: étape 11, image 1 de 1
    • Unscrew 2 copper 1.2 mm Phillips #000 screws underneath the lanyard loop (near the control wheel).

  12. Sony Alpha NEX-5N Camera Image Sensor Replacement: étape 12, image 1 de 3 Sony Alpha NEX-5N Camera Image Sensor Replacement: étape 12, image 2 de 3 Sony Alpha NEX-5N Camera Image Sensor Replacement: étape 12, image 3 de 3
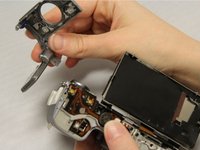
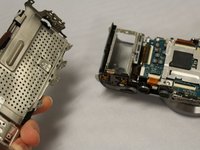
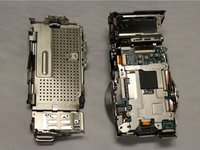
    • Pull off the metal back from the device body.

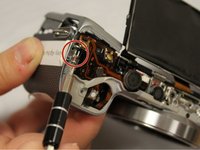
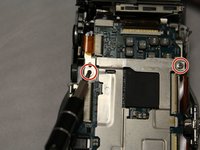
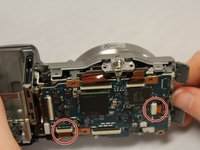
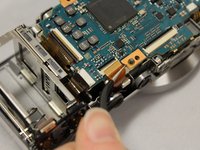
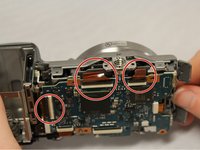
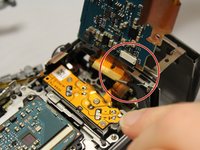
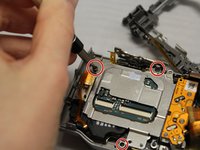
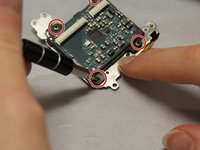
    • Locate a thin metal piece on top of the motherboard, and unscrew 4 silver 1.2 mm Phillips #000 screws in the corners of the metal piece.

    • Underneath. you will locate the motherboard.

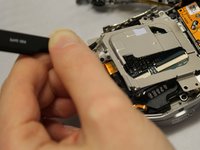
    • The tripod piece will be loose. Take the piece from the device and set it off to the side.

  13. Sony Alpha NEX-5N Camera Image Sensor Replacement: étape 13, image 1 de 2 Sony Alpha NEX-5N Camera Image Sensor Replacement: étape 13, image 2 de 2
    • The top and bottom of the device has ZIF ribbon cable connectors holding the motherboard in place.

    • Flip up the white retaining tabs, and utilize tweezer to, pull out the 2 thin ribbon cables, located on top of the motherboard.

    • Do not touch the ribbons with bare hands.

  14. Sony Alpha NEX-5N Camera Image Sensor Replacement: étape 14, image 1 de 3 Sony Alpha NEX-5N Camera Image Sensor Replacement: étape 14, image 2 de 3 Sony Alpha NEX-5N Camera Image Sensor Replacement: étape 14, image 3 de 3
    Outil utilisé dans cette étape :
    Tweezers
    $4.99
    J'achète
    • Locate 3 thick ribbon cables on the bottom, and flip up the white retaining tabs. Pull out the remaining ribbon cables, utilizing tweezers.

  15. Sony Alpha NEX-5N Camera Image Sensor Replacement: étape 15, image 1 de 2 Sony Alpha NEX-5N Camera Image Sensor Replacement: étape 15, image 2 de 2
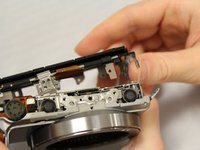
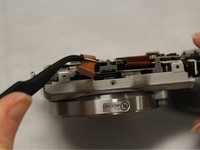
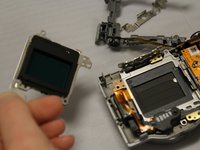
    • Lift the gray plastic camera piece surrounding the motherboard up.

    • Leave the long, thin ribbon cable that runs along the gray piece attached. It is not necessary to detach.

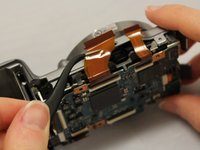
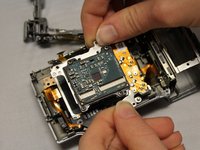
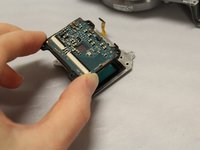
    • Lift up the motherboard to reveal one final thin ribbon cable connected to a white retaining tab underneath the motherboard.

    • Flip up the white retaining tab, and utilize tweezers to pull out the final thin ribbon cable.

  16. Sony Alpha NEX-5N Camera Image Sensor Replacement, Camera Image Sensor: étape 16, image 1 de 2 Sony Alpha NEX-5N Camera Image Sensor Replacement, Camera Image Sensor: étape 16, image 2 de 2
    Outil utilisé dans cette étape :
    Tweezers
    $4.99
    J'achète
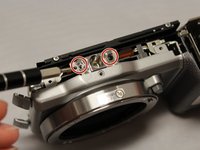
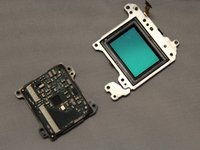
    • Unscrew 3 black 2.25mm screws, utilizing the screwdriver head PH000, on the metal plate underneath the motherboard.

    • Utilizing a pair of tweezers, remove the metal plate from the device.

  17. Sony Alpha NEX-5N Camera Image Sensor Replacement: étape 17, image 1 de 2 Sony Alpha NEX-5N Camera Image Sensor Replacement: étape 17, image 2 de 2
    • Detach the circuit board from the device.

  18. Sony Alpha NEX-5N Camera Image Sensor Replacement: étape 18, image 1 de 3 Sony Alpha NEX-5N Camera Image Sensor Replacement: étape 18, image 2 de 3 Sony Alpha NEX-5N Camera Image Sensor Replacement: étape 18, image 3 de 3
    • Unscrew 4 2.25mm Phillips #000 screws on the circuit board.

    • Remove the circuit board from the camera image sensor.

Conclusion

To reassemble your device, follow these instructions in reverse order.

3 autres ont terminé cette réparation.

Tessa Reininger

Membre depuis le 09/28/15

480 Réputation

2 tutoriels rédigés

Équipe

0 commentaires

Ajouter un commentaire

Nombre de vues :

Dernières 24 heures : 1

7 derniers jours : 5

30 derniers jours : 39

Total : 4,950