Aller au contenu principal

Sony Clie PEG-NR70 Audio Module Replacement

Ce dont vous avez besoin

  1. Sony Clie PEG-NR70 Audio Module Replacement, The Case: étape 1, image 1 de 1
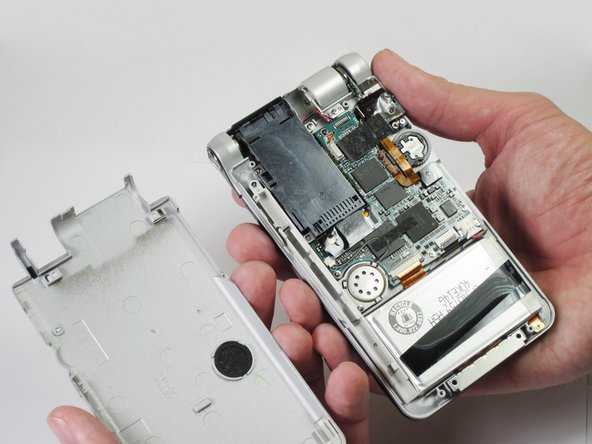
    • Unscrew the 1.9mm screw located at the top of the device with a Phillips #00 screwdriver.

    • It may be helpful to set up a piece of paper to keep track of where removed screws came from.

  2. Sony Clie PEG-NR70 Audio Module Replacement: étape 2, image 1 de 1
    • Unscrew the 2.5mm screw located on the left side of the device with a Phillips #00 screwdriver.

  3. Sony Clie PEG-NR70 Audio Module Replacement: étape 3, image 1 de 2 Sony Clie PEG-NR70 Audio Module Replacement: étape 3, image 2 de 2
    • Unscrew the five 2.5mm screws on the back panel with a Phillips #00 screwdriver.

    • Remove the back panel by lifting it away with your hands.

  4. Sony Clie PEG-NR70 Audio Module Replacement, Audio Module: étape 4, image 1 de 1
    • Unscrew the 2.5mm screw on the top portion of the audio module with a Phillips #00 screwdriver.

  5. Sony Clie PEG-NR70 Audio Module Replacement: étape 5, image 1 de 1
    • Remove the tape that is holding the module down.

  6. Sony Clie PEG-NR70 Audio Module Replacement: étape 6, image 1 de 1
    • Lift up the orange ribbon cable and unscrew the two 2.5mm screws located at the corners of the audio module with a Phillips #00 screwdriver.

  7. Sony Clie PEG-NR70 Audio Module Replacement: étape 7, image 1 de 1
    • Unplug the audio module from the motherboard by disconnecting the wires by lifting the orange wire up.

Conclusion

To reassemble your device, follow these instructions in reverse order.

Daniel Soski

Membre depuis le 04/18/13

57 Réputation

6 tutoriels rédigés

Équipe

Cal Poly, Team 14-11, Maness Spring 2013 Membre de l'équipe Cal Poly, Team 14-11, Maness Spring 2013

CPSU-MANESS-S13S14G11

5 membres

8 tutoriels rédigés

0 commentaires

Ajouter un commentaire

Nombre de vues :

Dernières 24 heures : 0

7 derniers jours : 1

30 derniers jours : 2

Total : 564