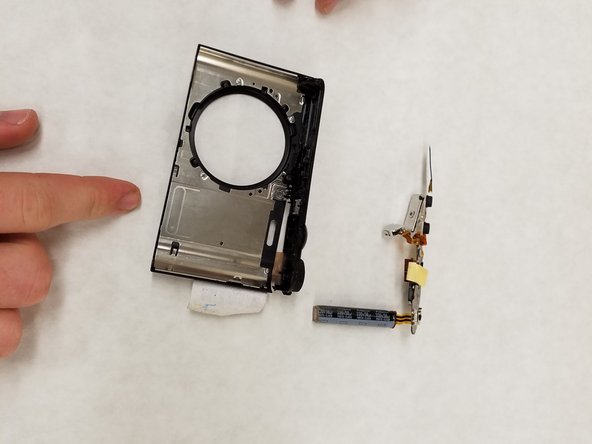
Aller au contenu principal

Sony Cyber-shot DSC-WX350 Flash Assembly Replacement

Ce dont vous avez besoin

  1. Sony Cyber-shot DSC-WX350 Flash Assembly Replacement, Flash Assembly: étape 1, image 1 de 3 Sony Cyber-shot DSC-WX350 Flash Assembly Replacement, Flash Assembly: étape 1, image 2 de 3 Sony Cyber-shot DSC-WX350 Flash Assembly Replacement, Flash Assembly: étape 1, image 3 de 3
    • Remove 6 black Phillips 4 mm screws using the J00 head screwdriver tip from the sides and bottom of top cover.

  2. Sony Cyber-shot DSC-WX350 Flash Assembly Replacement: étape 2, image 1 de 1
    • Remove the black Phillips 4 mm screw using the J00 head screwdriver tip from inside the battery inclosure.

  3. Sony Cyber-shot DSC-WX350 Flash Assembly Replacement: étape 3, image 1 de 2 Sony Cyber-shot DSC-WX350 Flash Assembly Replacement: étape 3, image 2 de 2
    • Use the plastic opening tool to take back cover off. Then take out the LCD screen with your hand.

  4. Sony Cyber-shot DSC-WX350 Flash Assembly Replacement: étape 4, image 1 de 1
    • Now take the control wheel board out with your hand.

  5. Sony Cyber-shot DSC-WX350 Flash Assembly Replacement: étape 5, image 1 de 1
    • On the left side of the camera, pull the LCD off the back plate.

    • There will be a ZIF connector by the control wheel, release the connector and remove the LCD.

  6. Sony Cyber-shot DSC-WX350 Flash Assembly Replacement: étape 6, image 1 de 2 Sony Cyber-shot DSC-WX350 Flash Assembly Replacement: étape 6, image 2 de 2
    • Remove silver Phillips 4 mm screws using the J00 head screwdriver tip from the metal cover. Once done take the metal cover off with your hands.

  7. Sony Cyber-shot DSC-WX350 Flash Assembly Replacement: étape 7, image 1 de 3 Sony Cyber-shot DSC-WX350 Flash Assembly Replacement: étape 7, image 2 de 3 Sony Cyber-shot DSC-WX350 Flash Assembly Replacement: étape 7, image 3 de 3
    • Using your finger open take off the three zifs.

  8. Sony Cyber-shot DSC-WX350 Flash Assembly Replacement: étape 8, image 1 de 2 Sony Cyber-shot DSC-WX350 Flash Assembly Replacement: étape 8, image 2 de 2
    • Use your hand to take out the lens assembly. Then take out the motherboard assembly with your hand.

  9. Sony Cyber-shot DSC-WX350 Flash Assembly Replacement: étape 9, image 1 de 3 Sony Cyber-shot DSC-WX350 Flash Assembly Replacement: étape 9, image 2 de 3 Sony Cyber-shot DSC-WX350 Flash Assembly Replacement: étape 9, image 3 de 3
    • Remove the silver Phillips 4 mm screws using the J00 head screwdriver tip from the metal piece and remove the 4mm screws from the metal piece lining the lens assembly hole.

  10. Sony Cyber-shot DSC-WX350 Flash Assembly Replacement: étape 10, image 1 de 2 Sony Cyber-shot DSC-WX350 Flash Assembly Replacement: étape 10, image 2 de 2
    • Grab the top of the camera and take it out. Then grab the flash assembly and slide it out.

Conclusion

To reassemble your device, follow these instructions in reverse order.

4 autres ont terminé cette réparation.

Matt Garthwaite

Membre depuis le 05/22/17

125 Réputation

1 tutoriel rédigé

Équipe

IUPUI, Team S1-G1, Wilson Summer 2017 Membre de l'équipe IUPUI, Team S1-G1, Wilson Summer 2017

IUPUI-WILSON-SU17S1G1

4 membres

3 tutoriels rédigés

0 commentaires

Ajouter un commentaire

Nombre de vues :

Dernières 24 heures : 0

7 derniers jours : 3

30 derniers jours : 16

Total : 1,635