Aller au contenu principal

Sony Handycam DCR-HC30 CCD Image Sensor Replacement

Ce dont vous avez besoin

  1. Sony Handycam DCR-HC30 CCD Image Sensor Replacement, CCD Image Sensor: étape 1, image 1 de 2 Sony Handycam DCR-HC30 CCD Image Sensor Replacement, CCD Image Sensor: étape 1, image 2 de 2
    • To begin, the LCD screen must be removed.

    • Bring the LCD screen to the fully open position.

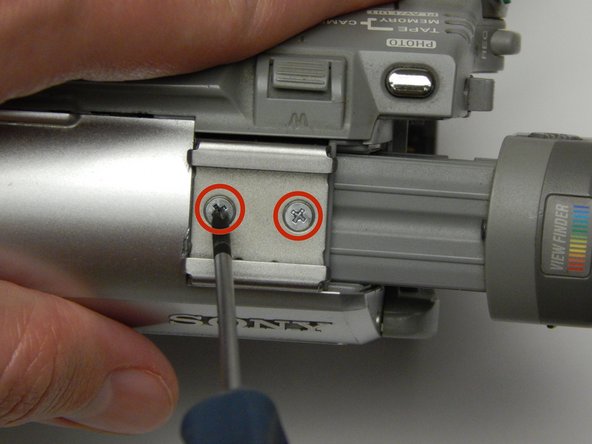
    • Remove the three 5 MM Phillips #1 screws on the front of the LCD screen.

  2. Sony Handycam DCR-HC30 CCD Image Sensor Replacement: étape 2, image 1 de 3 Sony Handycam DCR-HC30 CCD Image Sensor Replacement: étape 2, image 2 de 3 Sony Handycam DCR-HC30 CCD Image Sensor Replacement: étape 2, image 3 de 3
    • Flip the camera with the lens facing up.

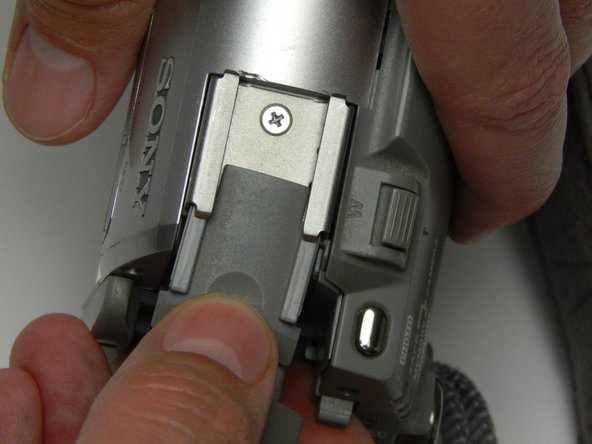
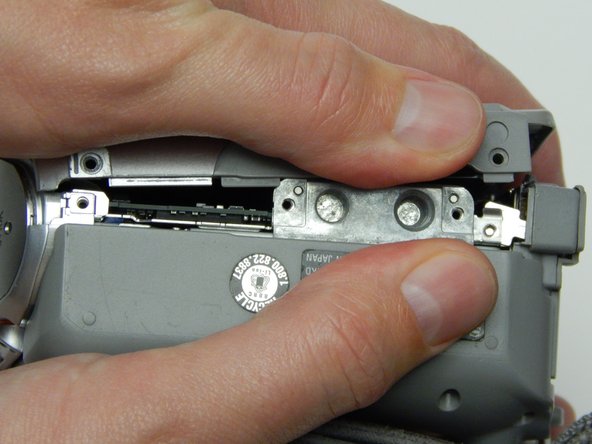
    • Turn the LCD screen so you can see the 5 MM Phillips #1 screw on the inside; remove the screw.

    • Spin the LCD screen around to get the 5 MM Phillips #1 screw in the same place on the other side.

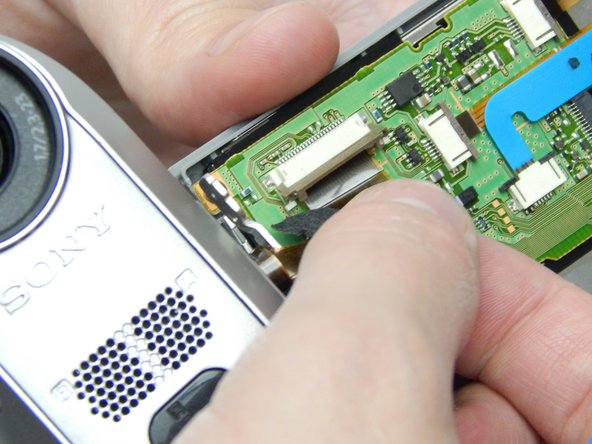
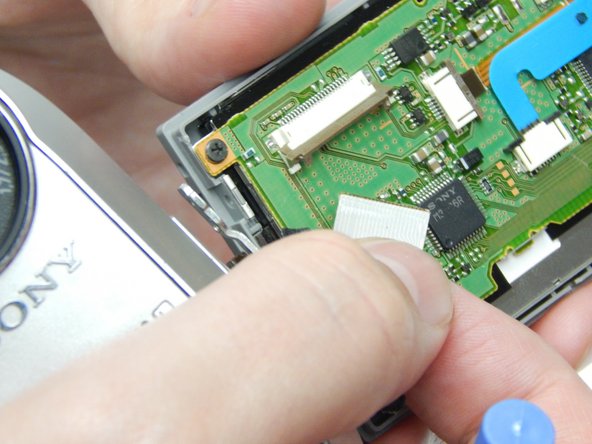
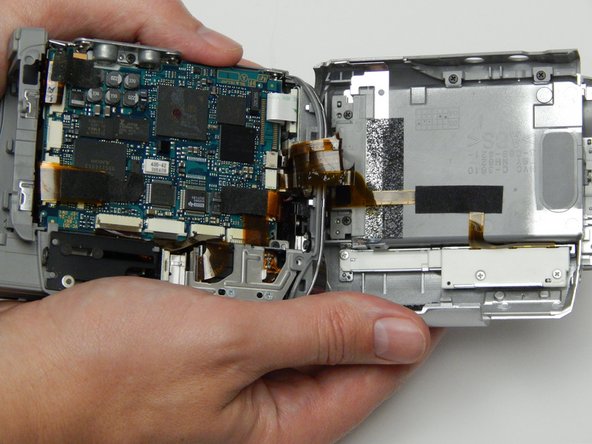
    • Use the plastic opening tool to gently separate the back of the screen from the unit.

  3. Sony Handycam DCR-HC30 CCD Image Sensor Replacement: étape 3, image 1 de 3 Sony Handycam DCR-HC30 CCD Image Sensor Replacement: étape 3, image 2 de 3 Sony Handycam DCR-HC30 CCD Image Sensor Replacement: étape 3, image 3 de 3
    • The parts are very small and fragile and can break easily.

    • With the back off, spin the LCD screen back around.

    • Using the plastic opening tool, gently lift up the holder that keeps the ribbon in place.

    • Gently slip the ribbon from its housing.

    • When this step is completed the camera will separate from the LCD screen. From here on you will only be working with the camera itself.

  4. Sony Handycam DCR-HC30 CCD Image Sensor Replacement: étape 4, image 1 de 3 Sony Handycam DCR-HC30 CCD Image Sensor Replacement: étape 4, image 2 de 3 Sony Handycam DCR-HC30 CCD Image Sensor Replacement: étape 4, image 3 de 3
    • With the LCD screen off the unit it is time to work on the rest of the screws.

    • Face the camera with the viewfinder towards you.

    • Remove the five 5 MM Phillips #1 screws circled here.

    • Flip the camera where the bottom faces toward you.

    • Remove the four circled 5 MM Phillips #1 screws.

  5. Sony Handycam DCR-HC30 CCD Image Sensor Replacement: étape 5, image 1 de 3 Sony Handycam DCR-HC30 CCD Image Sensor Replacement: étape 5, image 2 de 3 Sony Handycam DCR-HC30 CCD Image Sensor Replacement: étape 5, image 3 de 3
    • Looking downward on the camera pull the viewfinder to its fully extended position.

    • Slip the plastic covering off the top of the unit.

    • Remove the two 10 MM Phillips #1 screws that were under the covering.

  6. Sony Handycam DCR-HC30 CCD Image Sensor Replacement: étape 6, image 1 de 3 Sony Handycam DCR-HC30 CCD Image Sensor Replacement: étape 6, image 2 de 3 Sony Handycam DCR-HC30 CCD Image Sensor Replacement: étape 6, image 3 de 3
    • Remove the last 5 MM Phillips #1 screw that is somewhat hidden in the resting place of the LCD screen.

    • For the next step make sure to be careful so as to not break any of the clips that hold the camera's two halves together.

    • With the bottom of the camera facing you grasp each half of the camera and gently pull the halves apart.

    • There will be some slight popping sounds as the clips release.

  7. Sony Handycam DCR-HC30 CCD Image Sensor Replacement: étape 7, image 1 de 3 Sony Handycam DCR-HC30 CCD Image Sensor Replacement: étape 7, image 2 de 3 Sony Handycam DCR-HC30 CCD Image Sensor Replacement: étape 7, image 3 de 3
    • Face the camera with the strap toward you and remove the two 5 MM Phillips #1 screws indicated here.

    • Firmly grasp the silver part of the camera below the lens and pull away.

    • Be careful not to pull the ribbon from its housing.

  8. Sony Handycam DCR-HC30 CCD Image Sensor Replacement: étape 8, image 1 de 3 Sony Handycam DCR-HC30 CCD Image Sensor Replacement: étape 8, image 2 de 3 Sony Handycam DCR-HC30 CCD Image Sensor Replacement: étape 8, image 3 de 3
    • Flip the camera on its side with the strap facing down and lay the other half as shown in the photo.

    • Using the plastic opening tool remove the ribbon from its housing.

  9. Sony Handycam DCR-HC30 CCD Image Sensor Replacement: étape 9, image 1 de 3 Sony Handycam DCR-HC30 CCD Image Sensor Replacement: étape 9, image 2 de 3 Sony Handycam DCR-HC30 CCD Image Sensor Replacement: étape 9, image 3 de 3
    • Face the lens of the camera toward you.

    • Gently remove the two ribbons that are keeping the other half linked to the camera.

  10. Sony Handycam DCR-HC30 CCD Image Sensor Replacement: étape 10, image 1 de 3 Sony Handycam DCR-HC30 CCD Image Sensor Replacement: étape 10, image 2 de 3 Sony Handycam DCR-HC30 CCD Image Sensor Replacement: étape 10, image 3 de 3
    • Pull back the viewfinder piece to expose the screws holding the lens in place.

    • Remove the four indicated 5 MM Phillips #1 screws.

  11. Sony Handycam DCR-HC30 CCD Image Sensor Replacement: étape 11, image 1 de 3 Sony Handycam DCR-HC30 CCD Image Sensor Replacement: étape 11, image 2 de 3 Sony Handycam DCR-HC30 CCD Image Sensor Replacement: étape 11, image 3 de 3
    • Be very careful when handling the lens. DO NOT touch the glass aperture or wiggle the piece too much because it can cause display issues after the unit is fixed.

    • While gently holding the lens piece, remove the 5 MM Phillips #1 screw.

    • Slip the aluminum arm off of the lens piece.

  12. Sony Handycam DCR-HC30 CCD Image Sensor Replacement: étape 12, image 1 de 2 Sony Handycam DCR-HC30 CCD Image Sensor Replacement: étape 12, image 2 de 2
    • Remove the two 6 MM Phillips #1 screws holding the CCD image sensor in place.

    • Remove the CCD image sensor.

Conclusion

To reassemble your device, follow these instructions in reverse order.

2 autres ont terminé cette réparation.

Matthew Hurt

Membre depuis le 01/15/15

583 Réputation

3 tutoriels rédigés

Équipe

USF Sarasota-Manatee, Team 1-2, Stewart Winter 2015 Membre de l'équipe USF Sarasota-Manatee, Team 1-2, Stewart Winter 2015

USFSM-STEWART-W15S1G2

4 membres

11 tutoriels rédigés

Un commentaire

I guess this needs to be soldered out and new one re soldered in tits place

Johnny Bravo - Réponse

Ajouter un commentaire

Nombre de vues :

Dernières 24 heures : 0

7 derniers jours : 6

30 derniers jours : 24

Total : 2,254