Aller au contenu principal

Sony Handycam DCR-SR42 Flex Cable Replacement

Ce dont vous avez besoin

  1. Sony Handycam DCR-SR42 Flex Cable Replacement, Hard Drive: étape 1, image 1 de 2 Sony Handycam DCR-SR42 Flex Cable Replacement, Hard Drive: étape 1, image 2 de 2
    • Remove the battery, and use the Phillips #00 precision screwdriver to then remove the three 3mm Phillips #00 screws under the battery.

    • Wait 1 hour after removing the battery before continuing to disassemble the camera.

  2. Sony Handycam DCR-SR42 Flex Cable Replacement: étape 2, image 1 de 1
    • Remove the three 3mm #00 Phillips screws on the bottom of the camera.

  3. Sony Handycam DCR-SR42 Flex Cable Replacement: étape 3, image 1 de 1
    • Remove the three 3mm Phillips #00 screws on the side of the camera.

    • Remove the 4mm Phillips #00 screw under the AV port cover.

  4. Sony Handycam DCR-SR42 Flex Cable Replacement: étape 4, image 1 de 2 Sony Handycam DCR-SR42 Flex Cable Replacement: étape 4, image 2 de 2
    • Gently pull the black plastic hard drive cover away from the body of the camera. This will expose the hard drive.

    • Even with all the screws removed, this part will require some force to remove.

  5. Sony Handycam DCR-SR42 Flex Cable Replacement: étape 5, image 1 de 2 Sony Handycam DCR-SR42 Flex Cable Replacement: étape 5, image 2 de 2
    • Lift the hard drive out of the camera by grasping the grey rubber mounting brackets and pulling them upwards.

    • The hard drive is attached to the flex cable. Remove the hard drive slowly to prevent the flex cable from being damaged.

  6. Sony Handycam DCR-SR42 Flex Cable Replacement: étape 6, image 1 de 1
    • Remove the rubber mounting brackets by pulling them off the hard drive.

  7. Sony Handycam DCR-SR42 Flex Cable Replacement: étape 7, image 1 de 1
    • Carefully unplug the flex cable from the hard drive.

  8. Sony Handycam DCR-SR42 Flex Cable Replacement, Internal Components: étape 8, image 1 de 2 Sony Handycam DCR-SR42 Flex Cable Replacement, Internal Components: étape 8, image 2 de 2
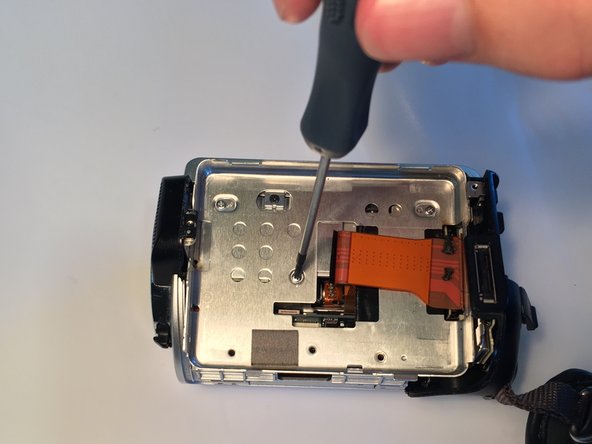
    • Remove the four 3mm Phillips #00 screws from under the hard drive.

  9. Sony Handycam DCR-SR42 Flex Cable Replacement: étape 9, image 1 de 3 Sony Handycam DCR-SR42 Flex Cable Replacement: étape 9, image 2 de 3 Sony Handycam DCR-SR42 Flex Cable Replacement: étape 9, image 3 de 3
    • Press in on the two tabs as shown and lift the metal plate up and off the camera.

    • Even with all the screws removed, this part will require some force to remove.

  10. Sony Handycam DCR-SR42 Flex Cable Replacement: étape 10, image 1 de 3 Sony Handycam DCR-SR42 Flex Cable Replacement: étape 10, image 2 de 3 Sony Handycam DCR-SR42 Flex Cable Replacement: étape 10, image 3 de 3
    • Remove the two 4mm Phillips #00 screws from the underside of the camera.

    • Remove the 2 mm Phillips #00 screw from the screen hinge.

  11. Sony Handycam DCR-SR42 Flex Cable Replacement: étape 11, image 1 de 3 Sony Handycam DCR-SR42 Flex Cable Replacement: étape 11, image 2 de 3 Sony Handycam DCR-SR42 Flex Cable Replacement: étape 11, image 3 de 3
    • Use the plastic opening tool to remove the plastic cover from the top of the camera.

    • Remove the two 3mm Phillips #00 screws from underneath the plastic cover.

  12. Sony Handycam DCR-SR42 Flex Cable Replacement: étape 12, image 1 de 2 Sony Handycam DCR-SR42 Flex Cable Replacement: étape 12, image 2 de 2
    • Remove the second plastic cover from the top of the camera.

    • Remove the 4mm Phillips #00 screw from underneath the cover.

  13. Sony Handycam DCR-SR42 Flex Cable Replacement: étape 13, image 1 de 2 Sony Handycam DCR-SR42 Flex Cable Replacement: étape 13, image 2 de 2
    • Carefully pry the screen assembly apart from the main body of the camera.

    • Unplug the flex cable from the screen assembly.

    • Even with all the screws removed, this part will require some force to remove.

  14. Sony Handycam DCR-SR42 Flex Cable Replacement, Flex Cable: étape 14, image 1 de 1
    • Remove the 5 3mm Phillips #00 Screws from the screen assembly.

  15. Sony Handycam DCR-SR42 Flex Cable Replacement: étape 15, image 1 de 3 Sony Handycam DCR-SR42 Flex Cable Replacement: étape 15, image 2 de 3 Sony Handycam DCR-SR42 Flex Cable Replacement: étape 15, image 3 de 3
    • Carefully lift up the sound chip and peel the flex cable off the screen case.

    • Lift off the plastic bracket from the hinge.

  16. Sony Handycam DCR-SR42 Flex Cable Replacement: étape 16, image 1 de 2 Sony Handycam DCR-SR42 Flex Cable Replacement: étape 16, image 2 de 2
    • Remove the screen from the plastic case by pulling the flex cable and sound chip through the hole in the case.

  17. Sony Handycam DCR-SR42 Flex Cable Replacement: étape 17, image 1 de 1
    • Turn the hinge sideways and remove the two 4mm Phillips #00 screws from the side of the screen.

  18. Sony Handycam DCR-SR42 Flex Cable Replacement: étape 18, image 1 de 3 Sony Handycam DCR-SR42 Flex Cable Replacement: étape 18, image 2 de 3 Sony Handycam DCR-SR42 Flex Cable Replacement: étape 18, image 3 de 3
    • Use the plastic opening tool to remove the plastic hinge covers and expose the metal hinge.

    • Unwrap the flex cable from around the hinge.

  19. Sony Handycam DCR-SR42 Flex Cable Replacement: étape 19, image 1 de 2 Sony Handycam DCR-SR42 Flex Cable Replacement: étape 19, image 2 de 2
    • Use the plastic opening tool to open the screen case.

    • Even with all the screws removed, this part will require some force to remove.

  20. Sony Handycam DCR-SR42 Flex Cable Replacement: étape 20, image 1 de 2 Sony Handycam DCR-SR42 Flex Cable Replacement: étape 20, image 2 de 2
    • Unplug the flex cable from the sound chip.

    • Unplug the flex cable from the screen chip.

Conclusion

To reassemble your device, follow these instructions in reverse order.

7 autres ont terminé cette réparation.

Dan Muller

Membre depuis le 03/23/15

1 020 Réputation

5 tutoriels rédigés

Équipe

Baylor, Team 7-13, Williams Spring 2015 Membre de l'équipe Baylor, Team 7-13, Williams Spring 2015

BU-WILLIAMS-S15S7G13

4 membres

10 tutoriels rédigés

15 commentaires

Dear sir,

in step 20, there is a small switch at in flex cable...

where do need to place?

during open I did not notice.

Please help.

sunthar marugapah - Réponse

Hey,

I'm not too sure. Try just pushing it back in.

Peter Kurapati -

At step 20, both cable contacts in the sound and screen chip are not fixed. They need to be carefully pulled out of the connector.

efr2et -

switch cable solution:

1. cable with switch goes to TOUCH the round rod so that the metal part will go near to rod.

there is a special slot made to that rod (so that it is not round from one place! take a look and find it) and thin metal sheet will hold it in place from outside and so do plastic covers. switch itself will touch the MIDDLE short rod that goes to lcd screen.

2. see pictures from 6 minutes and forward from youtube video called “Sony Handycam DCR-SR200E LCD Flip Screen Cable Replacement” ( https://www.youtube.com/watch?v=3slJNT68...). this helped me.

marko m -

right link is: https://www.youtube.com/watch?v=3slJNT68...

that is, within this … is/should be … xZE or last five digits are 68xZE

marko m -

Ajouter un commentaire

Nombre de vues :

Dernières 24 heures : 2

7 derniers jours : 26

30 derniers jours : 66

Total : 4,482