Aller au contenu principal

Sony Handycam HDR-CX675 Shutter Assembly Replacement

Ce dont vous avez besoin

  1. Sony Handycam HDR-CX675 Shutter Assembly Replacement, Camera Shell: étape 1, image 1 de 1
    • The battery should be removed and oriented upwards.

  2. Sony Handycam HDR-CX675 Shutter Assembly Replacement: étape 2, image 1 de 1
    • Remove the side 4.5 mm JIS #00 screw using JIS Screwdriver

    • Remove the 5.5 mm JIS #00 screw.

  3. Sony Handycam HDR-CX675 Shutter Assembly Replacement: étape 3, image 1 de 2 Sony Handycam HDR-CX675 Shutter Assembly Replacement: étape 3, image 2 de 2
    • Gently pry the plastic case surrounding the start/stop button free by using the blue plastic opening tools.

    • Remove the casing using your thumb and index finger.

  4. Sony Handycam HDR-CX675 Shutter Assembly Replacement: étape 4, image 1 de 1
    • Turn the camera around and flip open the LCD screen to expose the side panel.

    • Remove the 5.5mm #00 screw using the J00 head screwdriver.

  5. Sony Handycam HDR-CX675 Shutter Assembly Replacement: étape 5, image 1 de 1
    • Turn the camera to the handgrip side and unscrew two of the 5.5mm JIS #00 head screws using the JIS #00 head screwdriver.

  6. Sony Handycam HDR-CX675 Shutter Assembly Replacement: étape 6, image 1 de 1
    • Remove the two 5.5mm JIS #00 screws with the bottom of the camera facing up.

  7. Sony Handycam HDR-CX675 Shutter Assembly Replacement: étape 7, image 1 de 1
    • Turn the camera around in a way that the bottom of the camera is facing you.

    • Use the blue opening tool to gently remove the camera shell off of the camera.

  8. Sony Handycam HDR-CX675 Shutter Assembly Replacement, Lens Cover Panel: étape 8, image 1 de 1
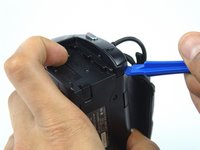
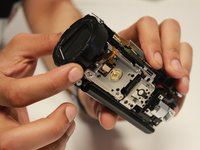
    • Using the blue plastic opener smoothly to take the camera shell off.

  9. Sony Handycam HDR-CX675 Shutter Assembly Replacement: étape 9, image 1 de 2 Sony Handycam HDR-CX675 Shutter Assembly Replacement: étape 9, image 2 de 2
    • Let the lens of the camera be pointed to your left.

    • Keep holding the camera with your right hand then gently remove the lens cover panel with your left hand.

  10. Sony Handycam HDR-CX675 Shutter Assembly Replacement, Shutter Assembly: étape 10, image 1 de 1
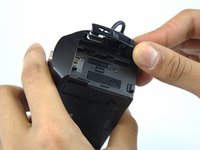
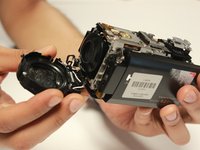
    • Place the camera on its lens and keep the LCD screen open and pointed to your right.

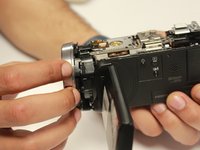
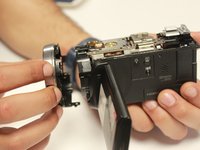
    • Remove the 5.5mm JIS #00 screws from the hinge of the camera.

  11. Sony Handycam HDR-CX675 Shutter Assembly Replacement: étape 11, image 1 de 2 Sony Handycam HDR-CX675 Shutter Assembly Replacement: étape 11, image 2 de 2
    • Hold the camera with your left hand, and gently remove the shutter assembly part.

  12. Sony Handycam HDR-CX675 Shutter Assembly Replacement: étape 12, image 1 de 1
    Outil utilisé dans cette étape :
    Tweezers
    $4.99
    J'achète
    • Hold the camera that the bottom is upwards and lens pointed to your left hand.

    • By the metal tweezers, remove the white wire that is connecting the shutter assembly and motherboard

Conclusion

To reassemble your device, follow these instructions in reverse order.

Une autre personne a terminé cette réparation.

Mohamed Nazer

Membre depuis le 02/15/17

403 Réputation

3 tutoriels rédigés

Équipe

USF Tampa, Team 8-2, Eyestone Spring 2017 Membre de l'équipe USF Tampa, Team 8-2, Eyestone Spring 2017

USFT-EYESTONE-S17S8G2

3 membres

8 tutoriels rédigés

0 commentaires

Ajouter un commentaire

Nombre de vues :

Dernières 24 heures : 1

7 derniers jours : 8

30 derniers jours : 19

Total : 751