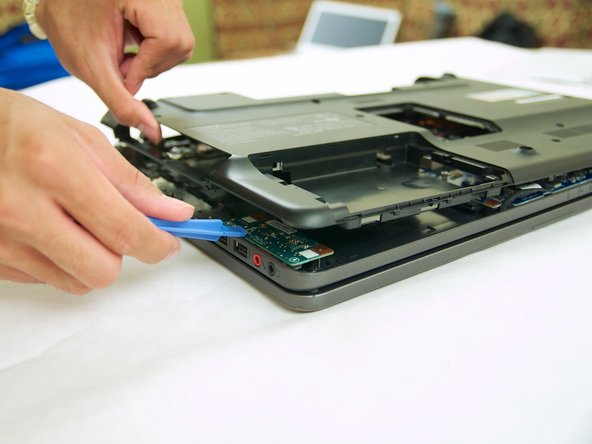
Aller au contenu principal

Sony Vaio VGN-NW240F (PCG-7184L) Back Panel Removal

Ce dont vous avez besoin

  1. Sony Vaio VGN-NW240F (PCG-7184L) Back Panel Removal, Battery: étape 1, image 1 de 1
    • Power off the laptop.

    • Unplug the charging cable and any other cables plugged into the laptop.

    • Failure to remove or unplug any cables could result in electric shock.

    • Turn the laptop over so that the back panel is facing upwards.

  2. Sony Vaio VGN-NW240F (PCG-7184L) Back Panel Removal: étape 2, image 1 de 1
    • Locate two switches above the battery that lock it into place.

    • Push the left-hand switch, that says "lock" above it, so that it is unlocked.

  3. Sony Vaio VGN-NW240F (PCG-7184L) Back Panel Removal: étape 3, image 1 de 1
    • Push and hold the right-hand switch, which says "release" above it, and lift the battery up out of its place.

  4. Sony Vaio VGN-NW240F (PCG-7184L) Back Panel Removal, Optical Drive: étape 4, image 1 de 1
    • Locate and unscrew the two highlighted 8 mm Phillips #1 screws.

    • There will be three dots next to the desired screws

  5. Sony Vaio VGN-NW240F (PCG-7184L) Back Panel Removal: étape 5, image 1 de 1
    • Grip the cover of the optical drive and slide it out.

    • If it does not come out, do not force it. Double check to make sure the screws are entirely removed.

  6. Sony Vaio VGN-NW240F (PCG-7184L) Back Panel Removal, Back Panel: étape 6, image 1 de 3 Sony Vaio VGN-NW240F (PCG-7184L) Back Panel Removal, Back Panel: étape 6, image 2 de 3 Sony Vaio VGN-NW240F (PCG-7184L) Back Panel Removal, Back Panel: étape 6, image 3 de 3
    • Remove all the 8mm Phillips #1 screws on the backside of the laptop.

    • There are three 3mm and two 5.3mm screws under the battery that also need to be taken out.

    • There are three 3mm screws under the optical drives that also need to be taken out.

    • Remove the RAM panel in addition to the other screws. For further instructions, refer to the RAM replacement guide.

  7. Sony Vaio VGN-NW240F (PCG-7184L) Back Panel Removal: étape 7, image 1 de 3 Sony Vaio VGN-NW240F (PCG-7184L) Back Panel Removal: étape 7, image 2 de 3 Sony Vaio VGN-NW240F (PCG-7184L) Back Panel Removal: étape 7, image 3 de 3
    • Pry along the edges of the back panel using the spudger.

    • If you are struggling to remove the back panel with a moderate amount of force, do NOT apply any additional force, instead double check to make sure all the screws were removed before attempting again.

Conclusion

To reassemble your device, follow these instructions in reverse order.

7 autres ont terminé cette réparation.

Sid

Membre depuis le 05/18/14

311 Réputation

2 tutoriels rédigés

Équipe

Cal Poly, Team 9-17, Regan Spring 2014 Membre de l'équipe Cal Poly, Team 9-17, Regan Spring 2014

CPSU-REGAN-S14S9G17

4 membres

18 tutoriels rédigés

Un commentaire

I put it back in the correct order but my screen won’t turn on.

zakikhimani - Réponse

Ajouter un commentaire

Nombre de vues :

Dernières 24 heures : 1

7 derniers jours : 6

30 derniers jours : 14

Total : 5,476