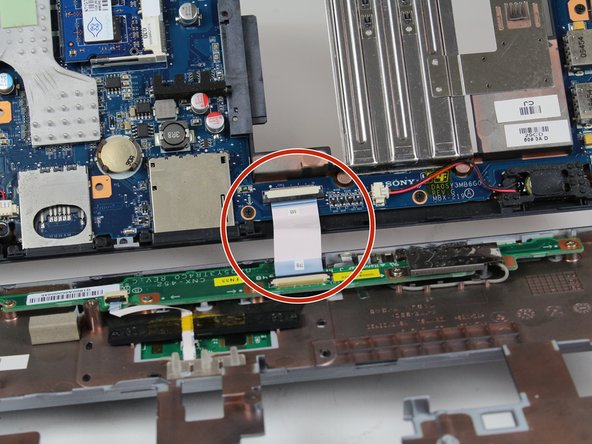
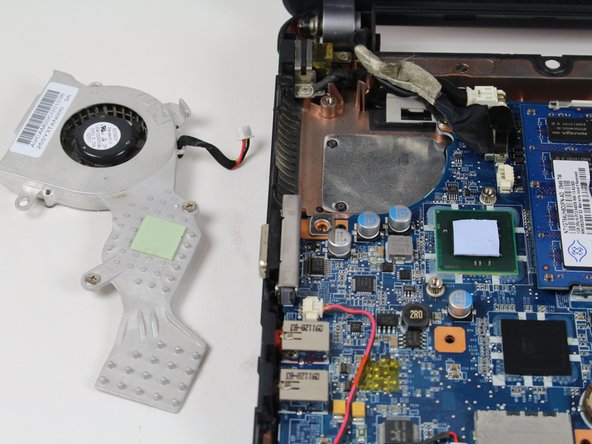
Aller au contenu principal

Sony Vaio VPCW211AX Fan Replacement

Ce dont vous avez besoin

  1. Sony Vaio VPCW211AX Fan Replacement, Keyboard: étape 1, image 1 de 1
    • Start with the laptop face up on a flat surface.

  2. Sony Vaio VPCW211AX Fan Replacement: étape 2, image 1 de 1
    • Open the laptop with the keyboard facing you.

  3. Sony Vaio VPCW211AX Fan Replacement: étape 3, image 1 de 2 Sony Vaio VPCW211AX Fan Replacement: étape 3, image 2 de 2
    • Use a plastic opening tool to pry up the keyboard. Start at the end closest to the screen.

    • Be careful around the edges; work your way around the keyboard until all of it is detached.

    • There will be a ribbon cable attached to the bottom of the keyboard. Be sure not to rip the cable when lifting the keyboard from the laptop frame.

  4. Sony Vaio VPCW211AX Fan Replacement: étape 4, image 1 de 2 Sony Vaio VPCW211AX Fan Replacement: étape 4, image 2 de 2
    • Carefully detach the ribbon from the base of the computer with your hands.

    • Remove the keyboard.

  5. Sony Vaio VPCW211AX Fan Replacement, Fan: étape 5, image 1 de 1
    • Use a Philips #0 screwdriver to remove the 7 top case screws.

  6. Sony Vaio VPCW211AX Fan Replacement: étape 6, image 1 de 1
    • Using a metal spudger, pry open at the seams.

    • Open the gray top of the laptop from the base black portion.

    • Slide the spudger along the seam, and then carefully open the top.

  7. Sony Vaio VPCW211AX Fan Replacement: étape 7, image 1 de 2 Sony Vaio VPCW211AX Fan Replacement: étape 7, image 2 de 2
    • Open the top carefully without disconnecting the two parts.

    • Be mindful and careful of the ribbon cable attaching the two parts together.

  8. Sony Vaio VPCW211AX Fan Replacement: étape 8, image 1 de 1
    • Use a Philips #0 screwdriver to unscrew the 4 heatsink screws.

  9. Sony Vaio VPCW211AX Fan Replacement: étape 9, image 1 de 1
    • If there is electrical tape, remove it with your finger.

  10. Sony Vaio VPCW211AX Fan Replacement: étape 10, image 1 de 1
    • Using the plastic opening tool, pry up the unscrewed fan.

  11. Sony Vaio VPCW211AX Fan Replacement: étape 11, image 1 de 2 Sony Vaio VPCW211AX Fan Replacement: étape 11, image 2 de 2
    • The fan will still be attached by a small red and yellow wire, with your fingers detach this carefully.

    • Remove the fan.

Conclusion

To reassemble your device, follow these instructions in reverse order.

Une autre personne a terminé cette réparation.

Giselle Dougan

Membre depuis le 01/31/18

760 Réputation

5 tutoriels rédigés

0 commentaires

Ajouter un commentaire

Nombre de vues :

Dernières 24 heures : 0

7 derniers jours : 5

30 derniers jours : 14

Total : 699