Aller au contenu principal

Sony Xperia J Speaker Replacement

Ce dont vous avez besoin

  1. Sony Xperia J Speaker Replacement, External Features: étape 1, image 1 de 1
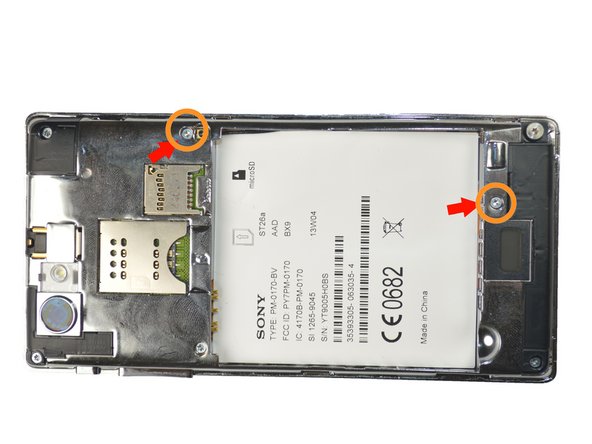
    • You will need a Torx T5 screwdriver, plastic opening tool, and a pincet for this operation.

  2. Sony Xperia J Speaker Replacement: étape 2, image 1 de 1
    • Find the little bracket on the bottom left of the phone (when looking at it upside down) and use the opening tool to pry off the back cover.

  3. Sony Xperia J Speaker Replacement: étape 3, image 1 de 1
    • Remove the silicone cover by squeezing it with the tweezers, there is not much pressure needed.

  4. Sony Xperia J Speaker Replacement: étape 4, image 1 de 3 Sony Xperia J Speaker Replacement: étape 4, image 2 de 3 Sony Xperia J Speaker Replacement: étape 4, image 3 de 3
    • Using the Torx T5 screwdriver remove the four 4.74mm screws.

    • Then remove the two 3.13mm screws

    • Lastly remove 5.90mm screw.

  5. Sony Xperia J Speaker Replacement: étape 5, image 1 de 3 Sony Xperia J Speaker Replacement: étape 5, image 2 de 3 Sony Xperia J Speaker Replacement: étape 5, image 3 de 3
    • Using the tweezers remove the black plate at the bottom of the phone. First insert the tweezers tip at the intersection between the black plate and phone, then just pull the plate up.

    • Repeat the same steps to remove the black plates located at the top left, and top right of the phone.

  6. Sony Xperia J Speaker Replacement: étape 6, image 1 de 1
    • After removing the top left black plate, you will find another 3.13mm screw. Just remove it by using the screwdriver.

  7. Sony Xperia J Speaker Replacement: étape 7, image 1 de 1
    • Place the plastic opening tool in-between the black external case of the phone and the silver case, then move it along the edges of the phone to detach the plates.

  8. Sony Xperia J Speaker Replacement, The Speaker: étape 8, image 1 de 1
    • Once the silver plate has been detached from the phone, locate the speaker at the bottom of the silver plate.

    • Insert the tweezers' tip into the small hole located at the left side of the speaker. Once the tip is inside, just remove the speaker from left to right.

    • The speaker might be a little difficult to remove due to the glue used when assembling the phone.

  9. Sony Xperia J Speaker Replacement, Replacing the speaker: étape 9, image 1 de 1
    • Place the new speakers in the same spot as the old one, and then push it with your finger until you hear a click.

    • Remember that the letters written in the speaker should be upside down before inserting the replacement.

Conclusion

To reassemble your device, follow these instructions in reverse order.

Une autre personne a terminé cette réparation.

Arlind

Membre depuis le 01/21/15

899 Réputation

5 tutoriels rédigés

Équipe

USF Tampa, Team 4-3, Brown Winter 2015 Membre de l'équipe USF Tampa, Team 4-3, Brown Winter 2015

USFT-BROWN-W15S4G3

3 membres

6 tutoriels rédigés

0 commentaires

Ajouter un commentaire

Nombre de vues :

Dernières 24 heures : 0

7 derniers jours : 0

30 derniers jours : 0

Total : 1,041