Introduction
J'ai fixé le bloc optique desserré par un adhésif (double face). La partie la plus "difficile" est juste la bonne fixation du bloc optique au capot inférieur car il faut tenir à l'envers...
Ce dont vous avez besoin
-
-
Retirez les 3 adhésifs noirs et les vis en dessous.
-
Soulevez le capot supérieur avec précaution
-
débranchez le connecteur blanc à l'aide d'un tournevis ou du doigt pour retirer complètement le couvercle
-
-
-
retirer délicatement le ruban adhésif noir
-
enlever 2 vis
-
soulevez toute la carte mère et prenez soin des deux points de fixation noirs
-
vous avez maintenant la carte mère et l'unité optique séparées
-
-
-
-
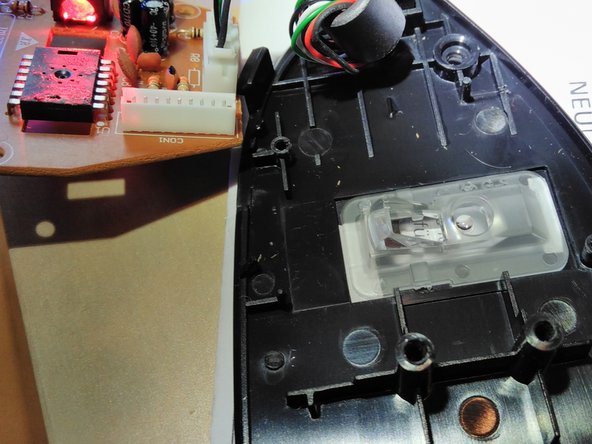
tenez la carte mère entre votre doigt comme indiqué sur l'image
-
placez le groupe optique transparent comme indiqué sur l'image
-
veillez à ce que l'unité soit correctement alignée horizontalement
-
tout en continuant à tenir la carte mère, prenez le couvercle INFÉRIEUR noir et placez-le à l'envers sur la carte mère, de sorte que ...
-
1.) l'unité optique est placée à la fenêtre correspondante du couvercle et que ...
-
2.) les points de fixation noirs et les deux points de support de vis s'enclenchent correctement dans les trous de la carte mère
-
-
-
Vous pouvez maintenant remettre directement les vis...
-
...ou encore retirer la carte mère et s'assurer que le bloc optique reste en place et bien fixé.
-
-
-
placez du ruban adhésif double face à l'intérieur de l'espace des deux côtés (blanc sur l'image)
-
appuyez doucement sur le couvercle noir pour fixer fermer l'espace
-
pour laisser le couvercle noir rester collé à la carte mère / au ruban adhésif, j'ai placé du ruban adhésif noir et solide sur le couvercle noir de la LED rouge pour l'appuyer en permanence.
-
J'ai voulu sauver et fixer le bloc optique et la LED rouge avec un peu plus de scotch noir pour les maintenir en place et éviter tout mouvement.
-
J'ai refait un test fonctionnel en branchant l'USB et en secouant la souris. Aucun mouvement du pointeur de la souris n'était plus présent --> SUCCÈS !
-
-
-
remettre les poids métalliques et les vis
-
rebrancher le connecteur
-
remettre le capot supérieur
-
revisser les vis et remettre les bandes coulissantes
-
ENYOU L'APPAREIL DE TRAVAIL !
-


Annulation : je n'ai pas terminé ce tutoriel.
6 autres ont terminé cette réparation.
Merci à ces traducteurs :
100%
[deleted] nous aide à réparer le monde ! Vous voulez contribuer ?
Commencez à traduire ›
5 commentaires
i have a slightly newer model of this mouse. the cursor was making a repeated square motion. Seems like the photodiode picked up the blinking blue LED, which I think is only an indicator for the user. The actual functional LED seems to be infrared rather than red in the new model, and placed closer to the blue LED. I fixed my problem by covering the LED more completely with opaque tape. Not sure if my explanation makes sense? This is what I deduced, with the help of the above post and some trial and error, seeing that the cursor movement correlated with the blue light blinking and that the behavior was prevented by blocking the blue light with my fingertip. Also broke the battery leads in the process and had to resolder the through-hole connections.
How do I disassemble the top part which has the buttons and scroll wheel.
To disassemble the button-unit you have to follow complete step 1 and disconnect the grey cable.
If you look into the top button carrying unit you see a clip (or two?) at the side opposite to the scroll wheel which you can carefully click out with a finger or a screw driver. Then only the buttons itself should lift up alittle bit and you can push it a little bit out. At the tip of the button unit there are just two hooks wich you can carefully pull out of the holes. Then you should have removed the buttons and can see the red button-devices underneath.
Did this help?
With this procedure I regularly adjust the pressure point of the left mouse button as it sometimes looses connection to the button-device. So I glue some stuff (for now very thin metal of <1x1mm² worked quite well) on the black cross-shaped “spike”.
Robert -
@Robert Thanks for the instructions on how to disassemble the button-unit. My scroll wheel was dirty and your comment made it possible for me to get in there and clean it. Didn’t even consider that both the left and right click buttons would clip off first before separating the unit. I think a visual guide for disassembling the button unit would be very useful as well. Thanks again!