Aller au contenu principal

Teenage Engineering OP-Z Pitch Bend Rubber Button Replacement

Ce dont vous avez besoin

  1. Teenage Engineering OP-Z Pitch Bend Rubber Button Replacement, Back Cover: étape 1, image 1 de 3 Teenage Engineering OP-Z Pitch Bend Rubber Button Replacement, Back Cover: étape 1, image 2 de 3 Teenage Engineering OP-Z Pitch Bend Rubber Button Replacement, Back Cover: étape 1, image 3 de 3
    • Unlock the four rubber feet by turning them 90° counterclockwise using your thumb or finger tip.

    • There is a tiny mark on every foot facing the bottom edge of the OP-Z. After turning them they should face towards the short edge where the on/off switch is.

  2. Teenage Engineering OP-Z Pitch Bend Rubber Button Replacement: étape 2, image 1 de 2 Teenage Engineering OP-Z Pitch Bend Rubber Button Replacement: étape 2, image 2 de 2
    • When turning the OP-Z over again the bottom plate should come off by itself (thanks gravity).

    • If the bottom plate won’t come off you might want to make sure every foot is rotated correctly and gently tug on one of them.

  3. Teenage Engineering OP-Z Pitch Bend Rubber Button Replacement: étape 3, image 1 de 1
    • Remove the bottom plate including the rubber feet.

  4. Teenage Engineering OP-Z Pitch Bend Rubber Button Replacement, Battery: étape 4, image 1 de 2 Teenage Engineering OP-Z Pitch Bend Rubber Button Replacement, Battery: étape 4, image 2 de 2
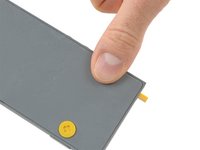
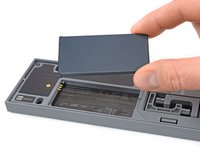
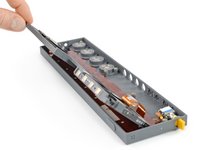
    • Use your fingernail or a spudger to lift the battery on the right side where the notch is.

  5. Teenage Engineering OP-Z Pitch Bend Rubber Button Replacement: étape 5, image 1 de 2 Teenage Engineering OP-Z Pitch Bend Rubber Button Replacement: étape 5, image 2 de 2
    • Remove the battery.

    • When installing the new battery make sure you put it in contact side first.

  6. Teenage Engineering OP-Z Pitch Bend Rubber Button Replacement, Expansion Module: étape 6, image 1 de 2 Teenage Engineering OP-Z Pitch Bend Rubber Button Replacement, Expansion Module: étape 6, image 2 de 2
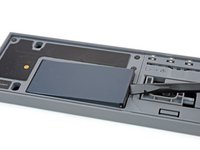
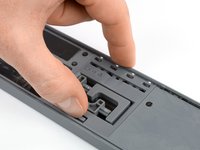
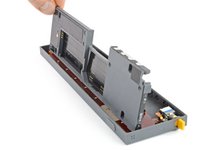
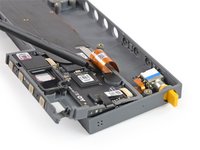
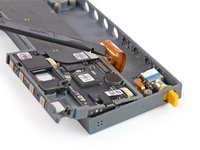
    • Use your finger or a spudger to push up on the small tab on the bottom of the module.

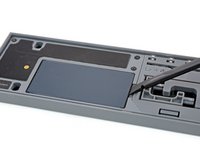
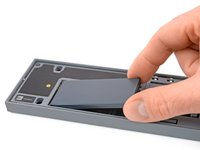
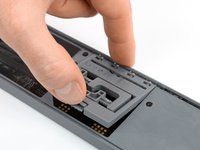
    • Lift the module up and out of its recess bottom first.

  7. Teenage Engineering OP-Z Pitch Bend Rubber Button Replacement: étape 7, image 1 de 1
    • Remove the module.

    • When inserting another module make sure you put it in outputs first. Then push down the bottom part for the tab to engage.

  8. Teenage Engineering OP-Z Pitch Bend Rubber Button Replacement, Midframe: étape 8, image 1 de 1
    • Remove the five Torx T4 screws.

  9. Teenage Engineering OP-Z Pitch Bend Rubber Button Replacement: étape 9, image 1 de 2 Teenage Engineering OP-Z Pitch Bend Rubber Button Replacement: étape 9, image 2 de 2
    • Place a spudger in the cutout of the extension module to lift the midframe.

    • Be careful not to damage the highway flex cable underneath.

    • Don’t remove the midframe yet. It is still connected to the rest of the OP-Z.

  10. Teenage Engineering OP-Z Pitch Bend Rubber Button Replacement: étape 10, image 1 de 3 Teenage Engineering OP-Z Pitch Bend Rubber Button Replacement: étape 10, image 2 de 3 Teenage Engineering OP-Z Pitch Bend Rubber Button Replacement: étape 10, image 3 de 3
    • Flip the midframe over to gain access to the flex cable connector underneath.

  11. Teenage Engineering OP-Z Pitch Bend Rubber Button Replacement: étape 11, image 1 de 2 Teenage Engineering OP-Z Pitch Bend Rubber Button Replacement: étape 11, image 2 de 2
    • Use the flat end of a spudger to disconnect the flex cable from the front panel assembly.

  12. Teenage Engineering OP-Z Pitch Bend Rubber Button Replacement, Pitch Bend Button: étape 12, image 1 de 2 Teenage Engineering OP-Z Pitch Bend Rubber Button Replacement, Pitch Bend Button: étape 12, image 2 de 2
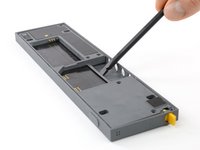
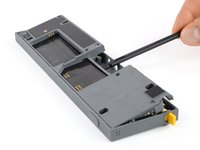
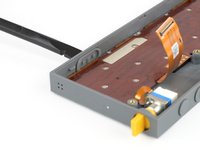
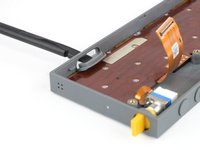
    • Use a spudger or your finger to push the pitch bend button inwards.

  13. Teenage Engineering OP-Z Pitch Bend Rubber Button Replacement: étape 13, image 1 de 1
    • Carefully lift and remove the pitch bend button.

    • The button has two small holes which engage with two pins in the midframe.

    • Make sure the two holes and pins align when reinstalling the new button.

Conclusion

To reassemble your device, follow these instructions in reverse order.

Tobias Isakeit

Membre depuis le 03/31/14

116 767 Réputation

188 tutoriels rédigés

Équipe

Master Techs Membre de l'équipe Master Techs

Community

322 membres

2 506 tutoriels rédigés

0 commentaires

Ajouter un commentaire

Nombre de vues :

Dernières 24 heures : 2

7 derniers jours : 8

30 derniers jours : 36

Total : 1,643