Introduction
Ceci est une réparation temporaire
Le connecteur USB dessoudé semble être un problème récurrent avec le disque dur externe Western Digital Essentials. Dans le cas où vous êtes dans cette situation, et si vous avez besoin d'accéder/restaurer les données stockées dans votre Western Digital Essentials HD, la première idée est de transférer le HD dans un autre boîtier externe ou directement connecté à votre carte mère. En fait ça ne marche pas ! Tout cela est dû à la puce de pont SATA/USB Initio INIC-1607E qui cherche à chiffrer vos données dans le pont USB vers SATA. Utiliser également la même carte logique d'un autre Western Digital Essentials HD ne garantit pas que vos données seront claires à lire.
Ce guide vous permettra d'accéder et de sauvegarder toutes vos données au cas où vous auriez un connecteur USB dessoudé. Il ne s'agit pas d'une réparation "à la pointe de la technologie" et dans tous les cas, vous devez considérer cela comme une réparation permanente. Cependant, vous pouvez éventuellement réutiliser le disque dur dans un autre boîtier USB/SATA une fois vos données sauvegardées en toute sécurité. C'est une réparation difficile mais cela a fonctionné pour moi.
Ce guide consiste en :
- Démontage du HD
- Réparation temporaire du connecteur USB
Ce dont vous avez besoin
-
-
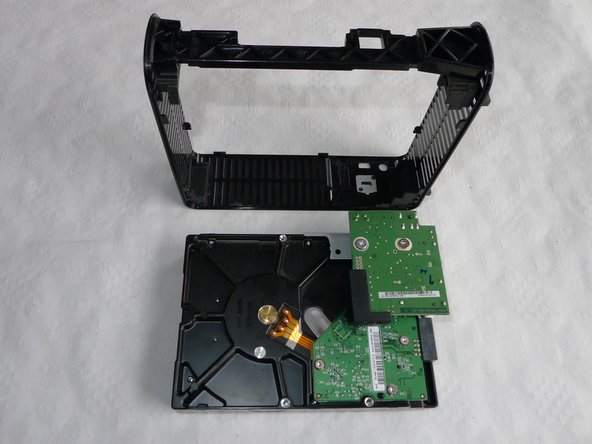
Utilisez un grand outil d'ouverture en plastique le long du panneau arrière :
-
Il y a 4 clips à libérer.
-
-
-
Faites glisser les plus gros morceaux de plastique.
-
-
-
Faites glisser le disque dur comme indiqué sur l'image
-
-
-
-
Retirez les 4 pièces en caoutchouc du cadre en plastique à chaque coin.
-
-
-
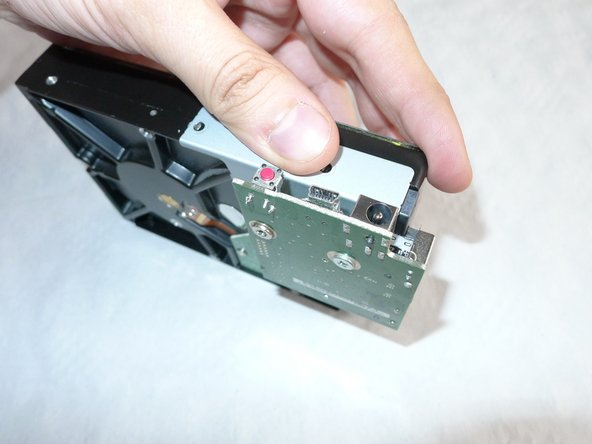
Retirez les deux vis retenant la plaque de retenue et le disque dur.
-
Faites glisser la plaque de maintien afin de déconnecter le connecteur SATA.
-
-
-
Utilisez une pince à épiler pour plier légèrement les contacts de la carte mère sur le connecteur USB. Le but est d'assurer un bon contact lorsque le connecteur USB sera appliqué contre la carte mère.
-
Dans la première image, vous pouvez voir les contacts dans leur position d'origine.
-
Dans la troisième image, vous pouvez voir les contacts en position pliée.
-
-
-
Appliquez un peu de colle sur la carte mère et sous le connecteur USB.
-
Placez le connecteur USB à son emplacement d'origine. Utilisez une loupe pour vous assurer que les cinq contacts sont bien en place contre les contacts de la carte mère. Vous pouvez utiliser une pince à épiler pour vous aider.
-
-
-
Tout d'abord, branchez et appliquez l'alimentation électrique sur la carte mère uniquement, ne branchez pas le disque dur ni même le connecteur USB. Attendez une minute si tout se passe bien !
-
Vous devez utiliser un ordinateur d'attente, le cas échéant. Votre ordinateur doit être protégé d'un court-circuit ici mais on ne sait jamais. S'il vous plaît, n'utilisez pas votre tout nouvel ordinateur !
-
Lorsque vous êtes prêt à partir :
-
Branchez le disque dur avec le pont USB/SATA via le connecteur SATA.
-
Branchez soigneusement le connecteur USB à la carte mère et à votre ordinateur.
-
Appliquez l'alimentation électrique sur le disque dur.
I used epoxy glue and on my first attempt, the USB connector dropped. Feels like the heat of the drive soften the glue. My solution was to re-glued the connector and put the controller upside down. In the other word, the controller sitting on the table. Opposite form the photo.
-


Le disque dur à l'intérieur du Western Digital Essentials HD est un SATA standard. Une fois vos données sauvegardées, vous pouvez réutiliser le disque dur directement comme disque dur interne ou vous pouvez également l'installer sur un nouveau boîtier USB vide. Il y en a plein sur internet.
Le disque dur à l'intérieur du Western Digital Essentials HD est un SATA standard. Une fois vos données sauvegardées, vous pouvez réutiliser le disque dur directement comme disque dur interne ou vous pouvez également l'installer sur un nouveau boîtier USB vide. Il y en a plein sur internet.
Annulation : je n'ai pas terminé ce tutoriel.
9 autres ont terminé cette réparation.
Merci à ces traducteurs :
100%
[deleted] nous aide à réparer le monde ! Vous voulez contribuer ?
Commencez à traduire ›

9 commentaires
Hi Gaëtan,
Thanks for this tutorial. My name is Cherisse and I'm currently in this situation and feel extremely defeated. My friend followed your recovery steps to help me fix my HD, however, he said that it seemed like two of the contacts on the USB connector had broken off and he couldn't continue with the steps. I took it to a computer repair shop and after waiting a week, they told me that they can't find a single file on it. I find that strange since the hard drive itself is not damaged. I don't know what to do and would love your help. Is there a way I can email you to get additional help and advice? I would really appreciate it. cherissethurab@gmail.com
Thank you
C
Hi Cherisse,
What your computer repair shop probably did was to connect the HD to a desktop computer directly or with another enclosure. Actually this is useless because the USB-SATA bridge used by Wester Digital is somehow encrypting the data. This means that your data will only be readable using the original WD logic board. I hope they did not charge for this?
If you want to restore your data, you have to find a way to connect the logic board USB contacts to a USB port. If the orignal USB connector is broken or can't be used, I would recommend to solder a USB Type A male connector with cable directly on the HD logic board contacts. You can probably recycle this cable from an old device your not using anymore (an hold webcam for exemple). This would require some tools like a solder iron with a very thin tip and maybe a multimeter. Let us know if you need some help to find with wire to connect to which contact.
Gaetan -
Hi Gaetan,
Thanks so much for your response.
I'm not that techy, so I'll try get a friend to help. I understand some of what you're saying but this sort of stuff isn't my expertise at all. :/
When I got home from picking up the HD, I put it into a dock and realized that they wiped everything off of it by initializing it. Now, I have an "Untitled" drive with nothing in it.
When this problem first came up (before taking the HD to them), I put it into the same dock I mentioned above, and ran a scan with Disk Drill. The scan revealed that there was over 300GB of files on the HD, but I didn't have the software, an extra HD, or know-how to restore the files. Each time I plugged in the HD to the dock, it asked if I wanted to "Initialize" it and I never did.
All I have now is the HD with no case. The parts are all separate. I can try to get a friend to help with your suggestions, but now that the HD has been wiped, I'm not sure what the next course of action should be... :(
If you're friend is finally able to get the HD connected to a computer using the original USB/SATA bridge that have its connector broken maybe you can try one of those utility software to restore deleted file. Honestly there is few chance it work if the disk was erased.
Gaetan -
Just followed your instructions, retrieved my files and saved myself at least $300 (what I was quoted as the minimum fix cost) - MASSIVE thankyou.
I only did one thing differently - I was impatient to wait for glue to dry so I used a clamp (from my wood work) and connected it straight up. Worked perfectly.
Genius!! I took a photo if you are interested to see - pretty funny!
Very well illustrated guide that can be used for those who want to directly access their internal drive from one of those enclosures, for the purpose of changing the drive's firmware settings, for example.
As for the USB repair - from the pictures, on your logic board it wouldn't have been difficult to solder another USB port as long as the pads on the board weren't damaged (lifted off or broken) and if you know soldering. The important point is to avoid overheating, which can lift the copper traces off the board.
As for those who purchased one of those encrypted drives - let this be a lesson : hardware encrypted drives were designed for the enterprise, to protect against theft of intellectual property when traveling outside of the office. It's useless for ordinary people, who are much better off encrypting confidential files by software.
Thank you for this isntructions! I’m not shure if this is the solution for a drive that simply doesn't switch on…? I have two of these External Hard drives, one works finne but the other doesn't switch on. All the conectors look fine from the outside. What would you recommend?
Thank you! Great instructions and photos. I first took the circuit board to a cell phone repair shop that I have used before and trusted. He said there wasn’t anything to solder to. I saw what he was talking about. I had to scrap quite a bit on the board in order to get the contacts to make contact. Took me many attempts before I final got lucky. I used super glue on the two edge mounting pads. Was able to get my data from it. Huge relief. I have one question though. I would like to use the 500GB drive as an external hard drive but when I connect it to my computer with a SATA/USB cable my computer asks me to insert a disk into the drive. Any ideas why?
Ed