Aller au contenu principal

TomTom XL Battery Replacement

Ce dont vous avez besoin

  1. TomTom XL Battery Replacement, Screen and Motherboard: étape 1, image 1 de 1
    • Slip a small plastic opening tool underneath the screen bezel, gently sliding it around the inside edge.

    • Starting at the corners, carefully pry up the screen bezel.

  2. TomTom XL Battery Replacement: étape 2, image 1 de 1
    • Remove the four Phillips #00 screws around the edge of the screen.

  3. TomTom XL Battery Replacement: étape 3, image 1 de 3 TomTom XL Battery Replacement: étape 3, image 2 de 3 TomTom XL Battery Replacement: étape 3, image 3 de 3
    • Slide a small plastic opening tool under the top portion of the metal frame and gently lift it up.

    • Slide the plastic opening tool around the inner edge of the metal frame until it feels loose.

    • It may take some time to release the frame from the housing. Some force may be necessary—but be careful not to bend the frame's fragile interior bracket.

    • Remove the frame from the housing.

  4. TomTom XL Battery Replacement: étape 4, image 1 de 2 TomTom XL Battery Replacement: étape 4, image 2 de 2
    • Lifting from the upper edge of the screen, tilt the screen away from the device.

    • Tilt the screen slowly. Flipping the screen up too quickly may damage the display cable.

  5. TomTom XL Battery Replacement: étape 5, image 1 de 2 TomTom XL Battery Replacement: étape 5, image 2 de 2
    • Remove the three Phillips #00 screws connecting the motherboard to the plastic housing:

    • Two Phillips #00 screws are located at the bottom of the first picture.

    • The third screw is hidden under the orange ribbon cable, near the screen.

    • You may have to carefully lift the screen in order to reach this screw.

  6. TomTom XL Battery Replacement: étape 6, image 1 de 2 TomTom XL Battery Replacement: étape 6, image 2 de 2
    • Flip the screen and motherboard over.

    • Gripping the plastic casing, disconnect the battery cable connector from the motherboard.

    • Disconnect the speaker cable connector from the motherboard.

    • Remove the motherboard and screen from the housing.

  7. TomTom XL Battery Replacement, Battery: étape 7, image 1 de 1
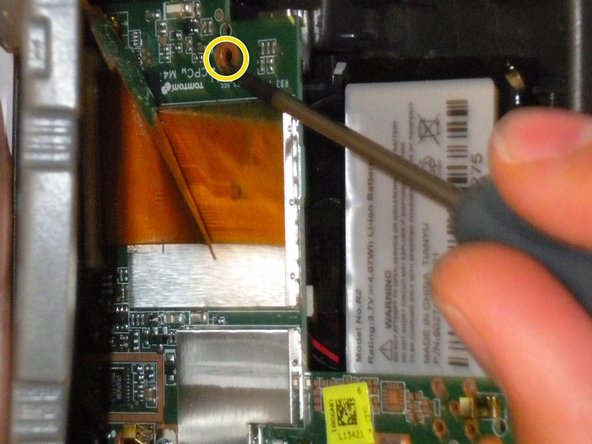
    • Slip a small plastic opening tool under the battery and slowly pry the battery up.

    • The battery is held on with strong adhesive, so it may require some force. Work slowly and carefully to avoid damaging the housing

    • Remove the battery from the housing.

Conclusion

To reassemble your device, follow these instructions in reverse order.

13 autres ont terminé cette réparation.

Sean Higginson

Membre depuis le 04/21/10

209 Réputation

2 tutoriels rédigés

Équipe

Cal Poly, Team 33-84, Johann Spring 2010 Membre de l'équipe Cal Poly, Team 33-84, Johann Spring 2010

CPSU-JOHANN-S10S33G84

4 membres

5 tutoriels rédigés

12 commentaires

Note: There are several variants of this. Some of them have 2 screws on the bottom under the stickers. You'll need to remove those first.

nathan - Réponse

Awesome and very detailed guide. Thanks for this.

Phil Harris - Réponse

Great demo, for replacement tomtom batteries take a look at : TomTom batteries

based in the UK they are reliable and give a truly longer charge

Kermit45 - Réponse

This was a great help. Followed the instructions and it was that easy. Thanks

mark - Réponse

nathanrenniewaldock is right... I cracked my screen before finding the hidden screws on the bottom. what a silly company to use the same name for different models!

Laz - Réponse

Ajouter un commentaire

Nombre de vues :

Dernières 24 heures : 0

7 derniers jours : 9

30 derniers jours : 36

Total : 51,419