Aller au contenu principal

Toro Stump Grinder 22615HD 2017 Cutter Head Replacement

Ce dont vous avez besoin

  1. Toro Stump Grinder 22615HD 2017 Cutter Head Replacement, Turn off the power: étape 1, image 1 de 2 Toro Stump Grinder 22615HD 2017 Cutter Head Replacement, Turn off the power: étape 1, image 2 de 2
    • Before you begin, ensure the machine is powered down and cool to the touch.

    • Turn the ignition switch to the off position.

  2. Toro Stump Grinder 22615HD 2017 Cutter Head Replacement, Close the fuel valve: étape 2, image 1 de 2 Toro Stump Grinder 22615HD 2017 Cutter Head Replacement, Close the fuel valve: étape 2, image 2 de 2
    • Flip the fuel cutoff valve switch into the off position.

  3. Toro Stump Grinder 22615HD 2017 Cutter Head Replacement, Disconnect the spark plug: étape 3, image 1 de 2 Toro Stump Grinder 22615HD 2017 Cutter Head Replacement, Disconnect the spark plug: étape 3, image 2 de 2
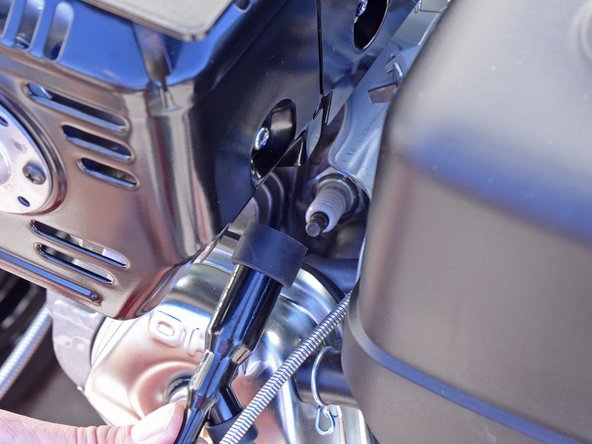
    • Grab the plastic housing at the end of the spark plug wire.

    • Pull firmly to disconnect the wire from the spark plug.

  4. Toro Stump Grinder 22615HD 2017 Cutter Head Replacement, Tilt the cutter wheel up: étape 4, image 1 de 1
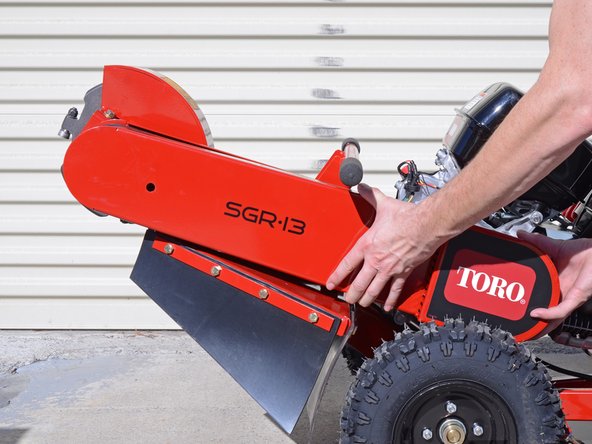
    • Tilt the machine so that it is resting on the handle with the cutter wheel raised.

  5. Toro Stump Grinder 22615HD 2017 Cutter Head Replacement, Remove the belt guard: étape 5, image 1 de 2 Toro Stump Grinder 22615HD 2017 Cutter Head Replacement, Remove the belt guard: étape 5, image 2 de 2
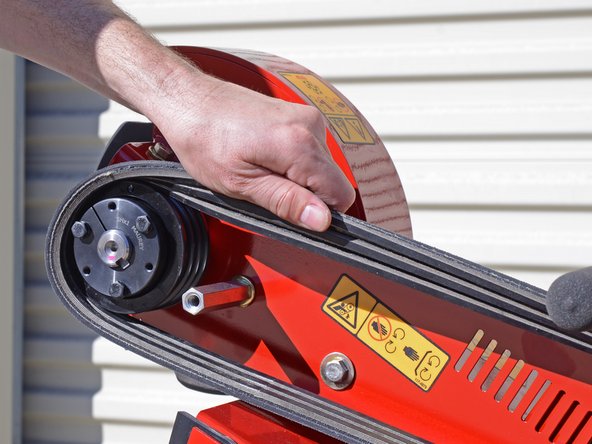
    • Use a 14 mm socket to remove the fasteners securing the belt guard:

    • One 10 mm bolt

    • One 10 mm nut

  6. Toro Stump Grinder 22615HD 2017 Cutter Head Replacement: étape 6, image 1 de 3 Toro Stump Grinder 22615HD 2017 Cutter Head Replacement: étape 6, image 2 de 3 Toro Stump Grinder 22615HD 2017 Cutter Head Replacement: étape 6, image 3 de 3
    • Remove the belt guard.

  7. Toro Stump Grinder 22615HD 2017 Cutter Head Replacement, Remove the drive belt: étape 7, image 1 de 3 Toro Stump Grinder 22615HD 2017 Cutter Head Replacement, Remove the drive belt: étape 7, image 2 de 3 Toro Stump Grinder 22615HD 2017 Cutter Head Replacement, Remove the drive belt: étape 7, image 3 de 3
    • Use a 9/16 inch socket to loosen the four nuts securing the bottom of the motor enough to allow the motor to slide freely. Do not remove the nuts.

    • Use a 1/2 inch wrench in combination with the socket wrench to hold the bolts in place.

  8. Toro Stump Grinder 22615HD 2017 Cutter Head Replacement: étape 8, image 1 de 1
    • Use a 1/2 inch wrench to loosen the two bolts behind the centrifugal clutch enough to allow the motor to slide freely. Do not remove the bolts.

  9. Toro Stump Grinder 22615HD 2017 Cutter Head Replacement: étape 9, image 1 de 2 Toro Stump Grinder 22615HD 2017 Cutter Head Replacement: étape 9, image 2 de 2
    • Wrap a piece of tape around the upper half of the tensioner bolt to mark the location of the second nut.

    • Use a 9/16 inch wrench to loosen the nut on the lower half of the tensioner bolt until the motor can slide forward as much as possible.

    • During reassembly, reference the tape to position the outer nut into the same location as before to ensure proper belt tension.

  10. Toro Stump Grinder 22615HD 2017 Cutter Head Replacement: étape 10, image 1 de 2 Toro Stump Grinder 22615HD 2017 Cutter Head Replacement: étape 10, image 2 de 2
    • Slide the engine towards the cutter blade to loosen the drive belt.

  11. Toro Stump Grinder 22615HD 2017 Cutter Head Replacement: étape 11, image 1 de 3 Toro Stump Grinder 22615HD 2017 Cutter Head Replacement: étape 11, image 2 de 3 Toro Stump Grinder 22615HD 2017 Cutter Head Replacement: étape 11, image 3 de 3
    • Lift the drive belt up and away from the machine while rolling it towards the cutter head to gradually roll it off of the pulley.

  12. Toro Stump Grinder 22615HD 2017 Cutter Head Replacement: étape 12, image 1 de 1
    • Remove the drive belt.

  13. Toro Stump Grinder 22615HD 2017 Cutter Head Replacement, Remove the centrifugal clutch: étape 13, image 1 de 1
    • Use an impact wrench with a 9/16 inch socket to remove the bolt and washer securing the centrifugal clutch to the spindle.

  14. Toro Stump Grinder 22615HD 2017 Cutter Head Replacement: étape 14, image 1 de 1
    • Use a jaw puller to extract the centrifugal clutch from the spindle:

    • Place the center screw so that it is in line with the center of the spindle.

    • Hook the jaws around the back edge of the clutch assembly.

    • Tighten the center screw until the centrifugal clutch is removed from the spindle.

  15. Toro Stump Grinder 22615HD 2017 Cutter Head Replacement: étape 15, image 1 de 1
    • Remove the centrifugal clutch and shaft key from the spindle.

  16. Attention : les étapes 16 à 18 sont issues d'un tutoriel marqué comme en cours.

    Toro Stump Grinder 22615HD 2017 Cutter Head Replacement, Remove the pulley: étape 16, image 1 de 1
    • Use a 1/8 inch hex key to remove the pulley set screw.

  17. Toro Stump Grinder 22615HD 2017 Cutter Head Replacement: étape 17, image 1 de 1
    • Use a universal puller to remove the pulley from the cutter wheel shaft:

    • Attach the universal puller to the pulley using the three bolts provided on the pulley.

    • Use a wrench to torque down the center screw to slowly loosen the pulley.

    • This may take a lot of force.

    • If the pulley seems to be stuck after significant pressure is applied with the universal puller, use a blowtorch to apply heat where the pulley contacts the shaft.

  18. Toro Stump Grinder 22615HD 2017 Cutter Head Replacement: étape 18, image 1 de 2 Toro Stump Grinder 22615HD 2017 Cutter Head Replacement: étape 18, image 2 de 2
    • If heat was used to loosen the pulley, use gloves when removing it.

    • Pull the pulley off of the shaft to remove it.

    • Remove the shaft key.

  19. Toro Stump Grinder 22615HD 2017 Cutter Head Replacement, Remove the guard plate: étape 19, image 1 de 1
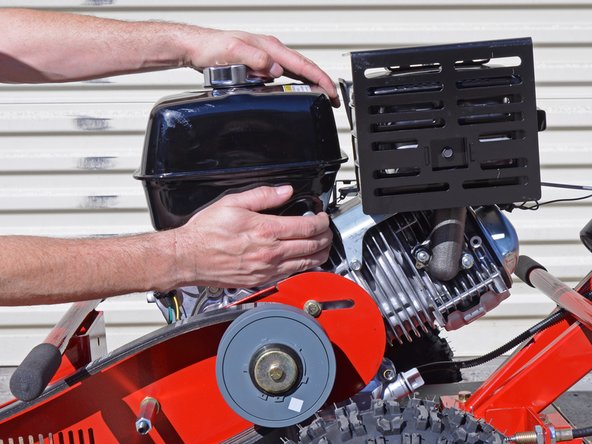
    • Use a 9/16 inch socket to remove the two bolts and washers securing the guard plate to the motor.

    • During reassembly, do not tighten these bolts all the way down until the belt is tensioned.

  20. Toro Stump Grinder 22615HD 2017 Cutter Head Replacement: étape 20, image 1 de 3 Toro Stump Grinder 22615HD 2017 Cutter Head Replacement: étape 20, image 2 de 3 Toro Stump Grinder 22615HD 2017 Cutter Head Replacement: étape 20, image 3 de 3
    • Use a 9/16 inch socket to remove the bolt and washer securing the guard plate to the frame.

    • Use a 5/8 inch wrench in combination with the 9/16 inch socket to hold the standoff in place.

    • Remove the bolt, washer, and standoff.

  21. Toro Stump Grinder 22615HD 2017 Cutter Head Replacement: étape 21, image 1 de 1
    • Use a 9/16 inch socket to remove the bolt and accompanying washer securing the guard plate to the frame.

  22. Toro Stump Grinder 22615HD 2017 Cutter Head Replacement: étape 22, image 1 de 1
    • Use a 5/8 inch socket to remove the nut securing the guard plate to the frame.

  23. Toro Stump Grinder 22615HD 2017 Cutter Head Replacement: étape 23, image 1 de 1
    • Use a 1/2 inch socket to remove the bolt next to the cutter wheel shaft securing the guard plate to the frame.

  24. Toro Stump Grinder 22615HD 2017 Cutter Head Replacement: étape 24, image 1 de 3 Toro Stump Grinder 22615HD 2017 Cutter Head Replacement: étape 24, image 2 de 3 Toro Stump Grinder 22615HD 2017 Cutter Head Replacement: étape 24, image 3 de 3
    • Remove the guard plate from the frame.

  25. Toro Stump Grinder 22615HD 2017 Cutter Head Replacement, Remove the cutter wheel assembly: étape 25, image 1 de 1
    • This step requires two people.

    • The cutter wheel assembly will become loose after these bolts are removed so have a second person hold the cutter wheel to prevent it from falling.

    • Use a 9/16 inch socket to remove the four bolts from the frame.

  26. Toro Stump Grinder 22615HD 2017 Cutter Head Replacement: étape 26, image 1 de 2 Toro Stump Grinder 22615HD 2017 Cutter Head Replacement: étape 26, image 2 de 2
    • Use gloves when handling the cutter head.

    • Lower the cutter wheel and bearings out from the frame.

    • Remove the cutter wheel and bearing assembly.

Conclusion

To reassemble your device, follow these instructions in reverse order.

5 autres ont terminé cette réparation.

Sam Omiotek

Membre depuis le 02/25/19

72 547 Réputation

288 tutoriels rédigés

0 commentaires

Ajouter un commentaire

Nombre de vues :

Dernières 24 heures : 3

7 derniers jours : 18

30 derniers jours : 71

Total : 2,404