Aller au contenu principal

Toshiba Portege M400 CD/DVD Drive Replacement

Ce dont vous avez besoin

  1. Toshiba Portege M400 CD/DVD Drive Replacement, CD/DVD Drive: étape 1, image 1 de 1
    • Make sure your computer is securely latched and closed.

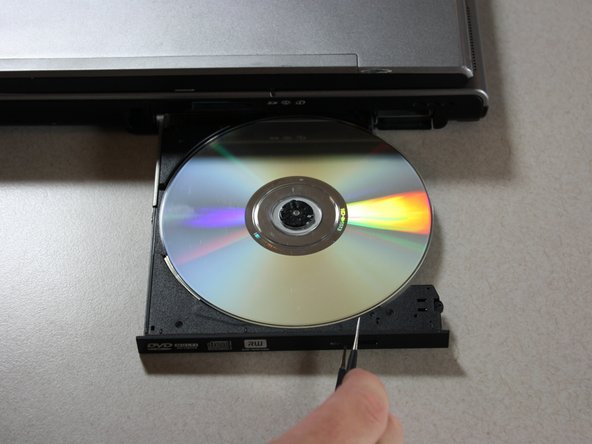
    • Locate the CD drive on the right side of your Toshiba Portege M400 laptop and find a small hole right next to the CD drive button.

  2. Toshiba Portege M400 CD/DVD Drive Replacement: étape 2, image 1 de 2 Toshiba Portege M400 CD/DVD Drive Replacement: étape 2, image 2 de 2
    Outil utilisé dans cette étape :
    Tweezers
    $4.99
    J'achète
    • Using the tweezers, insert them into the small hole next to the CD drive button.

  3. Toshiba Portege M400 CD/DVD Drive Replacement: étape 3, image 1 de 2 Toshiba Portege M400 CD/DVD Drive Replacement: étape 3, image 2 de 2
    • Push the tweezers back into the hole and grab the CD drive door with the other tweezers' appendage.

    • Pull the CD door out carefully to remove the broken or jammed disk.

    • Note: If the CD door still does not open, move on to the next step to see how to remove the CD drive entirely.

  4. Toshiba Portege M400 CD/DVD Drive Replacement: étape 4, image 1 de 1
    • Flip the laptop over so its on its face.

  5. Toshiba Portege M400 CD/DVD Drive Replacement: étape 5, image 1 de 3 Toshiba Portege M400 CD/DVD Drive Replacement: étape 5, image 2 de 3 Toshiba Portege M400 CD/DVD Drive Replacement: étape 5, image 3 de 3
    • Locate screw as seen on picture

    • Using #1 Philips head screwdriver remove the 3.8mm screw.

  6. Toshiba Portege M400 CD/DVD Drive Replacement: étape 6, image 1 de 2 Toshiba Portege M400 CD/DVD Drive Replacement: étape 6, image 2 de 2
    • Locate the lock switch in the center of the laptop.

    • Locate the tab on the end of the end of the CD Drive.

  7. Toshiba Portege M400 CD/DVD Drive Replacement: étape 7, image 1 de 3 Toshiba Portege M400 CD/DVD Drive Replacement: étape 7, image 2 de 3 Toshiba Portege M400 CD/DVD Drive Replacement: étape 7, image 3 de 3
    • Push down on the lock tab and pull on the CD tab simultaneously.

    • Keep pulling on the CD drive tab until the CD drive comes all the way out.

Conclusion

To reassemble your device, follow these instructions in reverse order.

Spencer Dilley

Membre depuis le 04/15/13

4 Réputation

1 tutoriel rédigé

Équipe

Cal Poly, Team 4-17, Maness Fall 2012 Membre de l'équipe Cal Poly, Team 4-17, Maness Fall 2012

CPSU-MANESS-F12S4G17

1 membre

3 tutoriels rédigés

0 commentaires

Ajouter un commentaire

Nombre de vues :

Dernières 24 heures : 3

7 derniers jours : 5

30 derniers jours : 29

Total : 1,168