Aller au contenu principal

Toshiba Portege M400 Touchpad Replacement

Ce dont vous avez besoin

  1. Toshiba Portege M400 Touchpad Replacement, Keyboard: étape 1, image 1 de 1
    • Remove the front face plate with a plastic opening tool.

    • Unscrew and remove the two 3.8mm screws labeled B3 with the #1 Phillips screwdriver.

  2. Toshiba Portege M400 Touchpad Replacement: étape 2, image 1 de 1
    • Lift the keyboard toward you starting from the edge closest to the screen.

    • This ribbon still connects the taptor to the keyboard.

    • Gently place the keyboard on top of the track pad with the keys upside down.

  3. Toshiba Portege M400 Touchpad Replacement: étape 3, image 1 de 3 Toshiba Portege M400 Touchpad Replacement: étape 3, image 2 de 3 Toshiba Portege M400 Touchpad Replacement: étape 3, image 3 de 3
    • Find the white ribbon connector (where the keyboard is still attached to the rest of the laptop).

    • Remove the screw on the metal plate that keeps the ribbon from sliding out.

    • Gently remove the metal plate and set it aside.

  4. Toshiba Portege M400 Touchpad Replacement: étape 4, image 1 de 2 Toshiba Portege M400 Touchpad Replacement: étape 4, image 2 de 2
    • Dislodge the white ribbon connector from the two clips holding it in place using the plastic opening tools.

    • Pull out the white ribbon connector with your fingers.

  5. Toshiba Portege M400 Touchpad Replacement, Touchpad: étape 5, image 1 de 2 Toshiba Portege M400 Touchpad Replacement, Touchpad: étape 5, image 2 de 2
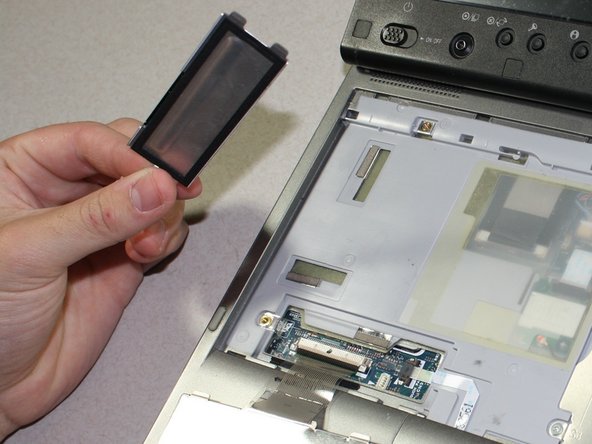
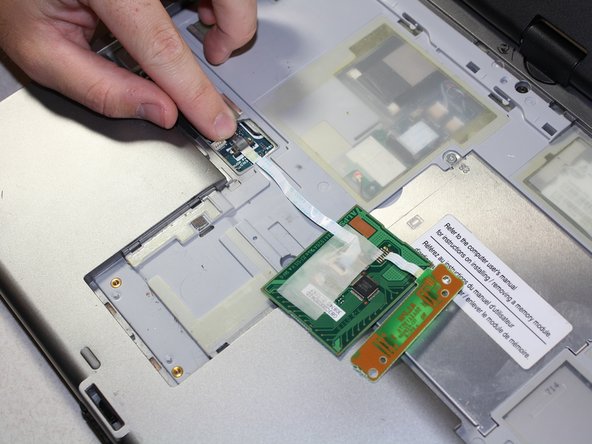
    • Use a plastic opening tool to carefully remove the cover of the touchpad.

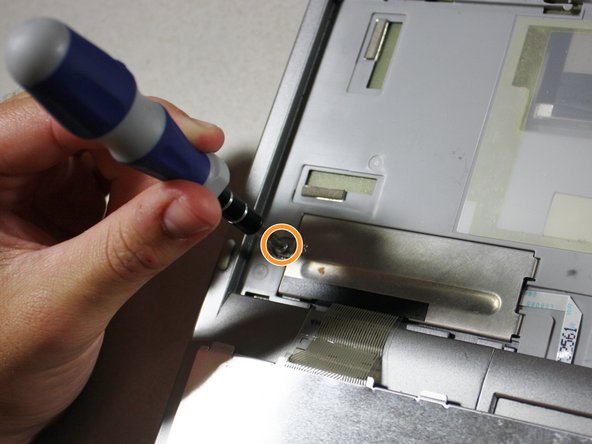
    • Remove the one 1/2" inch screw on the backside of the laptop.

  6. Toshiba Portege M400 Touchpad Replacement: étape 6, image 1 de 2 Toshiba Portege M400 Touchpad Replacement: étape 6, image 2 de 2
    • Gently pull up the touch-pad piece and lay it upside down.

    • The touch-pad will still be connected to the computer.

  7. Toshiba Portege M400 Touchpad Replacement: étape 7, image 1 de 2 Toshiba Portege M400 Touchpad Replacement: étape 7, image 2 de 2
    • Pull back the tab to disconnect the touchpad to the laptop.

Conclusion

To reassemble your device, follow these instructions in reverse order.

Varsha Roopreddy

Membre depuis le 04/19/13

37 Réputation

4 tutoriels rédigés

Équipe

Cal Poly, Team 4-17, Maness Spring 2013 Membre de l'équipe Cal Poly, Team 4-17, Maness Spring 2013

CPSU-MANESS-S13S4G17

3 membres

12 tutoriels rédigés

0 commentaires

Ajouter un commentaire

Nombre de vues :

Dernières 24 heures : 2

7 derniers jours : 7

30 derniers jours : 14

Total : 1,133