Aller au contenu principal

Toshiba Satellite 2435-S255 Monitor Replacement

Ce dont vous avez besoin

  1. Toshiba Satellite 2435-S255 Monitor Replacement, Removing the Latch: étape 1, image 1 de 2 Toshiba Satellite 2435-S255 Monitor Replacement, Removing the Latch: étape 1, image 2 de 2
    • The latch on this is tricky. Fortunately, it’s the only thing you have to deal with.

    • First, slide the latch until you hit resistance. At this point, you have two options.

    • You can either keep pushing the latch until the battery pops out. . .

    • or you can start prying the battery out while pushing the latch (as shown in the second picture above).

  2. Toshiba Satellite 2435-S255 Monitor Replacement, Remove the Battery: étape 2, image 1 de 1
    • Just lift the battery up and out, making sure to lift from the end near the latch.

    • Now the battery is out! To put it back, just insert it back in from the same angle you took it out on.

  3. Toshiba Satellite 2435-S255 Monitor Replacement, Unscrew the Cover: étape 3, image 1 de 2 Toshiba Satellite 2435-S255 Monitor Replacement, Unscrew the Cover: étape 3, image 2 de 2
    • Unscrew the front of the casing by unscrewing the two 8mm screws indicated. We will be using a PH00 screwdriver for every screw in this guide.

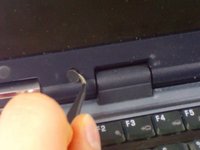
    • You may or may not have to take the screw covers off beforehand. They’re easy to remove; all you have to do is pry them off. We used tweezers, but anything thin enough should work. Then, just unscrew the underlying screws.

  4. Toshiba Satellite 2435-S255 Monitor Replacement, Remove the Cover: étape 4, image 1 de 2 Toshiba Satellite 2435-S255 Monitor Replacement, Remove the Cover: étape 4, image 2 de 2
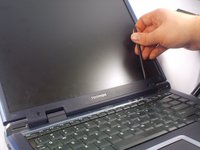
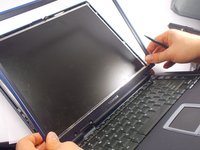
    • To remove the cover, insert the spudger between the screen and the casing.

    • Start near the screws you just freed and work your way around the monitor.

    • You should hear popping as the case unhooks itself. Make sure not to get caught on the latch at the top.

  5. Toshiba Satellite 2435-S255 Monitor Replacement, Remove the Cover(Part 2): étape 5, image 1 de 2 Toshiba Satellite 2435-S255 Monitor Replacement, Remove the Cover(Part 2): étape 5, image 2 de 2
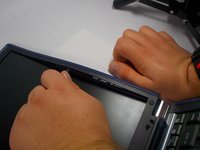
    • To finish removing the cover, grab the corners near the hinges and gently lift out, up, and away from the hinges.

    • If the casing is still too tight, go back and continue with Step 2 until you’re ready to move on.

  6. Toshiba Satellite 2435-S255 Monitor Replacement, Detach the Hinges: étape 6, image 1 de 1
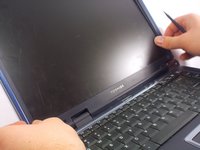
    • To disconnect the monitor itself from the bottom part of the laptop, remove the two indicated 8mm screws (on the sides of the hinges).

    • Note for reassembly: make sure to screw in the monitor to the outer two holes, then use the inner holes for the casing.

  7. Toshiba Satellite 2435-S255 Monitor Replacement, Detaching from the Housing: étape 7, image 1 de 1
    • The next step to liberating your monitor is to unscrew the 6 screws holding it into its housing. These screws are only 3mm.

    • There will be three going up along each side.

  8. Toshiba Satellite 2435-S255 Monitor Replacement, Free the Main Cable: étape 8, image 1 de 1
    • Unscrew the 3mm screw holding in this vinyl flap.

    • This will release the main monitor cable, fully freeing your monitor to move with the only inhibition being this cable.

  9. Toshiba Satellite 2435-S255 Monitor Replacement, Detach the Pink/White Cable: étape 9, image 1 de 2 Toshiba Satellite 2435-S255 Monitor Replacement, Detach the Pink/White Cable: étape 9, image 2 de 2
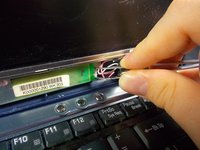
    • Now here’s one of the trickier parts. You have to remove the pink and white cables that are connected to and from below the green chip.

    • We used tweezers(as shown).

    • Place the tweezers in the notch at the end of the white piece of plastic and pull it out.

    • It’s also tricky to put back in. Make sure that the pink wire is positioned toward the top of the laptop.

  10. Toshiba Satellite 2435-S255 Monitor Replacement, Lift the Monitor: étape 10, image 1 de 1
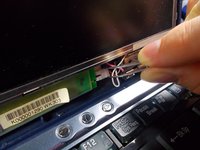
    • Lift the monitor until it’s positioned so that you can see the cable that it's connected to, for example as in the picture.

    • Make sure not to let it fall. The cable holding it there isn’t fragile, but we don’t want to rip it out.

  11. Toshiba Satellite 2435-S255 Monitor Replacement, Remove the Main Cable: étape 11, image 1 de 2 Toshiba Satellite 2435-S255 Monitor Replacement, Remove the Main Cable: étape 11, image 2 de 2
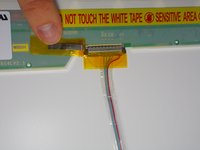
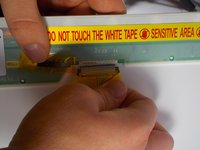
    • This step is easy, but be gentle. First, peel back the yellow anti-static tape.

    • If you don’t have more and plan to reuse the monitor, then don’t remove it fully, and make sure that the metal band is positioned in the same vertical position as it started.

    • Now, gently pull the connector away from the chip as shown.

    • Be careful with this part, as you don’t want to damage either end of the connection. Be even more careful plugging it into the new monitor.

    • Done! The monitor is fully disconnected from the laptop!

Conclusion

To reassemble your device, follow these instructions in reverse order.

Jonathan Lancey

Membre depuis le 10/22/14

1 Réputation

3 tutoriels rédigés

Équipe

UMass Dartmouth, Team 1-5, Shastany Fall 2014 Membre de l'équipe UMass Dartmouth, Team 1-5, Shastany Fall 2014

UMASSD-SHASTANY-F14S1G5

3 membres

9 tutoriels rédigés

0 commentaires

Ajouter un commentaire

Nombre de vues :

Dernières 24 heures : 0

7 derniers jours : 0

30 derniers jours : 5

Total : 387