Aller au contenu principal

Toshiba Satellite C55D-A5108 Wi-Fi Card Replacement

Ce dont vous avez besoin

  1. Toshiba Satellite C55D-A5108 Wi-Fi Card Replacement, Battery: étape 1, image 1 de 1
    • Flip over the device so that the model stickers are facing up.

  2. Toshiba Satellite C55D-A5108 Wi-Fi Card Replacement: étape 2, image 1 de 1
    • Move the right notch to the unlock position by sliding it to the right.

  3. Toshiba Satellite C55D-A5108 Wi-Fi Card Replacement: étape 3, image 1 de 1
    • Hold the left notch in an unlocked position with one hand and use the other hand to slide the battery out.

  4. Toshiba Satellite C55D-A5108 Wi-Fi Card Replacement, Hard Drive: étape 4, image 1 de 1
    • Remove the Phillips #0 screw from the memory cover.

  5. Toshiba Satellite C55D-A5108 Wi-Fi Card Replacement: étape 5, image 1 de 1
    • Grasp the side of the hard drive opposite the circular battery, and carefully pull out the drive by moving it away from the circular battery.

  6. Toshiba Satellite C55D-A5108 Wi-Fi Card Replacement, Back Cover: étape 6, image 1 de 3 Toshiba Satellite C55D-A5108 Wi-Fi Card Replacement, Back Cover: étape 6, image 2 de 3 Toshiba Satellite C55D-A5108 Wi-Fi Card Replacement, Back Cover: étape 6, image 3 de 3
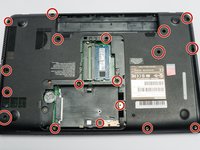
    • Remove the 16 screws holding the back cover with a Phillips #0 screwdriver.

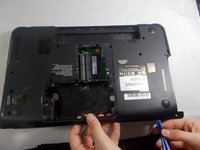
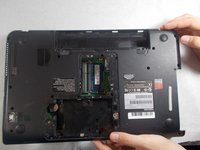
    • Pry the cover off with an opening tool.

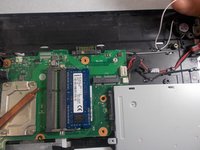
    • Gently remove the cover with your hands and place to the side.

  7. Toshiba Satellite C55D-A5108 Wi-Fi Card Replacement, Wi-Fi Card: étape 7, image 1 de 2 Toshiba Satellite C55D-A5108 Wi-Fi Card Replacement, Wi-Fi Card: étape 7, image 2 de 2
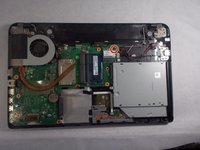
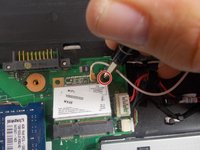
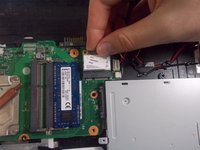
    • Remove the single screw securing the Wi-Fi card using a Phillips #0 screwdriver.

  8. Toshiba Satellite C55D-A5108 Wi-Fi Card Replacement: étape 8, image 1 de 2 Toshiba Satellite C55D-A5108 Wi-Fi Card Replacement: étape 8, image 2 de 2
    • The card will pop up; gently pull the card out of the port.

    • Unplug the wireless antenna cables attached to the card.

    • Remember how the cables were connected to assure you do not cross the Bluetooth and wireless connections by accident.

Conclusion

To reassemble your device, follow these instructions in reverse order.

Ryan Smith

Membre depuis le 10/25/19

187 Réputation

2 tutoriels rédigés

Équipe

UMass Dartmouth, Team S1-G5, O'Connell Fall 2019 Membre de l'équipe UMass Dartmouth, Team S1-G5, O'Connell Fall 2019

UMASSD-O'CONNELL-F19S1G5

3 membres

12 tutoriels rédigés

0 commentaires

Ajouter un commentaire

Nombre de vues :

Dernières 24 heures : 0

7 derniers jours : 7

30 derniers jours : 36

Total : 867