Aller au contenu principal

Toshiba Satellite C55D-B5310 Hard Drive Replacement

Ce dont vous avez besoin

  1. Toshiba Satellite C55D-B5310 Hard Drive Replacement, CD/DVD Drive: étape 1, image 1 de 1
    • Use a Phillips #1 screwdriver (PH1 bit) to remove the single 7 mm screw that secures the CD/DVD drive.

  2. Toshiba Satellite C55D-B5310 Hard Drive Replacement: étape 2, image 1 de 2 Toshiba Satellite C55D-B5310 Hard Drive Replacement: étape 2, image 2 de 2
    • Slide the CD/DVD Drive out of the laptop.

  3. Toshiba Satellite C55D-B5310 Hard Drive Replacement, Hard Drive: étape 3, image 1 de 1
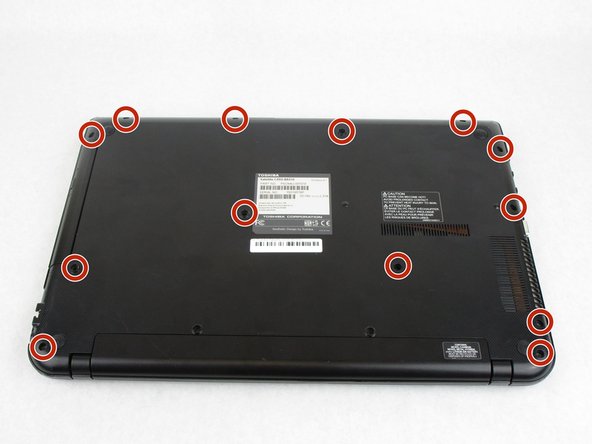
    • Use a Phillips #1 screwdriver (PH1 bit) to remove the thirteen 7 mm screws that secure the bottom cover.

  4. Toshiba Satellite C55D-B5310 Hard Drive Replacement: étape 4, image 1 de 2 Toshiba Satellite C55D-B5310 Hard Drive Replacement: étape 4, image 2 de 2
    • Use a plastic opening tool to separate the back cover from the laptop.

    • It is recommended that you start from a corner, and run the tool along the edge of the cover.

    • Be careful not to bend or crack the plastic back cover.

  5. Toshiba Satellite C55D-B5310 Hard Drive Replacement: étape 5, image 1 de 2 Toshiba Satellite C55D-B5310 Hard Drive Replacement: étape 5, image 2 de 2
    • Using the ribbon beneath the hard drive lift it upwards and pull the hard drive out.

  6. Toshiba Satellite C55D-B5310 Hard Drive Replacement: étape 6, image 1 de 3 Toshiba Satellite C55D-B5310 Hard Drive Replacement: étape 6, image 2 de 3 Toshiba Satellite C55D-B5310 Hard Drive Replacement: étape 6, image 3 de 3
    • Remove the hard drive from the blue rubber mount.

Conclusion

To reassemble your device, follow these instructions in reverse order.

6 autres ont terminé cette réparation.

0 commentaires

Ajouter un commentaire

Nombre de vues :

Dernières 24 heures : 6

7 derniers jours : 23

30 derniers jours : 76

Total : 3,161