Aller au contenu principal

Toshiba Satellite C75D-A7370 RAM Replacement

Ce dont vous avez besoin

  1. Toshiba Satellite C75D-A7370 RAM Replacement, Battery: étape 1, image 1 de 1
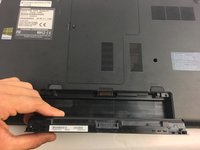
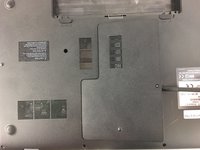
    • To begin replacing your battery, flip the laptop over so that the back is visible. Locate the battery at the bottom center of the laptop.

    • Before beginning battery removal, make sure that no power source is connected to the laptop. This will avoid electrical shock.

  2. Toshiba Satellite C75D-A7370 RAM Replacement: étape 2, image 1 de 2 Toshiba Satellite C75D-A7370 RAM Replacement: étape 2, image 2 de 2
    • On the right side of the battery there will be a locking switch. Slide the switch into the unlocked position.

  3. Toshiba Satellite C75D-A7370 RAM Replacement: étape 3, image 1 de 3 Toshiba Satellite C75D-A7370 RAM Replacement: étape 3, image 2 de 3 Toshiba Satellite C75D-A7370 RAM Replacement: étape 3, image 3 de 3
    • Using your left hand, move the switch on the left side of the battery towards the center of the laptop while simultaneously prying up on the center of the battery with a spudger. The battery will flip out and can be removed.

  4. Toshiba Satellite C75D-A7370 RAM Replacement, Back Access Panel: étape 4, image 1 de 3 Toshiba Satellite C75D-A7370 RAM Replacement, Back Access Panel: étape 4, image 2 de 3 Toshiba Satellite C75D-A7370 RAM Replacement, Back Access Panel: étape 4, image 3 de 3
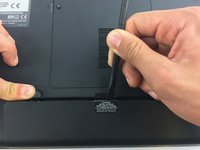
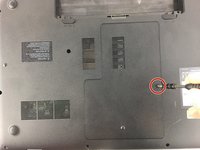
    • Remove the 7mm screw near the center of the back of the laptop with a P1 screwdriver and pry off the access panel with a nylon spudger.

  5. Toshiba Satellite C75D-A7370 RAM Replacement, RAM: étape 5, image 1 de 1
    • Using two fingers, push down on the aluminum rods on the sides of the RAM module

    • Before handling internal components, please remember to properly ground yourself using an ESD strap to prevent electrical damage to sensitive components.

  6. Toshiba Satellite C75D-A7370 RAM Replacement: étape 6, image 1 de 1
    • Gently pull the RAM module out of the laptop and repeat for the second module.

Conclusion

To reassemble your device, follow these instructions in reverse order.

Une autre personne a terminé cette réparation.

Chris Purdie

Membre depuis le 02/02/17

428 Réputation

4 tutoriels rédigés

Équipe

USF Tampa, Team 16-1, Blackwell Spring 2017 Membre de l'équipe USF Tampa, Team 16-1, Blackwell Spring 2017

USFT-BLACKWELL-S17S16G1

3 membres

12 tutoriels rédigés

0 commentaires

Ajouter un commentaire

Nombre de vues :

Dernières 24 heures : 0

7 derniers jours : 2

30 derniers jours : 7

Total : 411