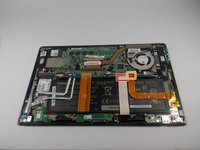
Aller au contenu principal

Toshiba Satellite Click 2 Pro Heat Sync Fan Replacement

Ce dont vous avez besoin
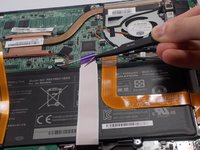
  1. Toshiba Satellite Click 2 Pro Heat Sync Fan Replacement, Battery: étape 1, image 1 de 2 Toshiba Satellite Click 2 Pro Heat Sync Fan Replacement, Battery: étape 1, image 2 de 2
    • Working on your device while it is turned on may result in electric shock. Make sure to shut down and unplug your device before you begin.

    • Push down on the tablet sides until you feel a click, then pull up.

    • This will separate the tablet from the detachable base, make sure to hold down the keyboard for easier detachment.

  2. Toshiba Satellite Click 2 Pro Heat Sync Fan Replacement: étape 2, image 1 de 3 Toshiba Satellite Click 2 Pro Heat Sync Fan Replacement: étape 2, image 2 de 3 Toshiba Satellite Click 2 Pro Heat Sync Fan Replacement: étape 2, image 3 de 3
    • Remove the base of the tablet from the screen using a plastic opening tool.

    • Make sure to separate the base evenly on both sides when removing it from the screen.

  3. Toshiba Satellite Click 2 Pro Heat Sync Fan Replacement: étape 3, image 1 de 2 Toshiba Satellite Click 2 Pro Heat Sync Fan Replacement: étape 3, image 2 de 2
    • Remove the battery power connector using ESD safe tweezers.

  4. Toshiba Satellite Click 2 Pro Heat Sync Fan Replacement: étape 4, image 1 de 2 Toshiba Satellite Click 2 Pro Heat Sync Fan Replacement: étape 4, image 2 de 2
    • Remove the LED ribbon cable using ESD safe tweezers.

    • Remove the SIM card ribbon cable using ESD safe tweezers.

    • Remove the Docking connector ribbon cable using plastic opening tool.

    • The ribbons may be stuck to the battery so make sure to peel off gently to prevent damage.

    • Make sure to flip up the white connector attached to the LED and Sim Card ribbons before removing them .

  5. Toshiba Satellite Click 2 Pro Heat Sync Fan Replacement: étape 5, image 1 de 3 Toshiba Satellite Click 2 Pro Heat Sync Fan Replacement: étape 5, image 2 de 3 Toshiba Satellite Click 2 Pro Heat Sync Fan Replacement: étape 5, image 3 de 3
    • Remove the LCD Display ribbon cable using a plastic opening tool.

    • Remove the I/O ribbon cable using a plastic opening tool.

    • The ribbons may be stuck to the battery so make sure to peel them off gently to prevent damage.

  6. Toshiba Satellite Click 2 Pro Heat Sync Fan Replacement: étape 6, image 1 de 2 Toshiba Satellite Click 2 Pro Heat Sync Fan Replacement: étape 6, image 2 de 2
    • Remove five 3.5mm Phillips J0 screws using a Phillips screw driver.

  7. Toshiba Satellite Click 2 Pro Heat Sync Fan Replacement: étape 7, image 1 de 1
    • Remove the battery from its holding position.

  8. Toshiba Satellite Click 2 Pro Heat Sync Fan Replacement, Heat Sync Fan: étape 8, image 1 de 1
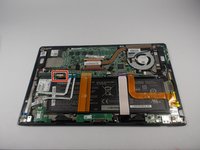
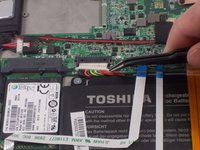
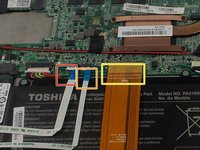
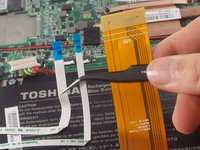
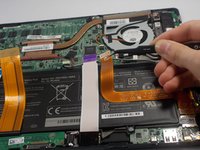
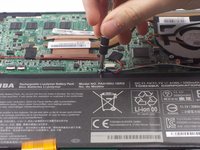
    • Remove the power connector from the fan using a pair of tweezers.

  9. Toshiba Satellite Click 2 Pro Heat Sync Fan Replacement: étape 9, image 1 de 1
    • Remove two 3.0mm Phillips J0 screws using a Phillips screw driver.

  10. Toshiba Satellite Click 2 Pro Heat Sync Fan Replacement: étape 10, image 1 de 1
    • Remove four 3.5mm Phillips J0 screws from the heat sink.

  11. Toshiba Satellite Click 2 Pro Heat Sync Fan Replacement: étape 11, image 1 de 1
    • Remove the heat sink fan.

    • The heat sink cover may be hard to peel off the first time due to the adhesive.

Conclusion

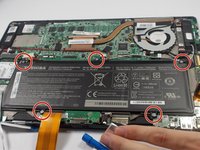
To reassemble your device, follow these instructions in reverse order.

Une autre personne a terminé cette réparation.

Paul DeOrsey

Membre depuis le 03/10/16

893 Réputation

5 tutoriels rédigés

Équipe

UMass Dartmouth, Team 4-3, Catania Spring 2016 Membre de l'équipe UMass Dartmouth, Team 4-3, Catania Spring 2016

UMASSD-CATANIA-S16S4G3

3 membres

10 tutoriels rédigés

0 commentaires

Ajouter un commentaire

Nombre de vues :

Dernières 24 heures : 0

7 derniers jours : 0

30 derniers jours : 1

Total : 401