Aller au contenu principal

Toshiba Satellite L305-S5875 CCFL Tube Replacement

Ce dont vous avez besoin

  1. Toshiba Satellite L305-S5875 CCFL Tube Replacement, LCD Screen: étape 1, image 1 de 1
    • Open the laptop so that you can see the screen.

  2. Toshiba Satellite L305-S5875 CCFL Tube Replacement: étape 2, image 1 de 2 Toshiba Satellite L305-S5875 CCFL Tube Replacement: étape 2, image 2 de 2
    • Remove the four rubber inserts from the four corners of the screen.

    • Once removed, unscrew and remove the four screws found beneath the four rubber inserts.

  3. Toshiba Satellite L305-S5875 CCFL Tube Replacement: étape 3, image 1 de 3 Toshiba Satellite L305-S5875 CCFL Tube Replacement: étape 3, image 2 de 3 Toshiba Satellite L305-S5875 CCFL Tube Replacement: étape 3, image 3 de 3
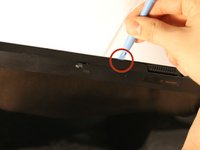
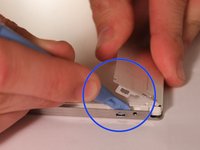
    • Use the plastic opening tool to separate the front panel of the laptop from the back panel, pulling the front panel off the laptop.

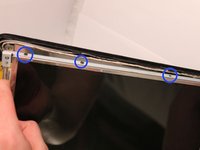
    • Gently pull the back panel approximately 1 inch away from the screen.

    • Warning: Following step will detach screen from casing. Use caution.

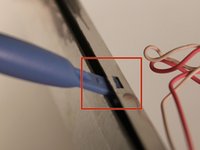
    • Unscrew and remove the 4 screws on the left and right side of the screen; 8 screws in total.

  4. Toshiba Satellite L305-S5875 CCFL Tube Replacement: étape 4, image 1 de 3 Toshiba Satellite L305-S5875 CCFL Tube Replacement: étape 4, image 2 de 3 Toshiba Satellite L305-S5875 CCFL Tube Replacement: étape 4, image 3 de 3
    • Lay screen down on keyboard.

    • On the back of the screen, locate the ribbon cable that connects the screen to the computer. Remove the tape from the cable if it is present.

    • Carefully remove the ribbon cable by pulling it out of it's socket.

  5. Toshiba Satellite L305-S5875 CCFL Tube Replacement: étape 5, image 1 de 3 Toshiba Satellite L305-S5875 CCFL Tube Replacement: étape 5, image 2 de 3 Toshiba Satellite L305-S5875 CCFL Tube Replacement: étape 5, image 3 de 3
    • At the bottom of the screen, locate the pink and white wires.

    • Unplug the connector from the circuit board by gently pulling it out.

  6. Toshiba Satellite L305-S5875 CCFL Tube Replacement: étape 6, image 1 de 1
    • Congratulations, you have just removed your screen!

  7. Toshiba Satellite L305-S5875 CCFL Tube Replacement, CCFL Tube: étape 7, image 1 de 2 Toshiba Satellite L305-S5875 CCFL Tube Replacement, CCFL Tube: étape 7, image 2 de 2
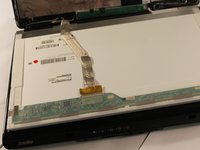
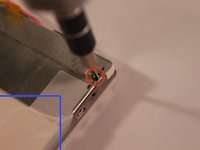
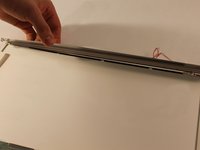
    • With the screen now removed from the computer, remove the two screws from the screen's metal enclosure.

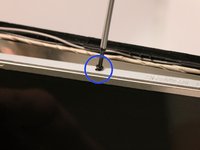
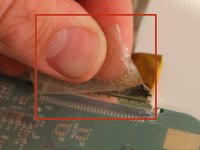
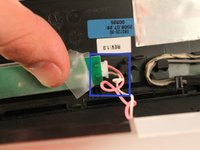
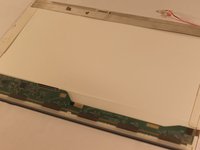
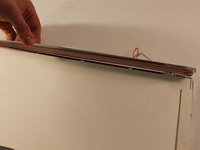
    • In addition to removing the screws, remove the tape on the edge of the screen.

  8. Toshiba Satellite L305-S5875 CCFL Tube Replacement: étape 8, image 1 de 3 Toshiba Satellite L305-S5875 CCFL Tube Replacement: étape 8, image 2 de 3 Toshiba Satellite L305-S5875 CCFL Tube Replacement: étape 8, image 3 de 3
    • Using a plastic opening tool, unhook the latches on the side of the screen's metal enclosure.

    • Once all of the latches are unhooked, genitally pull the metal case up to expose the CCFL tube.

  9. Toshiba Satellite L305-S5875 CCFL Tube Replacement: étape 9, image 1 de 2 Toshiba Satellite L305-S5875 CCFL Tube Replacement: étape 9, image 2 de 2
    • With the bad CCFL tube now accessible, very carefully remove it from the screen housing.

    • With the spent CCFL tube now removed, replace it with the new replacement tube in the appropriate slot.

    • Note: Make sure you do not break the CCFL tube, as the contents within the tube are toxic to humans.

Conclusion

To reassemble your device, follow these instructions in reverse order.

Une autre personne a terminé cette réparation.

Tyler

Membre depuis le 03/11/14

208 Réputation

2 tutoriels rédigés

Équipe

UMass Dartmouth, Team 3-1, Calaway Spring 2014 Membre de l'équipe UMass Dartmouth, Team 3-1, Calaway Spring 2014

UMASSD-CALAWAY-S14S3G1

4 membres

6 tutoriels rédigés

0 commentaires

Ajouter un commentaire

Nombre de vues :

Dernières 24 heures : 0

7 derniers jours : 0

30 derniers jours : 1

Total : 548