Aller au contenu principal

Toshiba Satellite P75-A7100 Fan Replacement

Ce dont vous avez besoin

  1. Toshiba Satellite P75-A7100 Fan Replacement, Battery: étape 1, image 1 de 1
    • Slide the tabs apart from each other.

  2. Toshiba Satellite P75-A7100 Fan Replacement: étape 2, image 1 de 2 Toshiba Satellite P75-A7100 Fan Replacement: étape 2, image 2 de 2
    • Lift the battery upwards and remove it from the device.

  3. Toshiba Satellite P75-A7100 Fan Replacement, Wi-Fi Adapter: étape 3, image 1 de 2 Toshiba Satellite P75-A7100 Fan Replacement, Wi-Fi Adapter: étape 3, image 2 de 2
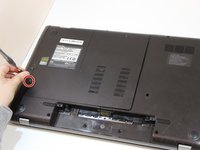
    • Using a Phillips #1 screwdriver, remove the screw from the back cover.

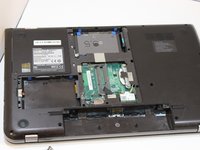
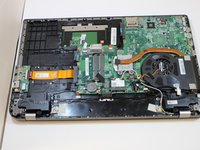
    • Remove the back cover from the device.

  4. Toshiba Satellite P75-A7100 Fan Replacement: étape 4, image 1 de 3 Toshiba Satellite P75-A7100 Fan Replacement: étape 4, image 2 de 3 Toshiba Satellite P75-A7100 Fan Replacement: étape 4, image 3 de 3
    • Remove the optical drive from the device.

  5. Toshiba Satellite P75-A7100 Fan Replacement: étape 5, image 1 de 2 Toshiba Satellite P75-A7100 Fan Replacement: étape 5, image 2 de 2
    • Using a Phillips #1 screwdriver, unscrew the remaining screws that are visible on the laptop.

    • Remove the back cover from your device.

  6. Toshiba Satellite P75-A7100 Fan Replacement: étape 6, image 1 de 3 Toshiba Satellite P75-A7100 Fan Replacement: étape 6, image 2 de 3 Toshiba Satellite P75-A7100 Fan Replacement: étape 6, image 3 de 3
    • Using a Phillips #1 screwdriver, remove the screw connecting the Wi-Fi adapter to the motherboard.

    • Remove the Wi-Fi adapter from the device.

  7. Toshiba Satellite P75-A7100 Fan Replacement, Fan: étape 7, image 1 de 2 Toshiba Satellite P75-A7100 Fan Replacement, Fan: étape 7, image 2 de 2
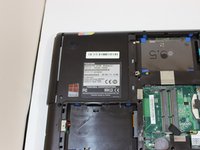
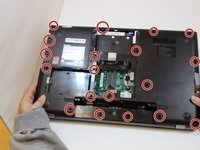
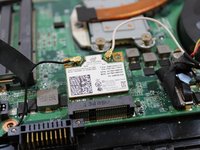
    • Using a Phillips #1 screwdriver, unscrew the 6 remaining screws attached to the fan.

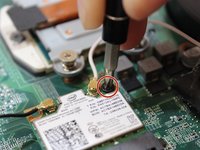
    • Unplug the connector connecting the fan to the motherboard.

    • Remove the fan from the device.

Conclusion

To reassemble your device, follow these instructions in reverse order.

2 autres ont terminé cette réparation.

Un commentaire

How do you remove and replace the fan from from/to the heatsink? Mine is secured with a metallic tape that is not sticky once removed.

Bruce - Réponse

Ajouter un commentaire

Nombre de vues :

Dernières 24 heures : 0

7 derniers jours : 0

30 derniers jours : 9

Total : 2,248