Aller au contenu principal

Toshiba Satellite Radius P55W-B5112 RAM Replacement

Ce dont vous avez besoin

  1. Toshiba Satellite Radius P55W-B5112 RAM Replacement, Battery Replacement: étape 1, image 1 de 3 Toshiba Satellite Radius P55W-B5112 RAM Replacement, Battery Replacement: étape 1, image 2 de 3 Toshiba Satellite Radius P55W-B5112 RAM Replacement, Battery Replacement: étape 1, image 3 de 3
    • Unplug your laptop from any source of power.

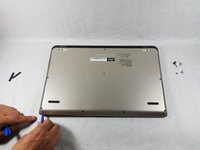
    • Lay your laptop on a soft, clean surface as shown.

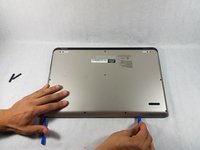
    • Using the metal spudger, remove the two rubber grips on the bottom face of the laptop, located closest to the hinge.

    • The grips may be brittle. Be careful when removing them with the metal spudger so as not to damage them.

  2. Toshiba Satellite Radius P55W-B5112 RAM Replacement: étape 2, image 1 de 3 Toshiba Satellite Radius P55W-B5112 RAM Replacement: étape 2, image 2 de 3 Toshiba Satellite Radius P55W-B5112 RAM Replacement: étape 2, image 3 de 3
    • Remove the ten 5mm Phillips #0 screws that secure the back plate to the computer.

  3. Toshiba Satellite Radius P55W-B5112 RAM Replacement: étape 3, image 1 de 3 Toshiba Satellite Radius P55W-B5112 RAM Replacement: étape 3, image 2 de 3 Toshiba Satellite Radius P55W-B5112 RAM Replacement: étape 3, image 3 de 3
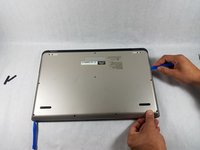
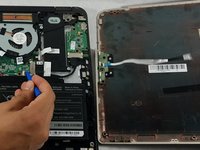
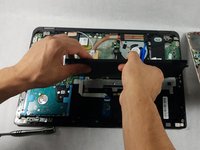
    • Starting on the edge that is opposite the hinge, use the plastic opening tools to pry the back plate away from the computer.

    • Loosen the three non-hinge edges.

    • Leave a plastic opening tool in each corner to ensure that one side does not snap closed before you are done opening the others.

    • DO NOT lift the back plate away from the computer; it is still connected to the motherboard.

  4. Toshiba Satellite Radius P55W-B5112 RAM Replacement: étape 4, image 1 de 3 Toshiba Satellite Radius P55W-B5112 RAM Replacement: étape 4, image 2 de 3 Toshiba Satellite Radius P55W-B5112 RAM Replacement: étape 4, image 3 de 3
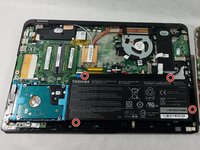
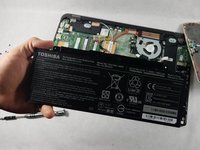
    • To loosen the back plate, lift it slightly and gently pull it away from the hinge.

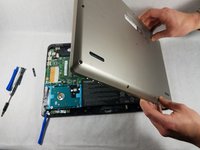
    • Flip the back plate open towards the power button, but be sure to not pull on the ribbon cable that connects the back plate to the motherboard.

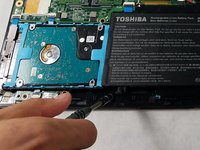
    • Use a plastic opening tool to detach the side of the ribbon cable connected to the computer by prying up gently on the small black lever at the point of attachment.

  5. Toshiba Satellite Radius P55W-B5112 RAM Replacement: étape 5, image 1 de 3 Toshiba Satellite Radius P55W-B5112 RAM Replacement: étape 5, image 2 de 3 Toshiba Satellite Radius P55W-B5112 RAM Replacement: étape 5, image 3 de 3
    • Remove the four 3mm Phillips #0 screws connecting the battery to the computer.

  6. Toshiba Satellite Radius P55W-B5112 RAM Replacement: étape 6, image 1 de 3 Toshiba Satellite Radius P55W-B5112 RAM Replacement: étape 6, image 2 de 3 Toshiba Satellite Radius P55W-B5112 RAM Replacement: étape 6, image 3 de 3
    • Use a plastic opening tool to lift the side of the battery that is closest to the long edge of the computer.

    • As you are pulling the battery away from the computer, unplug it from the side closest to the short edge of the computer.

    • There may be a lot of resistance when unplugging the battery. If there is, try to wiggle the male side of the plug back and forth as you remove it.

  7. Toshiba Satellite Radius P55W-B5112 RAM Replacement, RAM Replacement: étape 7, image 1 de 2 Toshiba Satellite Radius P55W-B5112 RAM Replacement, RAM Replacement: étape 7, image 2 de 2
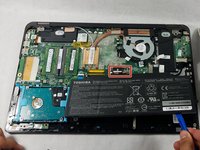
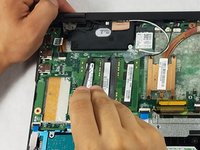
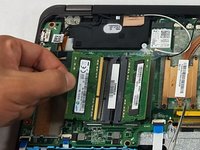
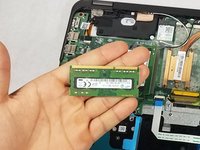
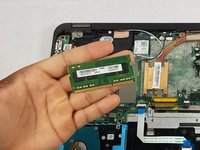
    • Use a spudger to gently pry up the plastic brackets holding on each RAM drive. The long edges of each drive furthest from one another should pop up at an angle.

    • While a metal spudger is used in these photos, using plastic opening tools instead will lower your chances of damaging your device.

  8. Toshiba Satellite Radius P55W-B5112 RAM Replacement: étape 8, image 1 de 3 Toshiba Satellite Radius P55W-B5112 RAM Replacement: étape 8, image 2 de 3 Toshiba Satellite Radius P55W-B5112 RAM Replacement: étape 8, image 3 de 3
    • Remove each RAM drive by pulling at an upwards angle in the direction of its free edge.

Conclusion

To reassemble your device, follow these instructions in reverse order.

3 autres ont terminé cette réparation.

Mudassar Abbas Khan

Membre depuis le 10/19/17

624 Réputation

5 tutoriels rédigés

Équipe

UMass Dartmouth, Team S66-G5, Rockett Fall 2017 Membre de l'équipe UMass Dartmouth, Team S66-G5, Rockett Fall 2017

UMASSD-ROCKETT-F17S66G5

3 membres

5 tutoriels rédigés

2 commentaires

Hola estimado, quiera saber el código de la pieza conector hdd sata para Toshiba satellite P55W-B5112

victor vela - Réponse

Ya done great, bro!!!! Kudos and many thanks!!!

Alton Franklin - Réponse

Ajouter un commentaire

Nombre de vues :

Dernières 24 heures : 0

7 derniers jours : 1

30 derniers jours : 3

Total : 1,071