Aller au contenu principal

Toshiba Satellite S75D-A7346 Hard Drive Replacement

Ce dont vous avez besoin

  1. Toshiba Satellite S75D-A7346 Hard Drive Replacement, Taking Out The Battery: étape 1, image 1 de 2 Toshiba Satellite S75D-A7346 Hard Drive Replacement, Taking Out The Battery: étape 1, image 2 de 2
    • First we have to take out the battery

    • Pull the switch on the left to the left

    • then hold the switch on the right to the right direction

    • then pull up the bttery from the point inbetween the 2 switches

  2. Toshiba Satellite S75D-A7346 Hard Drive Replacement, UnScrewing The BackPlate: étape 2, image 1 de 2 Toshiba Satellite S75D-A7346 Hard Drive Replacement, UnScrewing The BackPlate: étape 2, image 2 de 2
    • Unscrew the screw located next to the information sticker

    • Then get a screw driver or prier to gently pry the covering plate

  3. Toshiba Satellite S75D-A7346 Hard Drive Replacement, Taking Out The HDD: étape 3, image 1 de 2 Toshiba Satellite S75D-A7346 Hard Drive Replacement, Taking Out The HDD: étape 3, image 2 de 2
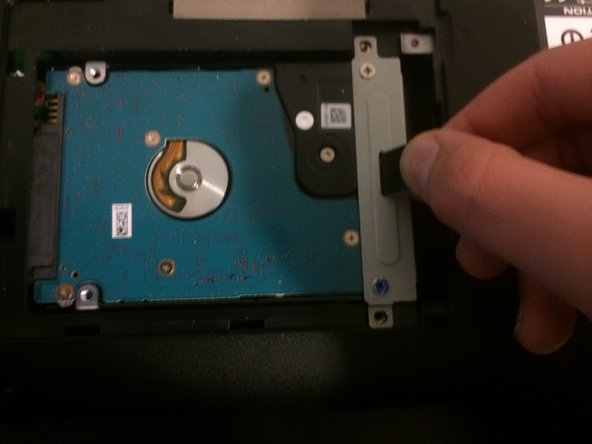
    • Unscrew the black screws and then pull the black tab to the right

    • Then lift it out and place it somewhere

  4. Toshiba Satellite S75D-A7346 Hard Drive Replacement, Taking The HDD Of the Mount: étape 4, image 1 de 2 Toshiba Satellite S75D-A7346 Hard Drive Replacement, Taking The HDD Of the Mount: étape 4, image 2 de 2
    • Unscrew the silver screws and move the hard drive somewhere else

  5. Toshiba Satellite S75D-A7346 Hard Drive Replacement, Adding The New HDD/SSD To The Mount: étape 5, image 1 de 1
    • Screw the silver screws into the screw slots furthest away from the connectors

    • Note: This computer is only compatible with 2.5 inch SATA 3Gbps

  6. Toshiba Satellite S75D-A7346 Hard Drive Replacement, Connecting The HDD/SSD: étape 6, image 1 de 2 Toshiba Satellite S75D-A7346 Hard Drive Replacement, Connecting The HDD/SSD: étape 6, image 2 de 2
    • Put the Hard Drive in slot (make sure the connectors are on the same side of the connectors

    • Push the Hard Driver into the connector and screw the black screws in

  7. Toshiba Satellite S75D-A7346 Hard Drive Replacement, Putting On The Backplate: étape 7, image 1 de 2 Toshiba Satellite S75D-A7346 Hard Drive Replacement, Putting On The Backplate: étape 7, image 2 de 2
    • Put on the backplate and put pressure arround the edges of the blackplate so it stays flat with the case

    • Then screw in the screw next to the information sticker

  8. Toshiba Satellite S75D-A7346 Hard Drive Replacement, Putting In The Battery: étape 8, image 1 de 3 Toshiba Satellite S75D-A7346 Hard Drive Replacement, Putting In The Battery: étape 8, image 2 de 3 Toshiba Satellite S75D-A7346 Hard Drive Replacement, Putting In The Battery: étape 8, image 3 de 3
    • Place the battery in the slot

    • Then hold the right switch to the right and push the battery in, then release the switch.

    • move the left switch to the right

  9. Toshiba Satellite S75D-A7346 Hard Drive Replacement, You Finished: étape 9, image 1 de 1
    • You have know finished the replacement

Conclusion

To reassemble your device, follow these instructions in reverse order.

Une autre personne a terminé cette réparation.

Emil Lambert

Membre depuis le 12/16/16

228 Réputation

2 tutoriels rédigés

0 commentaires

Ajouter un commentaire

Nombre de vues :

Dernières 24 heures : 0

7 derniers jours : 0

30 derniers jours : 1

Total : 450